Log search and analysis

The log UI allows you to:
- Create queries for log search and filtering.
- View charts on logs with different query statuses.
- View the content of log lines.
- Navigate from logs to analysis of associated traces and spans using their IDs (if trace delivery is configured).
To view logs, configure their delivery:
-
Set up data transfer in OpenTelemetry format for your application or service, e.g., with the help of OTel Collector or Fluent Bit.
-
Turn on logging for Yandex Cloud resources. As a general rule, you can set up logging when creating or updating a resource. For more information, see the relevant service guides.
For the list of services that support automated logging, see Observability tools for monitoring and logging.
Log search
-
On the Monium home page, select Explore → Logs on the left.
-
At the top, specify the data search interval using one of the following methods:
- Select an interval:
5m,30m, etc., to search for data for the last 5, 30 minutes, etc. - Enter a time interval manually.
- Use the exact time interval field to set the From and To boundaries.
- Drag the interval boundaries on the timeline.
- Select an interval:
-
In the query string, select labels for log search.
In Monium, telemetry has this hierarchy: project → cluster → service. Therefore, select the
project,cluster, andserviceparameters in the query string first.-
To search for application logs, specify:
-
project = <project_ID>: Select the project specified inx-monium-projectof the application's telemetry transmission configuration.This may be a cloud (
cloud__<cloud_ID>) or folder (folder__<folder_ID>) project, or another project. -
cluster = <cluster_name>: Select the name of the installation that runs your application. If no cluster is specified,cluster = defaultis used. -
service = <service_name>: Name of your application or service. You can use theOTEL_SERVICE_NAMEenvironment variable to provide it.If you do not see the required labels in the suggestions, you can enter them manually. However, the system most likely has not received data with these labels. For more on troubleshooting possible issues, see Data delivery troubleshooting.
-
-
To search for Yandex Cloud resource logs, specify:
-
project = folder__<folder_ID>: ID of the folder the Yandex Cloud resource resides in. -
service = <log_group>: Name or ID of the log group the logs go to, e.g.,default. -
resource_type = <resource_type>: Type of the Yandex Cloud resource that sends logs, e.g.,managed-airflow.cluster,k8s.cluster,alb.loadBalancer. -
resource_id = <resource_ID>: ID of the Yandex Cloud resource that sends logs, e.g., cluster ID.If you skip the resource type, all logs in the log group will be shown. If you skip the resource ID, all logs for the selected resource type will be shown.
-
You can enter your query in token mode by selecting labels from a list or in text mode. To switch to text mode, click and enter your query in this format:
{ <key>="<value>", <key>="<value>", ... }For information on how to build queries, see Data model in Monium.Metrics and Query language in Monium.
Example of an application log search query:
{project = "market", cluster = "production", service = "basket"}Example of an L7 Application Load Balancer error log search query:
{project = "folder__b1g86q4m5vej********", service = "default", resource_type = "alb.loadBalancer", level = "ERROR"} -
-
Click Execute query.
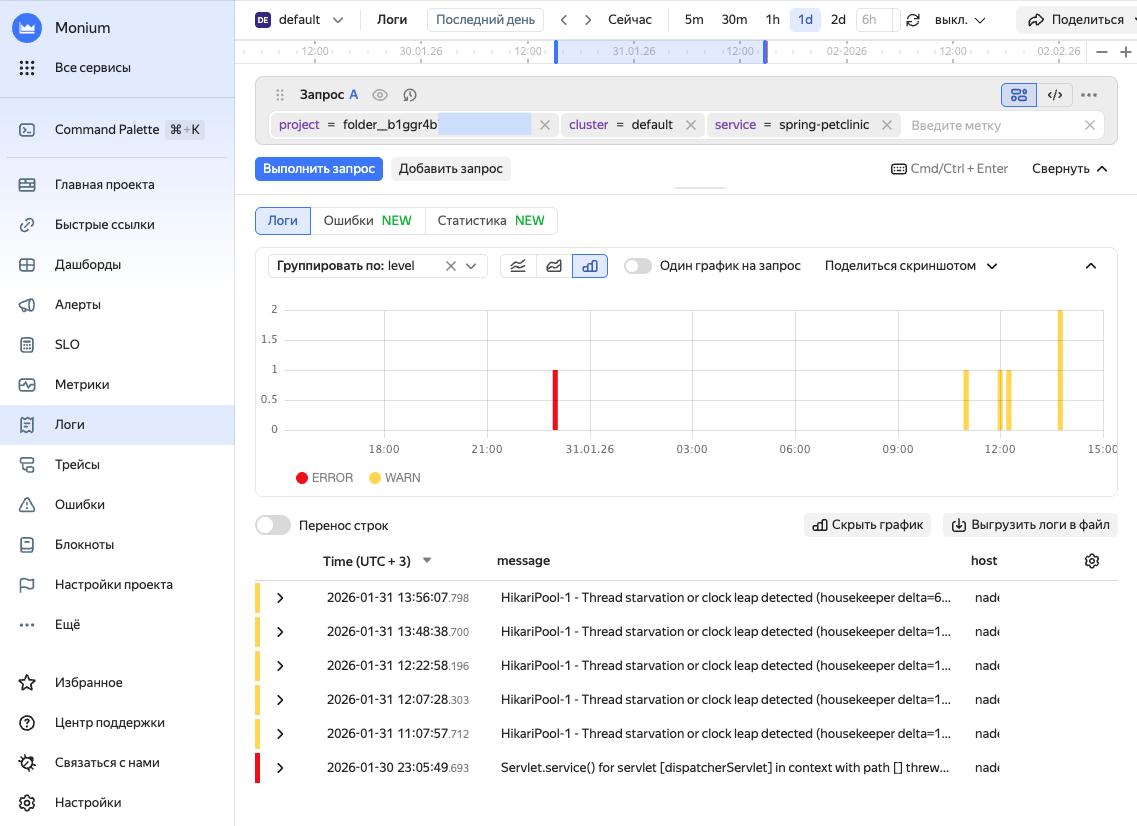
Example of an application log page
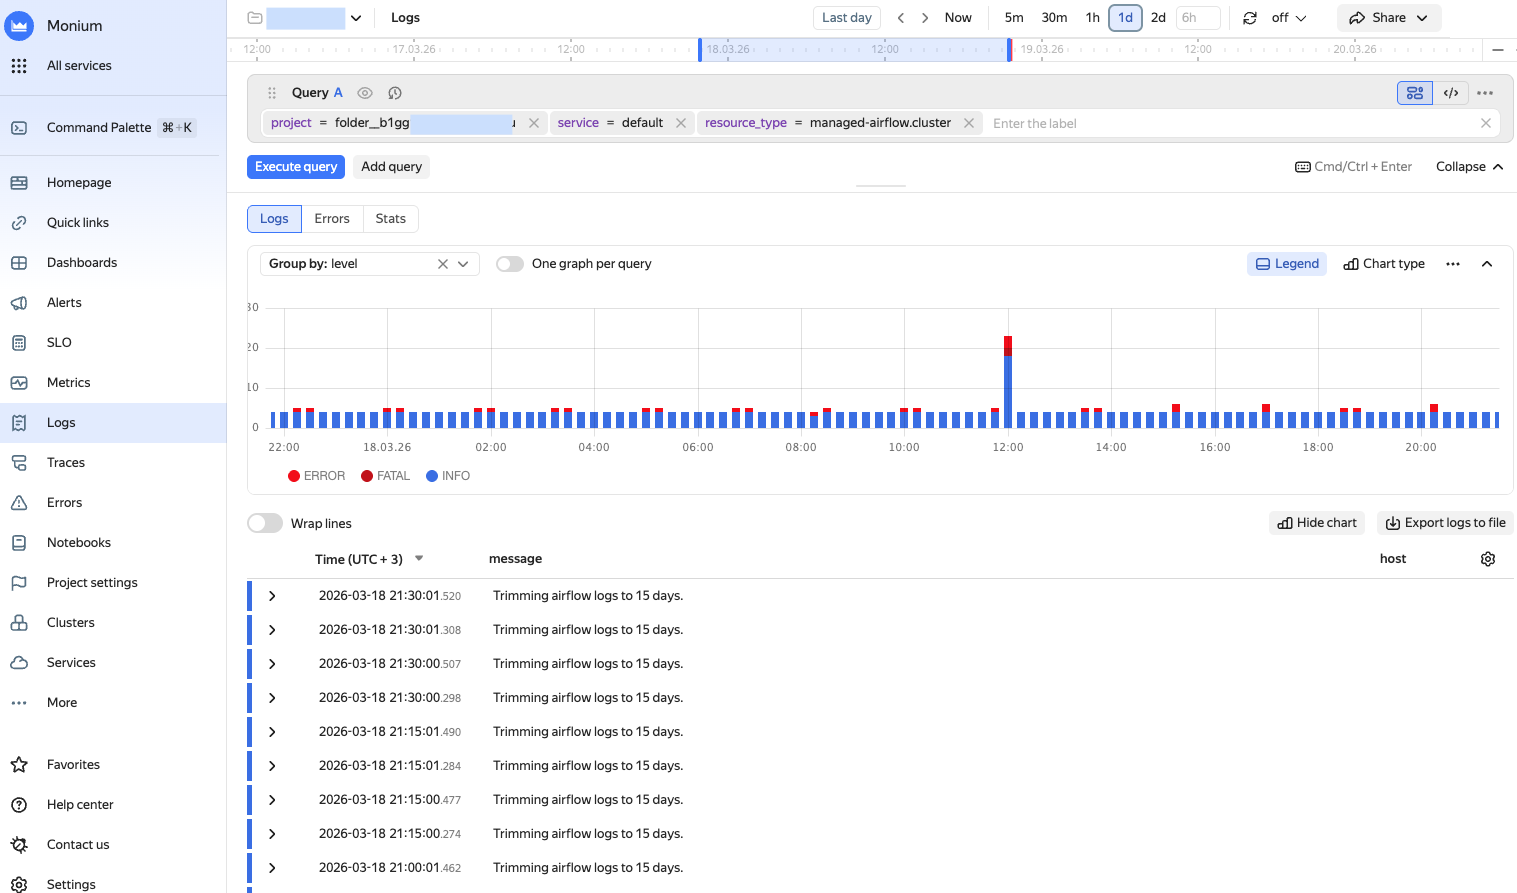
Example of an Apache Airflow™ cluster log page
Analyzing logs
For log analysis, you can use log filtering in the query line, log records, and log visualization.
Filtering and grouping
-
To locate a specific portion of the logs, select the labels of interest from the list. For example, the label
level = WARNwill display all WARNING level logs.For information on how to build queries, see Data model in Monium.Metrics and Query language in Monium.
-
To view the logs of different applications or resources at the same time, click Add query and specify another query's parameters.
Visualization
The graph shows the number of log records over time. The graph automatically updates if you change the query or time range.
Features available when using the graph:
-
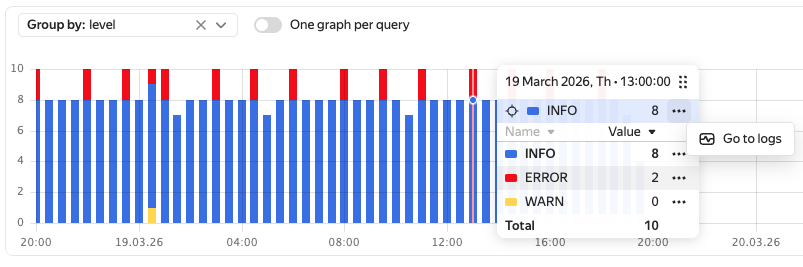
Information window:
- To open a window with info on logs received at a specific point in time, hover your cursor over that part of the graph.
- To pin the information window, click the relevant part of the graph.
- To navigate to log records, click → Go to logs next to the line of interest.
-
Legend: Shows the values of the labels for each data series on the graph.
-
Chart type: Selects the type of the graph with the number of logs:
- Line: Lines.
- Area: Shaded areas.
- Column (default): Columns.
-
Log grouping: Select a grouping parameter from the Group by list. For example, grouping by
levelwill show log distribution by level of importance. -
When working with multiple queries, you can create a separate graph for each one. Do it by enabling One graph per query or selecting the number of graphs per row.
-
To examine a graph in detail or share it, click in the top-right corner of the graph and select:
- Show chart fullscreen.
- Copy screenshot link.
- Copy screenshot to content.
-
Export logs to file: Saves logs in
CSV,JSON, orTXTformat. You can save no more than 1,000 log lines. If there are more, shorten the time range.
If you need no visualization, click Hide graph. To display the graph again, click Show graph.
Working with log records
-
If log descriptions do not fit into the screen width, enable Line breaks.
-
To analyze a particular log entry, expand it and select one of the following actions next to the log line of interest:
- =: Add the line’s key label to the query.
- !=: Exclude the line’s key label from the query.
- : Hide the log line.
- : Copy the log line.
If you work with traces, you can use the
trace.idandspan.idfields to navigate to relevant trace data. -
To configure the log lines table, click at the top-right corner of the table and select the columns and context.
Service dashboard for logs
The system automatically collects incoming log metrics: data volume, delivery delays, number of errors by level, etc.
Incoming log charts are available on the service dashboard.