Copying errors from the browser console

If there is a problem when working with pages and interactive elements in the Yandex Cloud management console, information from the browser console can help identify the cause. Copy the message from the error console and forward it to support.
-
On the error page, press Ctrl + Shift + J (or ⌥ + ⌘ + J for macOS).
Other methods
- Click
 and select Advanced → More tools → JavaScript console.
 - Right-click anywhere on the page, select Inspect element code, and go to the Console tab.
- Click
-
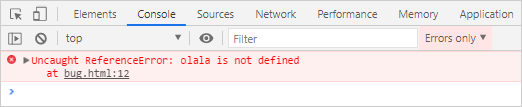
To the right of the Filter field in the Default levels list, disable all options except Errors.
-
Refresh the page or repeat the actions that resulted in the error.
-
Copy the messages:
- Take a screenshot. If you need to scroll vertically to view messages, take several screenshots.
- Save the error log to a text file: right-click on any message and select Save as.
-
Attach the error log or screenshots to your message to support.
For more information, take a screenshot of the information on the Network tab.
-
On the error page, press Ctrl + Shift + J (or ⌥ + ⌘ + J for macOS).
Other method
Open
 → More tools → Developer tools and select the Console tab.
 -
To the right of the Filter field in the Default levels list, disable all options except Errors.
-
Refresh the page or repeat the actions that resulted in the error.
-
Copy the messages:
- Take a screenshot. If you need to scroll vertically to view messages, take several screenshots.
- Save the error log to a text file: right-click on any message and select Save as.
-
Attach the error log or screenshots to your message to support.
For more information, take a screenshot of the information on the Network tab.
-
On the error page, press Ctrl + Shift + J.
Other method
In the upper left-hand corner, click Opera, select Developer → Developer Tools from the menu, and go to the Console tab.
-
To the right of the Filter field in the Default levels list, disable all options except Errors.
-
Refresh the page or repeat the actions that resulted in the error.
-
Copy the messages:
- Take a screenshot. If you need to scroll vertically to view messages, take several screenshots.
- Save the error log to a text file: right-click on any message and select Save as.
-
Attach the error log or screenshots to your message to support.
For more information, take a screenshot of the information on the Network tab.
-
On the error page, press Ctrl + Shift + J.
Other methods
- Open
 → Web Developer Tools → Console.
 - Right-click anywhere on the page, select Inspect, and go to the Console tab.
- Open
-
Make sure that only Errors is checked in all filters ("Network", "CSS", "JS", "Protection", "Log", "Server"). To do this, next to each filter, click
 .
.Warning
If you click the filter name instead of
, error checks will be disabled.
-
Refresh the page or repeat the actions that resulted in the error.
-
Copy the messages:
- Take a screenshot. If you need to scroll vertically to view messages, take several screenshots.
- Save the error log to a text file: right-click on any message and select Export Visible Messages To → File.
-
Attach the error log or screenshots to your message to support.
-
On the error page, press Ctrl + Shift + J.
Other methods
- Open
 → More tools → Developer tools.
 - Right-click anywhere on the page, select Inspect, and go to the Console tab.
- Open
-
To the right of the Filter field in the Default levels list, disable all options except Errors.
-
Refresh the page or repeat the actions that resulted in the error.
-
Copy the messages:
- Take a screenshot. If you need to scroll vertically to view messages, take several screenshots.
- Save the error log to a text file: right-click on any message and select Save as.
-
Attach the error log or screenshots to your message to support.
For more information, take a screenshot of the information on the Network tab.
-
Activate the error console: in the menu, select Safari → Preferences → Advanced and enable Show Develop menu in the menu bar.
-
On the error page, press ⌥ + ⌘ + C.
Other methods
- Select Develop → Show JavaScript Console from the menu.
- Right-click anywhere on the page, select Inspect element and go to the Console tab.
-
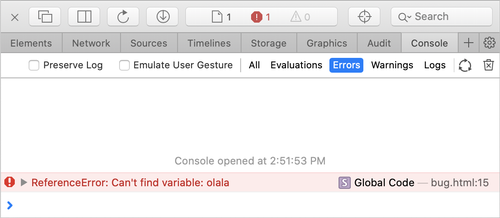
Go to the Console tab and turn on the Errors filter. In a narrow window, the filter name may be hidden: maximize the window.
-
Refresh the page or repeat the actions that resulted in the error.
-
Copy the messages:
- Take a screenshot. If you need to scroll vertically to view messages, take several screenshots.
- Save the error log to a text file.
-
Attach the error log or screenshots to your message to support.
For more information, take a screenshot of the information on the Network tab.