Reinstalling an OS from a custom ISO image

Yandex BareMetal allows you to install and reinstall a server OS from a custom ISO image. This way, you can install Linux or Windows operating systems on your server. Note that if the OS you want to install requires a license, you must provide your own license.
When installing or reinstalling an OS from your custom ISO image, you can freely redistribute the available disk space on the server.
Creating fault-tolerant disk configurations requires experience and understanding of RAID and/or LVM technologies. We recommend using Marketplace public OS images instead, resorting to this installation method only if you need customizations beyond Marketplace options.
For example, you might need to install from your own ISO image if the required OS is not available in Marketplace, or you need a custom disk partitioning layout, UEFI/SecureBoot mode, root encryption, or other options unavailable through Marketplace image deployment.
Warning
Incorrect disk partitioning or RAID configuration can lead to the loss of fault tolerance, unexpected partition space shortages, and server boot failures.
This guide demonstrates how to install Ubuntu 24.04 in UEFI mode on a BA-i201-H server with four HDDs using a custom ISO image and RAID 10 disk configuration with LVM.
Boot the server from your custom ISO image in UEFI mode
To create a BareMetal image from your ISO image and deploy it on the server:
-
Download the required ISO OS image to your local computer.
-
Upload the ISO image to Yandex Object Storage and get a link to the uploaded object:
-
Create an Object Storage bucket:
Management consoleYandex Cloud CLI-
In the management console, select the folder where you want to create a bucket.
-
Navigate to Object Storage.
-
At the top right, click Create bucket.
-
On the
create bucketpage:- Specify a bucket name that meets these naming conventions.
- Set a bucket size limit or enable No limit, if required.
- Leave all other parameters as they are and click Create bucket.
If you do not have the Yandex Cloud CLI yet, install and initialize it.
The folder used by default is the one specified when creating the CLI profile. To change the default folder, use the
yc config set folder-id <folder_ID>command. You can also specify a different folder for any command using--folder-nameor--folder-id. If you access a resource by its name, the search will be limited to the default folder. If you access a resource by its ID, the search will be global, i.e., through all folders based on access permissions.-
Create a bucket in the default folder:
yc storage bucket create --name <bucket_name>Where
--nameis the name of the bucket. This is a required setting. For more information, see Bucket naming rules.Result:
name: <bucket_name>
folder_id: b1gt6g8ht345********
anonymous_access_flags: {}
default_storage_class: STANDARD
versioning: VERSIONING_DISABLED
created_at: "2025-08-06T07:29:40.418079Z"
resource_id: e3e9neva43dl********
For more information about the
yc storage bucket createcommand, see the Yandex Cloud CLI reference.
-
-
Upload the downloaded image file to the created bucket.
Management consoleYandex Cloud CLINote
You can upload objects of up to 5 GB via the management console. For more information, see Object Storage quotas and limits. To upload larger objects, use other tools.
- In the management console, navigate to Object Storage and then to the bucket you want to upload the image to.
- In the left-hand panel, click Objects and then Upload in the top-right corner.
- In the window that opens, select the image file and click Open.
- In the object upload window, click Upload and wait for the image to upload.
- Refresh the page.
-
Run this command:
yc storage s3api put-object \
  --body <local_file_path> \
  --bucket <bucket_name> \
  --key <object_path>
Where:
--body: Path to the file you need to upload to the bucket, e.g.,./ubuntu.iso.--bucket: Name of your bucket.--key: Key by which to store the object in the bucket, e.g.,Ubuntu-2404.iso.
Result:
etag: '"87740887a5159e2685500c02********"'
request_id: 300dceee********
For more information about the
yc storage s3api put-objectcommand, see the Yandex Cloud CLI reference. -
Get a link to the image uploaded to the bucket:
Management console- In the management console, select a folder.
- Navigate to Object Storage and select the bucket.
- Click the name of the object with the uploaded ISO image.
- In the top-right corner, click Get link.
- Click Get link.
- Copy the link.
-
-
Create a BareMetal image from the downloaded ISO image:
Management consoleCLIAPI-
In the management console, select a folder where you want to create your image.
-
Navigate to BareMetal.
-
In the left-hand panel, select Boot images.
-
Click Upload image.
-
Specify the image name. The naming requirements are as follows:
- Length: between 3 and 63 characters.
- It can only contain lowercase Latin letters, numbers, and hyphens.
- It must start with a letter and cannot end with a hyphen.
-
Optionally, provide a description for the image.
-
Paste the link to the image file you got from Object Storage in the previous step.
-
Click Upload.
-
Run this command:
yc baremetal boot-image create \
  --name <image_name> \
  --uri "<image_link>"
Where:
-
--name: Image name. The naming requirements are as follows:- Length: between 3 and 63 characters.
- It can only contain lowercase Latin letters, numbers, and hyphens.
- It must start with a letter and cannot end with a hyphen.
-
--uri: Link to the image file you got from Object Storage in the previous step.
-
To create an image in BareMetal, use the create REST API method for the Image resource or the ImageService/Create gRPC API call.
Run this query:
curl -X POST \
  -H "Content-Type: application/json" \
  -H "Authorization: Bearer <IAM_token>" \
  -d '{
       "folderId": "b1g07hj5r6i4********",
       "name": "baremetal-ubuntu",
       "description": "New OS Baremetal Image",
       "uri": "https://storage.yandexcloud.net/bm-test-backet/new-server-amd64.iso",
       "labels": {
         "key": "ubuntu"
       }
      }' \
  "https://baremetal.api.cloud.yandex.net/baremetal/v1alpha/images"
Where:
-
<IAM_token>: IAM token used for authentication. -
folderId: Folder ID. -
name: Image name. Follow these naming requirements:- Length: between 3 and 63 characters.
- It can only contain lowercase Latin letters, numbers, and hyphens.
- It must start with a letter and cannot end with a hyphen.
-
description: Image description. This is an optional parameter. -
uri: Image link you got in Object Storage. -
labels: Image labels. This is an optional parameter.
Result:
{
"done": false,
"metadata": {
  "@type": "type.googleapis.com/yandex.cloud.baremetal.v1alpha.CreateImageMetadata",
  "imageId": "ly5kr5tjsple********"
},
"id": "ly5iwrc2uvuf********",
"description": "User image create",
"createdAt": "2025-12-07T20:31:52.845955Z",
"createdBy": "ajeb9l33h6mu********",
"modifiedAt": "2025-12-07T20:31:52.845955Z"
}
Follow the status of the operation by the
donefield. -
-
Connect to the server's KVM console.
Note
Complete the following OS installation steps in the KVM console. You can mount your ISO image using either the KVM console window or the KVM console tab in the management console.
-
Mount the ISO image to the server's virtual CD drive. For servers on supported platforms, there are two available mounting options:
Note
Yandex BareMetal supports servers on various platforms. The Mount Image button on the KVM console tab in the management console and Media → Virtual Media Wizard... menu items in the KVM console window may be available or not, depending on the server’s platform. If you do not see the required button or menu item in the KVM console, contact support.
Via the KVM console tab (recommended)Via the KVM console windowThis method is available for servers on supported platforms. An ISO image mounted this way will not unmount when you close the KVM console window and remains mounted until the specified time.
- On the server page in the management console, go to the KVM console tab.
- Click Mount Image.
- In the dialog that opens, select the previously downloaded ISO image of your OS and confirm the mount action.
If the image is mounted, above the KVM console, you will see the Mounted Image indicator and the remaining mount time.
This method is available for all servers. The image will be unmounted when you close the KVM console window.
-
Click the CD icon or select Media → Virtual Media Wizard... in the top menu of the KVM console window. In the window that opens:
- In the CD/DVD Media1 section, click Browse and select the previously uploaded ISO OS image in the
user-isodirectory. - Click Connect CD/DVD.
- Check the Virtual CD 1 device Status section to make sure the Connected To field now shows your selected ISO path, then click Close.
- In the CD/DVD Media1 section, click Browse and select the previously uploaded ISO OS image in the
Depending on your server configuration, you may need to manually select the boot device or enable
UEFImode in BIOS. For instance, on a server with theBA-i201-Hconfiguration, you must boot from a CD drive in UEFI mode for UEFI-based OS installations. -
To boot the server from the selected ISO image:
-
Click Reboot to CD-ROM in the top-right corner of the KVM console.
-
During server boot, press F11 or Del when the POST screen appears. You will see the following message:
Entering Setup.... -
Wait for the BIOS menu to appear, then navigate to the Save & Exit section using the ← and → keys.
-
In the Boot Override section, use the ↑ and ↓ keys to select
UEFI: AMI Virtual CDROM0 1.00, then press Enter.If there is no such option in the Boot Override section, go to Boot settings and add it under UEFI Boot Drive BBS Priorities.
The server will restart and boot from the virtual CD drive in
UEFImode.Warning
BareMetal servers use optimal BIOS settings by default. We do not recommend changing them.
-
Configure the basic OS settings
In this step, you will configure the basic settings for the OS installation. Perform all following actions in the KVM console:
-
In the GRUB bootloader menu, select Try or Install Ubuntu Server and press Enter.
-
Select the system language:
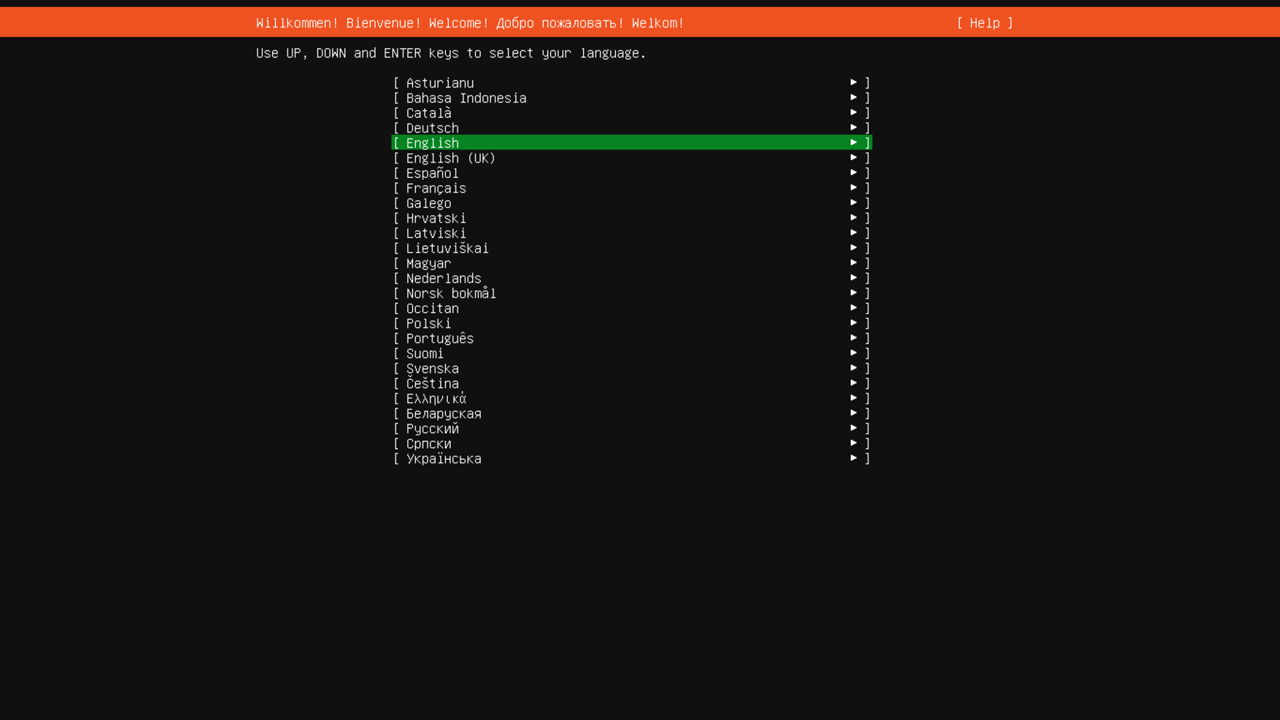
Use the ↑ and ↓ keys to navigate the menu.
-
Choose your keyboard layout, select Done, and press Enter. Depending on the selected layout, you may need to configure a keyboard shortcut for switching input languages.
-
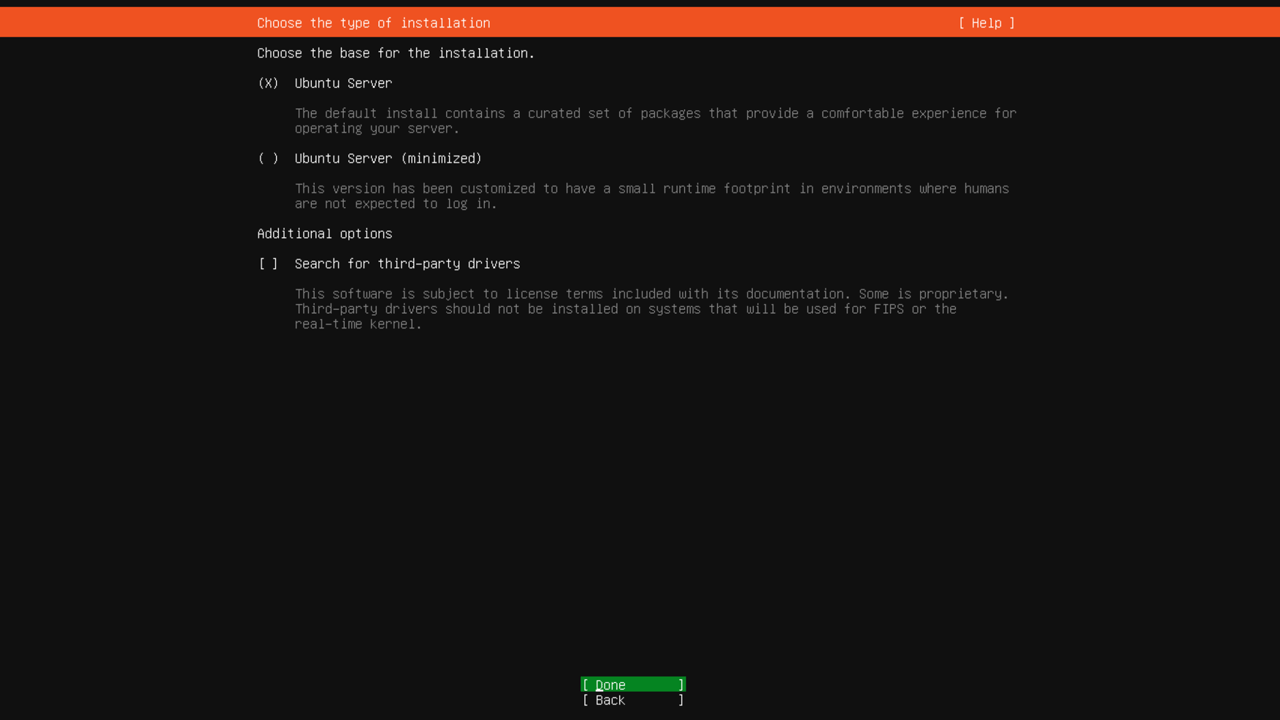
Select the server installation option, either full or minimal:
-
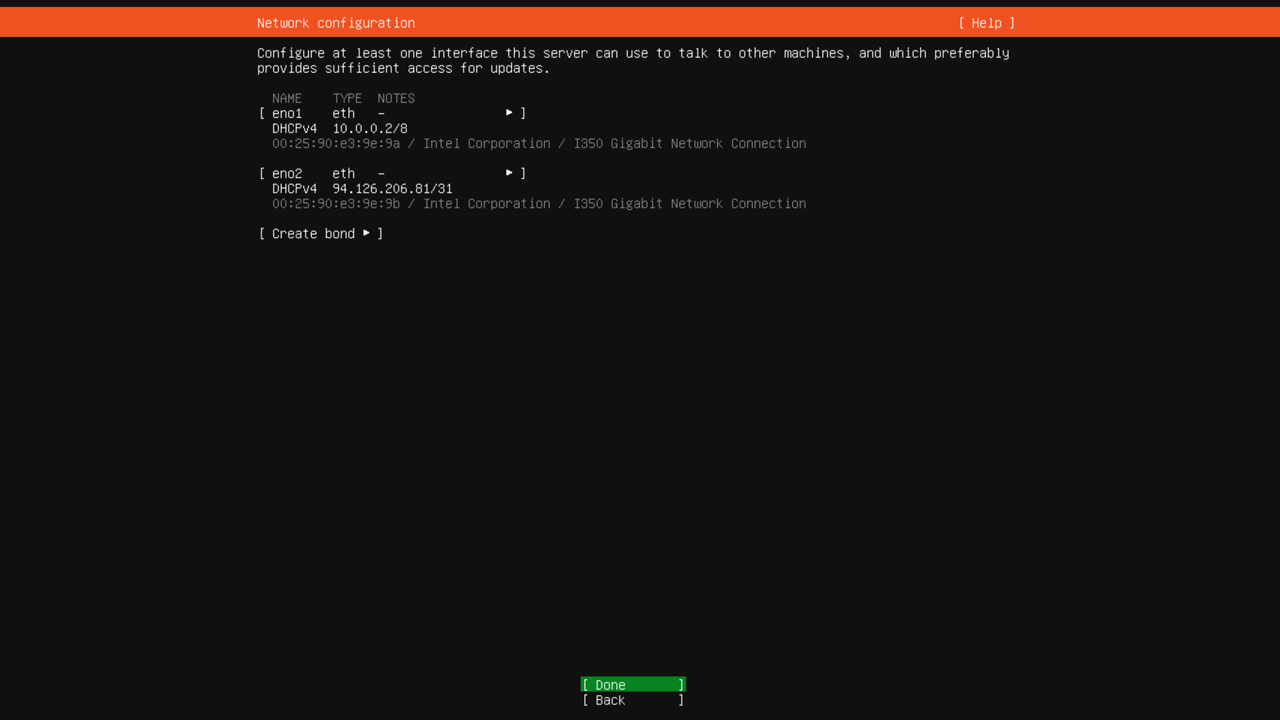
Configure network interfaces. The default configuration uses DHCP for all network interfaces:
-
If needed, configure a proxy and repository mirror address for OS package installation.
For instance, you can use the following mirror address for Ubuntu systems:
http://mirror.yandex.ru/ubuntu. In most cases, though, no configuration changes are needed. -
Select the Custom storage layout disk partitioning option. To do this, navigate to this menu item and press Space.
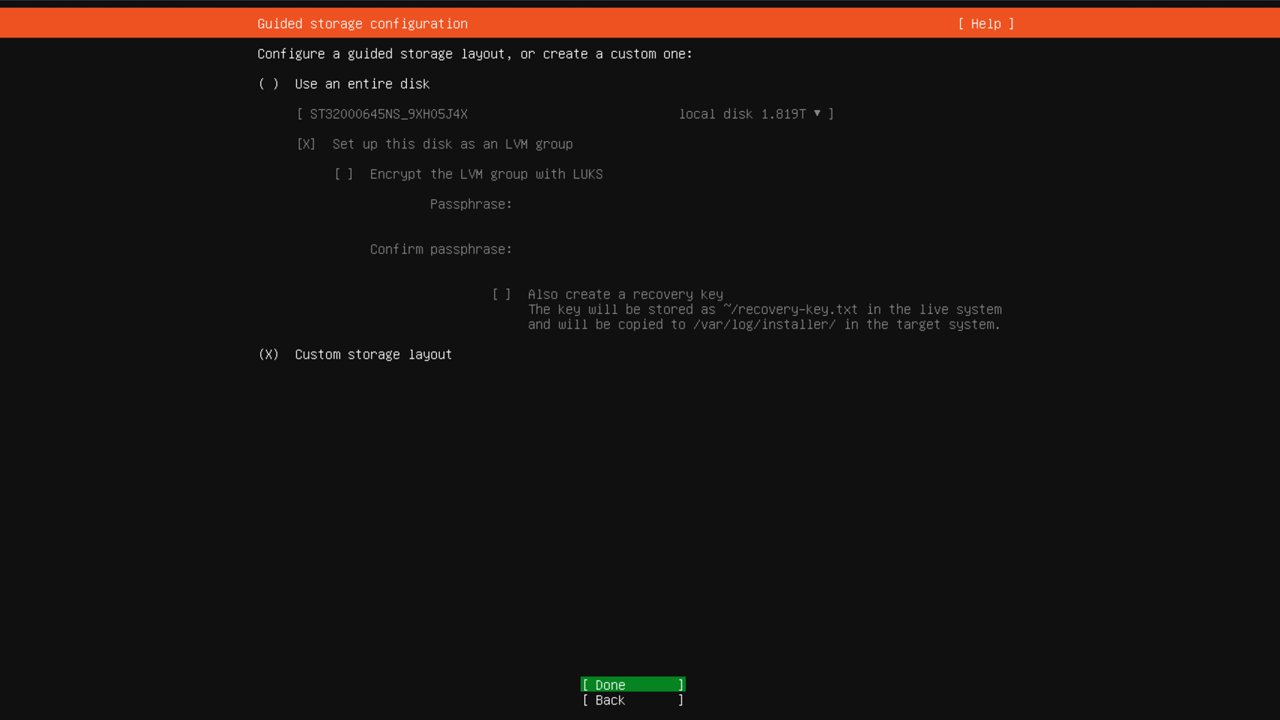
We recommended against using the default Ubuntu installer option of installing the system on a single drive. Such configuration is not fault tolerant, and the system disk failure will require at minimum a full OS reinstallation.
Partition your disks and create RAID 10 arrays
Alert
During disk partitioning, the created partitions will be automatically formatted. This operation will erase all existing data on the disks. Before you proceed, make sure you have backups of all important server files.
Proper disk partitioning is critical for OS installation, affecting disk subsystem performance, data storage reliability, server fault tolerance, and recovery speed in failure scenarios.
At this step, you can create any disk configuration, from basic Marketplace OS installer defaults to advanced LVM with encryption.
Before proceeding with OS installation, create the following partitions:
-
/: Root partition. -
/boot: Boot partition. -
swap: Swap partition. -
/home: User home partition. -
/srv: Service data partition. -
ESP:1GBUEFIsystem partition.If you boot the server in
Legacymode, the system will create a300MBBIOS grub spacersystem partition instead of theESPpartition.Note
The
ESPandBIOS grub spacersystem partitions are created automatically when you select the disk as a primary or secondary boot device during installation.
To create a RAID10 fault-tolerant disk array, you need at least four disks or partitions. If you plan to create a RAID array using disk partitions, first you need to prepare the disks by creating a partition table and defining equally sized partitions on each disk:
-
If the server has an OS installed and the disks already have partitions, remove all existing partitions. If the server was provisioned without an OS and you have not installed one yet, skip this step and proceed to the next one.
-
In the AVAILABLE DEVICES section, remove all existing disk partitions and RAID arrays on the server.
Use the ↑ and ↓ keys to select a partition or RAID array, press Enter, select
DELETEfrom the menu that appears, and confirm the deletion.To delete all partitions on a disk, select the line containing this disk’s name, press Enter, then select
Reformatand confirm the deletion. -
Repeat the previous step for all partitions, disks, and RAID arrays listed under AVAILABLE DEVICES.
After completing these steps, the AVAILABLE DEVICES section should only show disks with unallocated space, e.g.,
free space: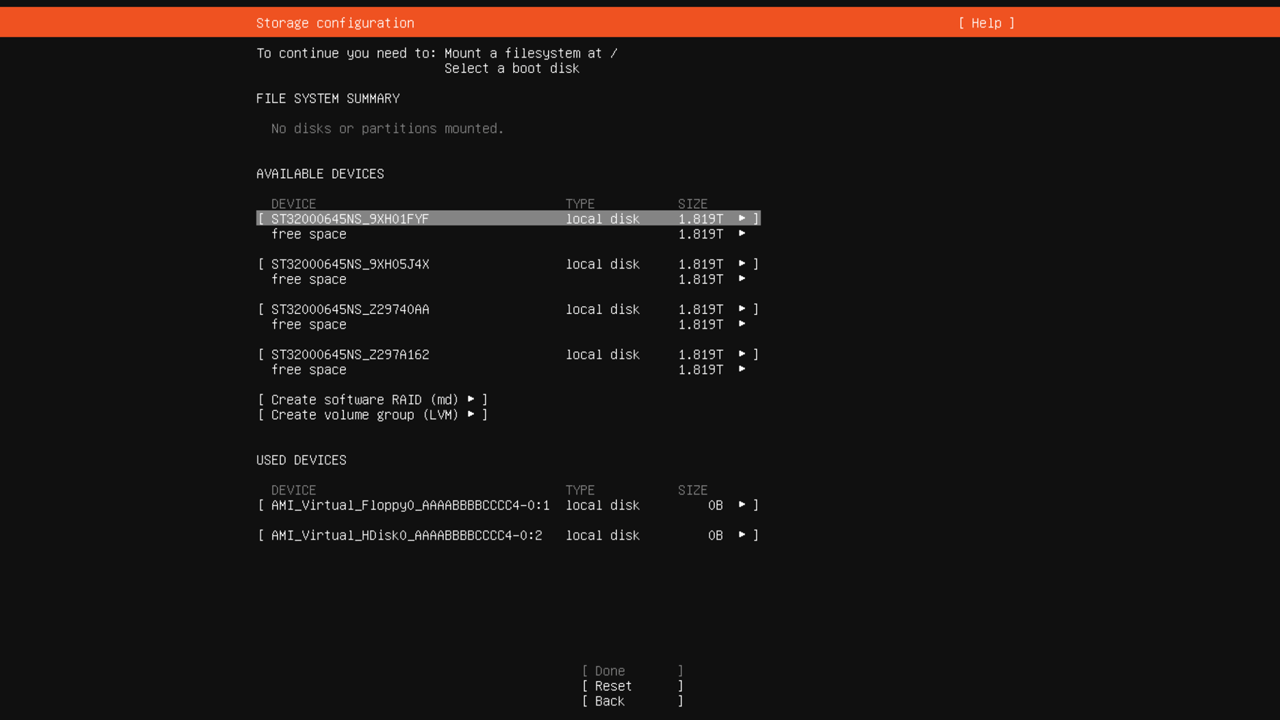
-
-
Select your boot disks:
-
Using the ↑ and ↓ keys, select any disk and press Enter.
-
In the menu that appears on the right, select
Use As Boot Deviceand press Enter.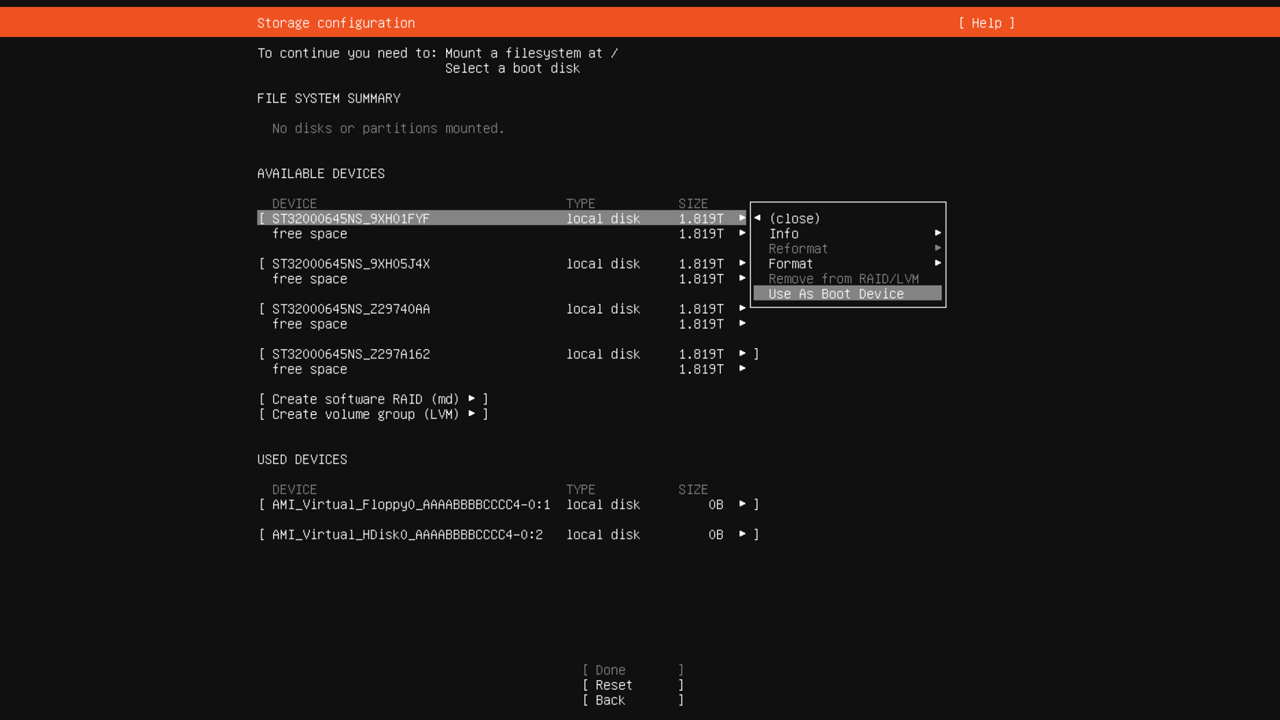
To install the bootloader, you must mark at least one disk as bootable. For fault tolerance, we recommend marking at least two disks.
-
Select another disk, press Enter, and select
Add As Another Boot Device.
-
-
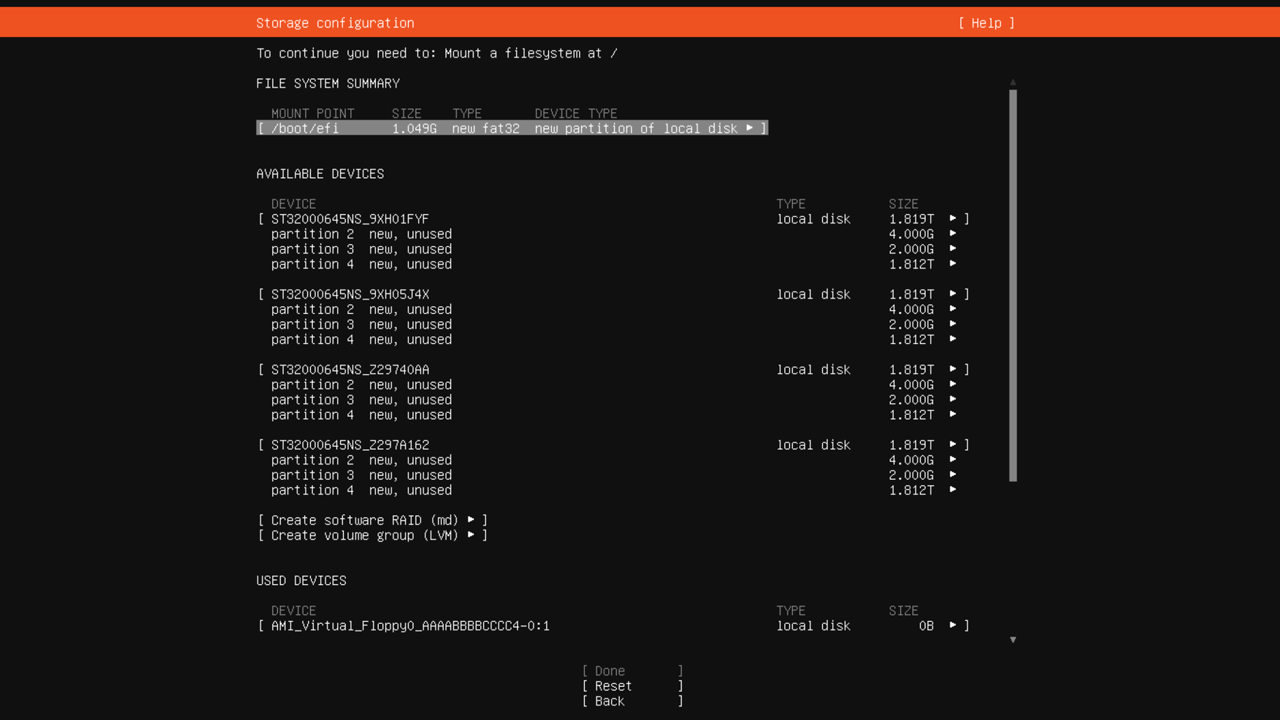
Create matching partition layouts on all disks, sized according to the expected storage requirements. In this example, we will create three partitions on each disk:
-
Partition the first disk:
- For the first disk in the list, select the free space entry, press Enter, then select
Add GPT Partitionfrom the menu that appears. - In the Size: field of the dialog that appears, specify the size of the first partition:
4G. - In the Format: field, select
Leave unformatted. - Move the cursor to Create and press Enter.
- Repeat the process to create two additional partitions: one
2 GBpartition and the other using all remaining available space.
- For the first disk in the list, select the free space entry, press Enter, then select
-
Use the process described above to partition the remaining three disks. The partition layouts on all four disks must be the same.
-
-
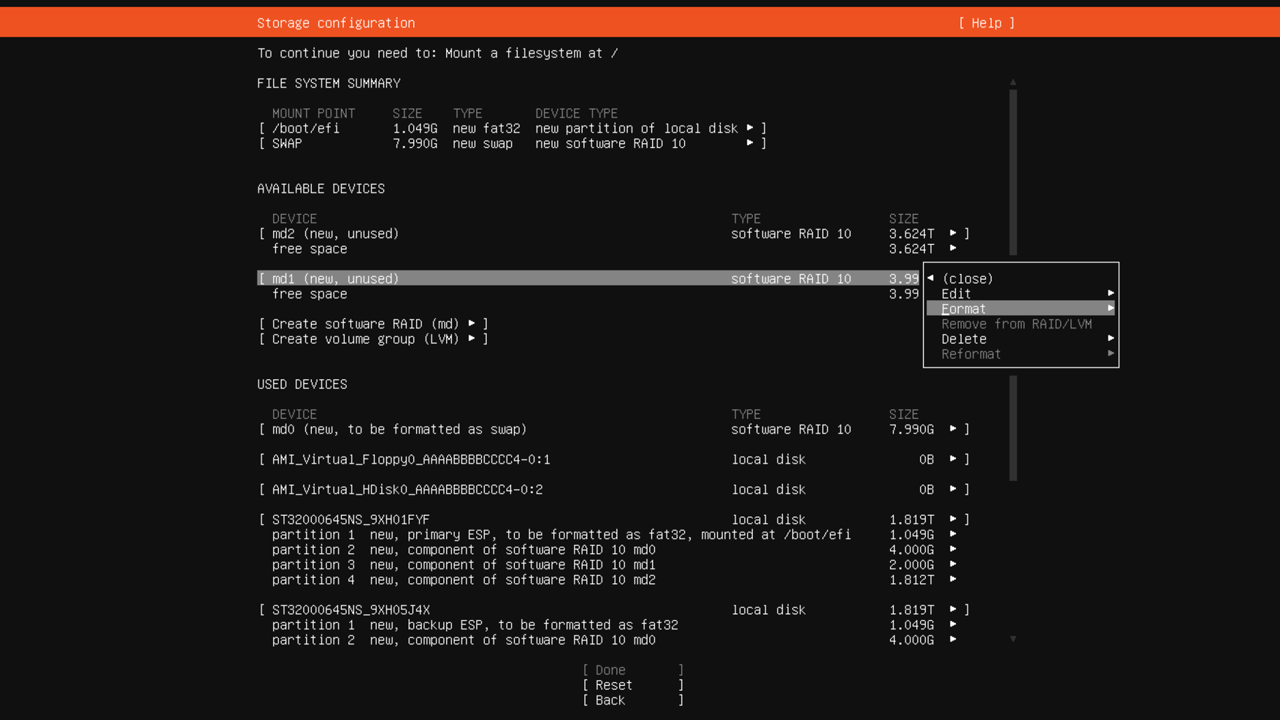
Build RAID arrays using the partitions created in the previous step:
-
Navigate to Create software RAID (md) in the menu and press Enter. In the dialog that opens:
- In the RAID Level: field, select
10. - Use the Space key to mark
4 GBpartitions on each disk. - Move the cursor to Create and press Enter.

- In the RAID Level: field, select
-
Repeat the steps to create the second RAID
10array using2-GBpartitions and, finally, the third RAID10array using the remaining largest partitions.
-
-
Create filesystem partitions within your newly configured RAID arrays:
-
Create the
swappartition:- Select the
md08 GBRAID array, press Enter, and selectFormatfrom the menu that appears. - In the dialog that opens, select
swapin the Format: field. - Move the cursor to Done and press Enter.
- Select the
-
Create the
/bootpartition:- Select the
md14 GBRAID array, press Enter, and selectFormatfrom the menu that appears. - In the dialog that opens, leave the Format field set to
ext4and select/bootin the Mount: field. - Move the cursor to Done and press Enter.
- Select the
-
-
Use the
md2RAID array composed of your largest partitions to create avg0LVM group:-
Create an LVM group:
- Navigate to Create volume group (LVM) in the menu and press Enter.
- In the dialog that opens, navigate to the
md2array in the Devices: field and press Space to select it. - Move the cursor to Create and press Enter.
-
Create an
lv-rootlogical volume for the root partition: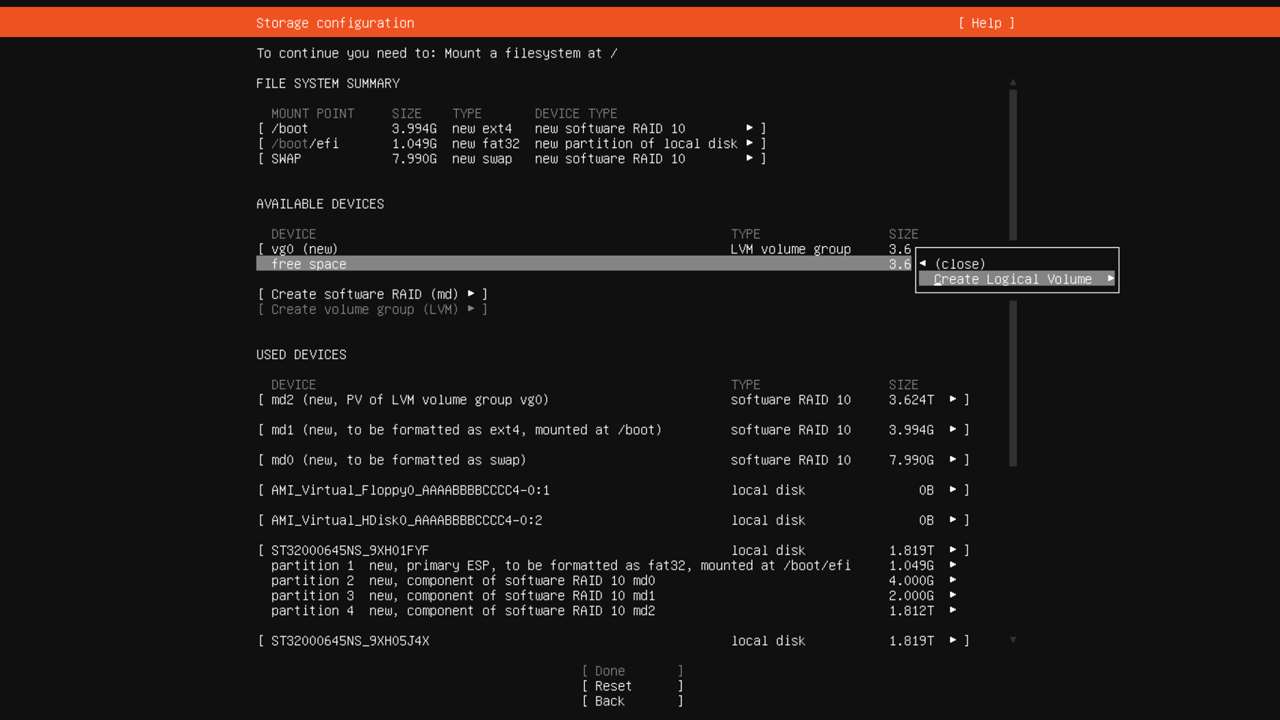
- In the
vg0section under AVAILABLE DEVICES, select free space and press Enter, then selectCreate Logical Volumefrom the menu that opens. - In the Name: field, specify
lv-root. - In the Size: field, specify the volume size as
100G. - Leave the Format: field set to
ext4and the Mount: field set to/. - Move the cursor to Create and press Enter.

- In the
-
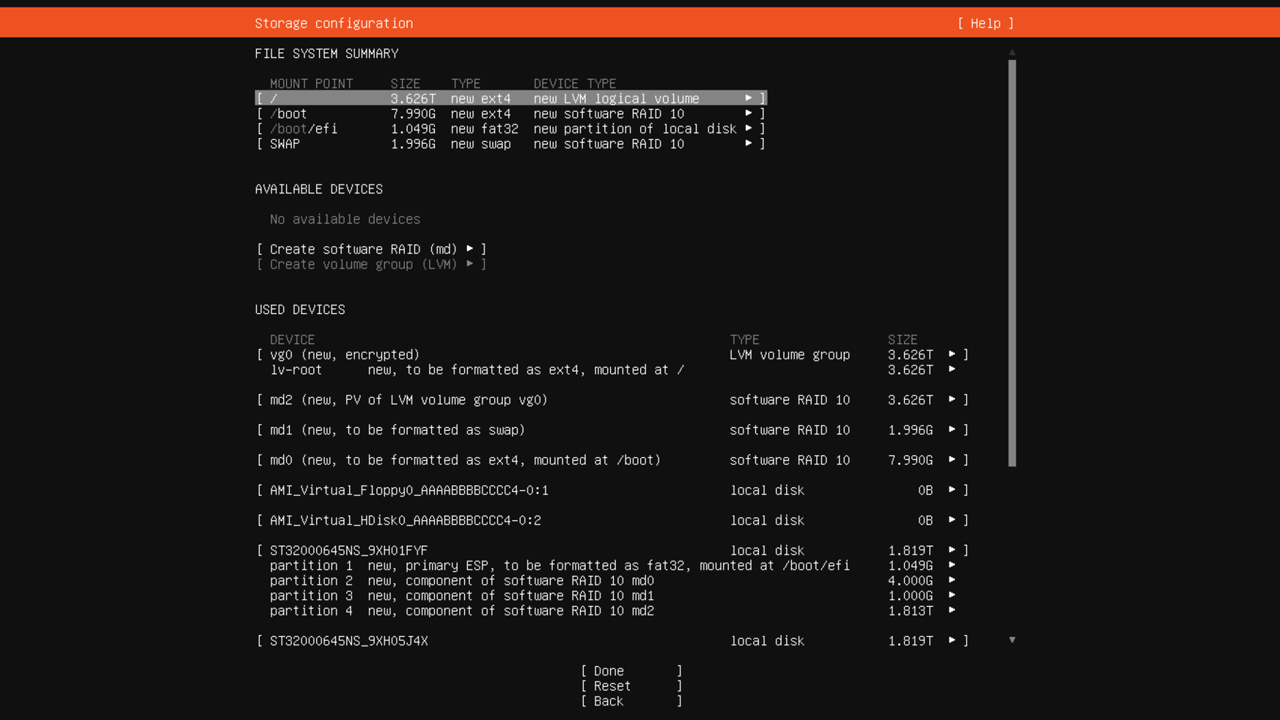
Repeat the steps to create the following logical volumes:
lv-home:512 GBlogical volume mounted at/homefor user directories.lv-srv:1 TBlogical volume mounted at/srvfor service data.
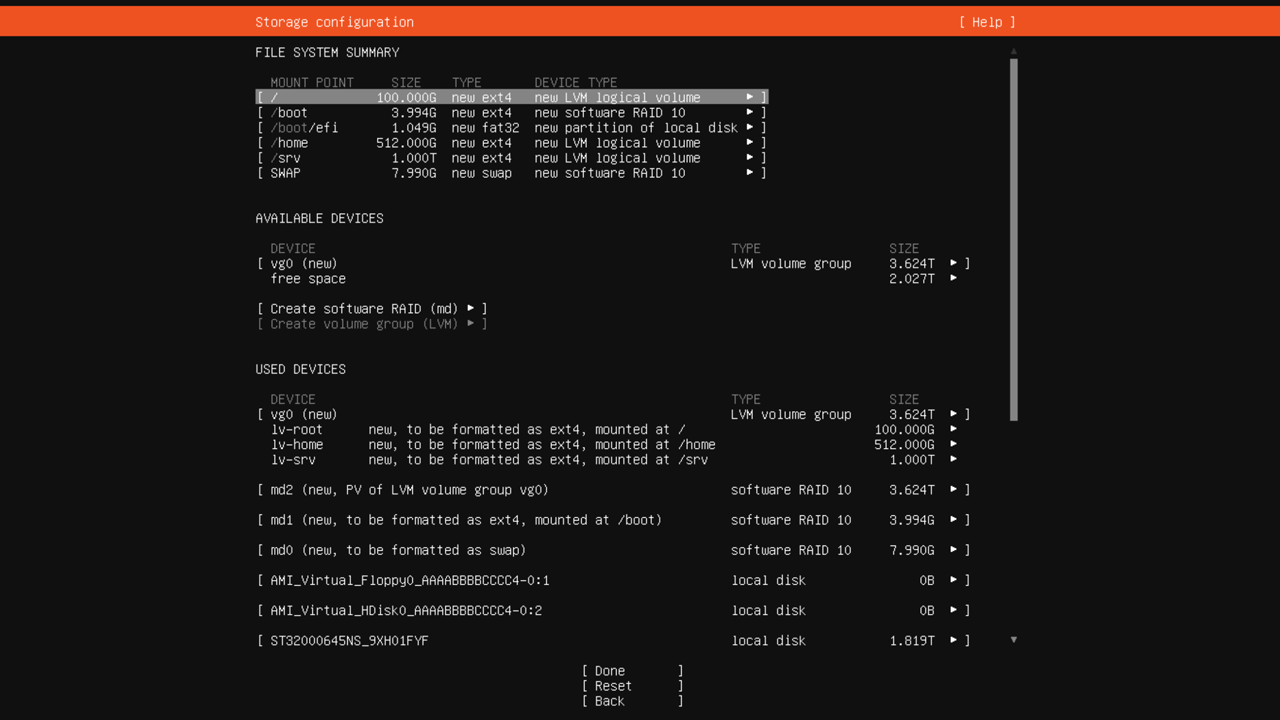
The remaining unallocated space in the
vg0LVM volume group can be used to expand existing logical volumes or create additional volumes when needed. -
Alternative disk partitioning options
The disk partitioning scheme shown above is just an example. Disk partitioning should always be tailored to the projected server usage patterns. Furthermore, disk partitioning requirements differ between server boot modes: Legacy or UEFI.
Let’s consider some other disk partitioning configurations:
Disk layout identical to that created by the Marketplace BareMetal installer in Legacy boot mode:
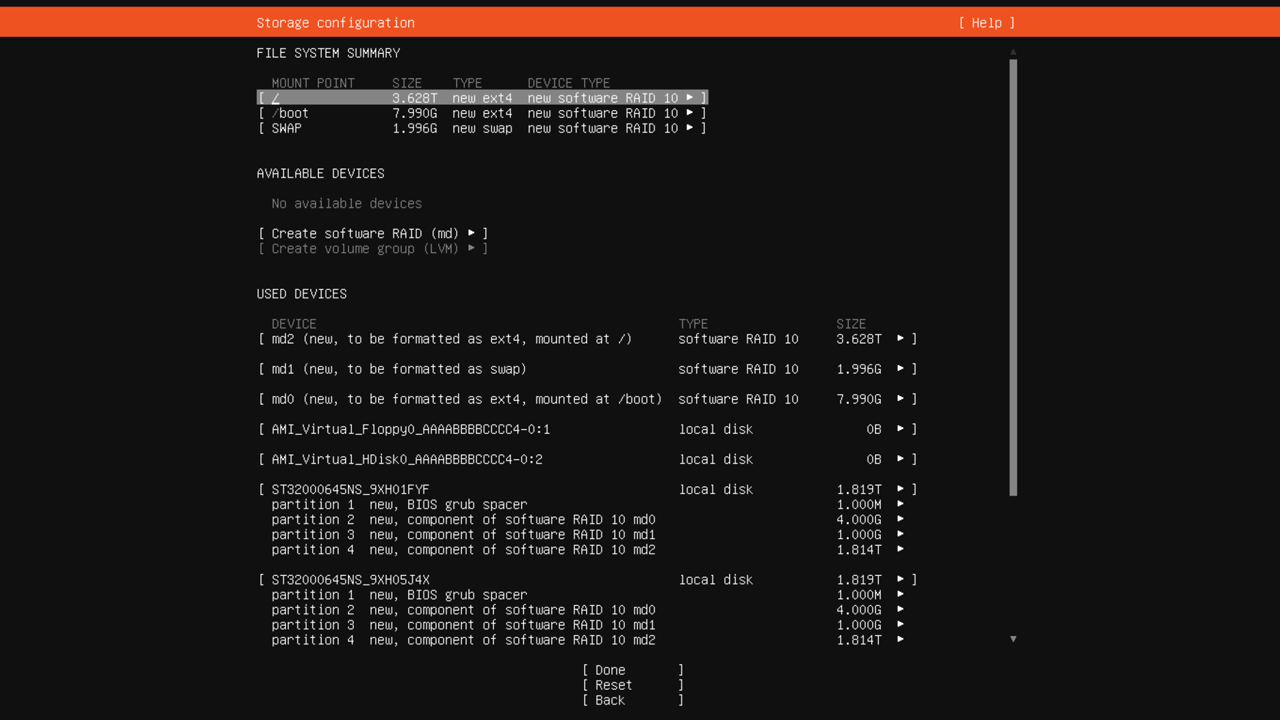
Disk layout identical to that created by the Marketplace BareMetal installer in UEFI boot mode:
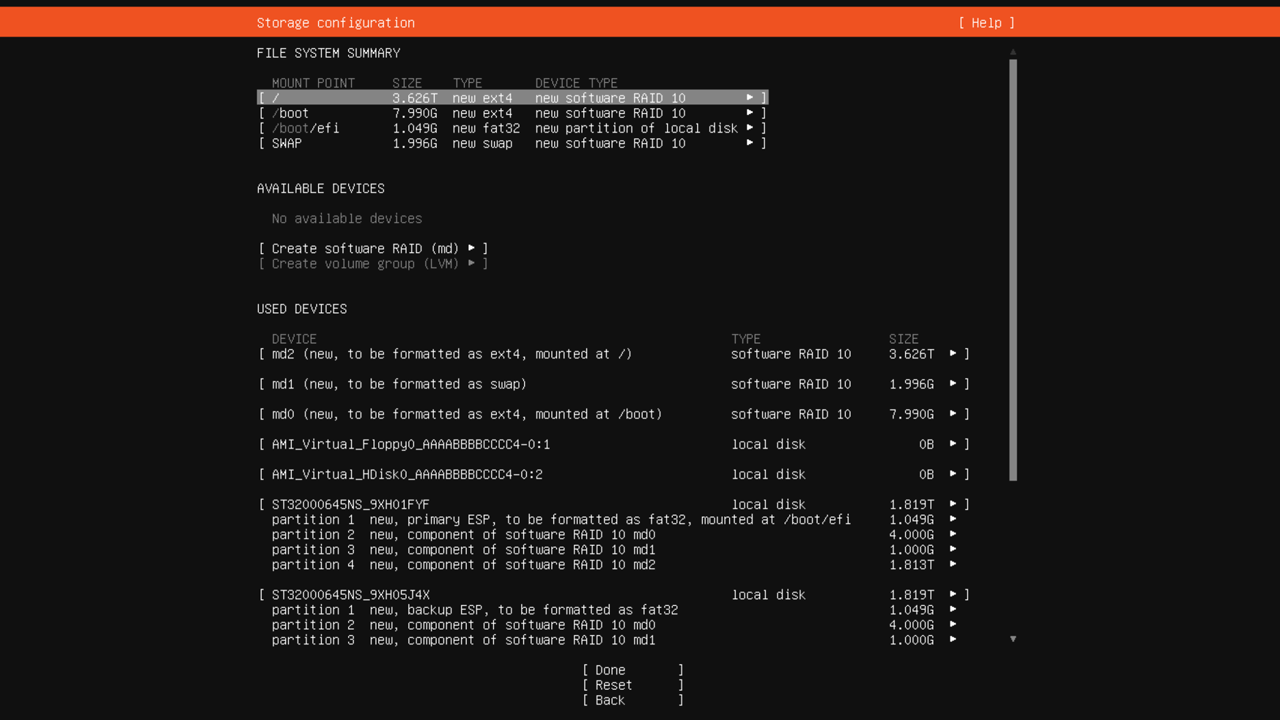
Setting up partitioning with the root filesystem in the LVM logical volume, encrypted and hosted on a RAID10 array:
Note
Partition encryption can have a number of downsides, such as reduced server performance, the need to enter an encryption key on every restart, and irreversible data loss if the key is lost. To avoid entering an encryption key on every boot, you can configure a [TPM](Trusted Platform Module) on the server. For more details, see https://en.wikipedia.org/wiki/Trusted_Platform_Module.
Installing system files
Once you completed disk partitioning on your server, you can proceed with system installation.
Alert
Up to this point, no disk modifications have been made yet, so you may safely abort the OS installation without data loss. Proceeding with installation will permanently erase all existing data on the target disks and physically create new partition structures.
-
To proceed, move the cursor to Done and press Enter.
In the Confirm destructive action dialog that appears, click Continue to confirm disk formatting.
-
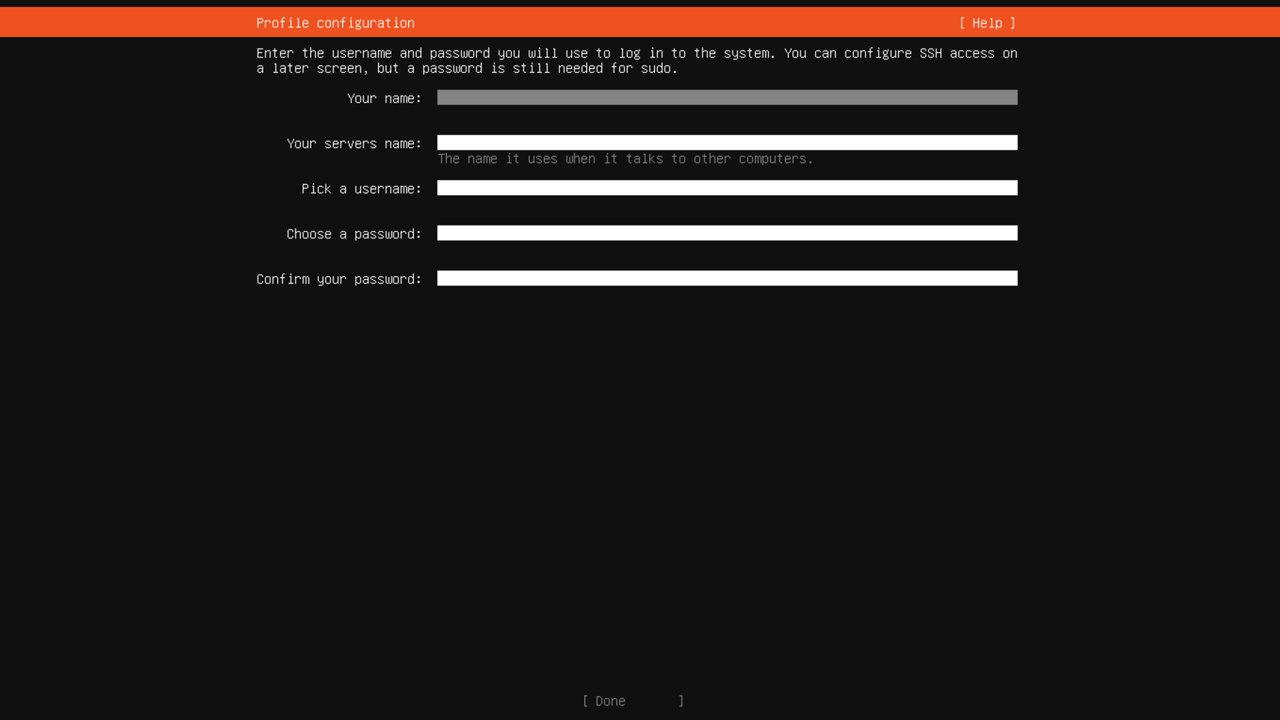
Specify the hostname, create the primary user account, configure SSH access if needed, and install additional software:
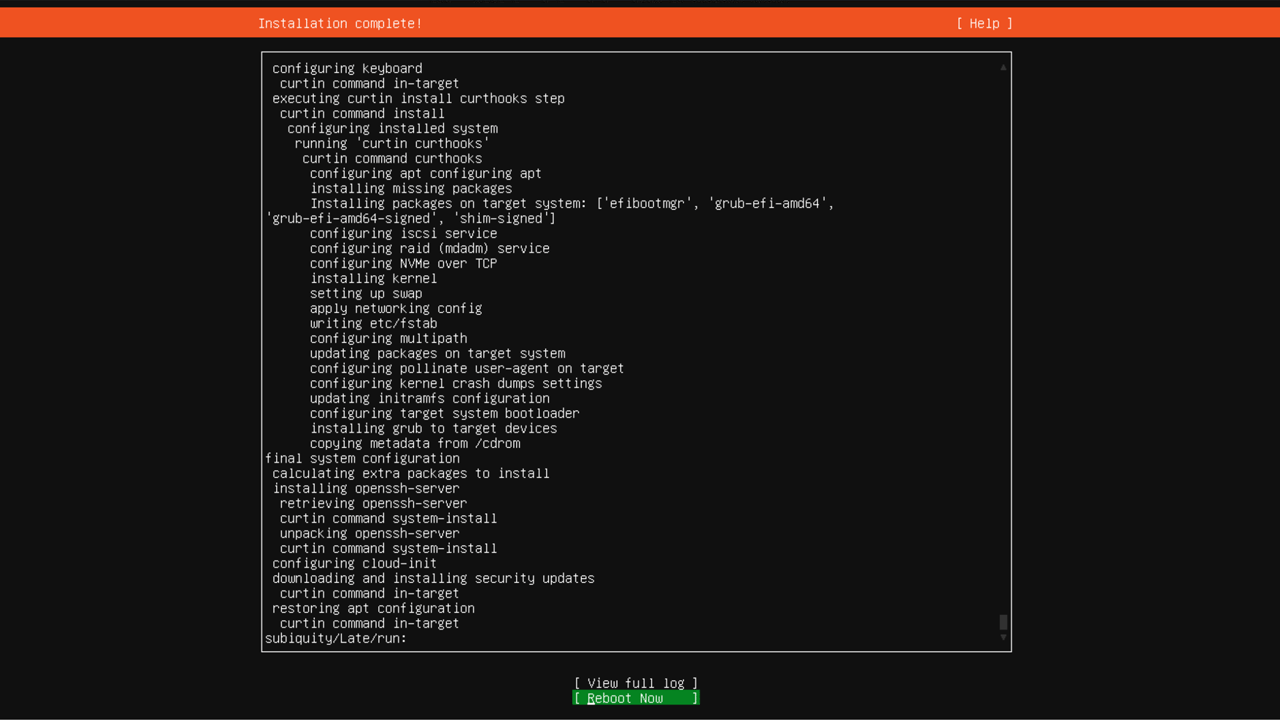
Wait for the operating system installation to complete.
-
Disable the virtual CD drive. The way you do this depends on how the ISO image was mounted:
Via the KVM console tabVia the KVM console windowOn the server page in the management console, click the button for disabling the mounted image on the KVM console tab.
Disable the virtual CD drive in the KVM console:
- Click the CD icon or select Media → Virtual Media Wizard... in the top menu of the KVM console window.
- In the window that opens, click Disconnect under CD/DVD Media1.
- Click Close.
-
To boot into the new OS, select Reboot Now and press Enter:
-
Configure the server to boot in UEFI mode:
-
While the server is booting, press F11 or Del on the POST screen. You will see the following message:
Entering Setup.... -
Wait for the system BIOS menu to appear, then navigate to the Boot section using the ← and → keys.
-
Select 1st Boot Device, press Enter, and select
UEFI: Built-in EFI Shell. -
Select UEFI Boot Drive BBS Priorities and press Enter. In the menu that opens, do the following:
- In the 1st Device field, press Enter and select any of the
UEFI OSvalues. - Press Esc to return to the previous menu.
- In the 1st Device field, press Enter and select any of the
-
Make sure the value of the 1st Boot Device field has changed to
UEFI OS. -
Navigate to the Save & Exit section, using the ← and → keys.
-
Select Save Changes and Reset, press Enter, and confirm the action by pressing Yes.
-
The server will now boot into the new operating system using UEFI mode.