Adding a new SSH key for a user
When you lease a BareMetal server, the root user’s public SSH key is preconfigured. To connect to the server over SSH, you need a private key corresponding to the authorized public key.
If you lose your private SSH key specified when leasing the server, you can add a new public SSH key to the root user account.
Create a new SSH key pair
Generate a new SSH key pair locally before adding the public key to the BareMetal server to enable root access over SSH:
-
Open the terminal.
-
Use the
ssh-keygencommand to create a new key:ssh-keygen -t ed25519 -C "<optional_comment>"You can specify an empty string in the
-Cparameter to avoid adding a comment, or you may not specify the-Cparameter at all: in this case, a default comment will be added.After running this command, you will be prompted to specify the name and path to the key files, as well as enter the password for the private key. If you only specify the name, the key pair will be created in the current directory. The public key will be saved in a file with the
.pubextension, while the private key, in a file without extension.By default, the command prompts you to save the key under the
id_ed25519name in the following directory:/home/<username>/.ssh. If there is already an SSH key namedid_ed25519in this directory, you may accidentally overwrite it and lose access to the resources it is used in. Therefore, you may want to use unique names for all SSH keys.
If you do not have OpenSSH installed yet, follow this guide to install it.
-
Run
cmd.exeorpowershell.exe(make sure to update PowerShell before doing so). -
Use the
ssh-keygencommand to create a new key:ssh-keygen -t ed25519 -C "<optional_comment>"You can specify an empty string in the
-Cparameter to avoid adding a comment, or you may not specify the-Cparameter at all: in this case, a default comment will be added.After running this command, you will be prompted to specify the name and path to the key files, as well as enter the password for the private key. If you only specify the name, the key pair will be created in the current directory. The public key will be saved in a file with the
.pubextension, while the private key, in a file without extension.By default, the command prompts you to save the key under the
id_ed25519name in the following folder:C:\Users\<username>/.ssh. If there is already an SSH key namedid_ed25519in this directory, you may accidentally overwrite it and lose access to the resources it is used in. Therefore, you may want to use unique names for all SSH keys.
Create keys using the PuTTY app:
-
Download and install PuTTY.
-
Add the folder with PuTTY to the
PATHvariable:- Click Start and type Change system environment variables in the Windows search bar.
- Click Environment Variables... at the bottom right.
- In the window that opens, find the
PATHparameter and click Edit. - Add your folder path to the list.
- Click OK.
-
Launch the PuTTYgen app.
-
Select EdDSA as the pair type to generate. Click Generate and move the cursor in the field above it until key creation is complete.
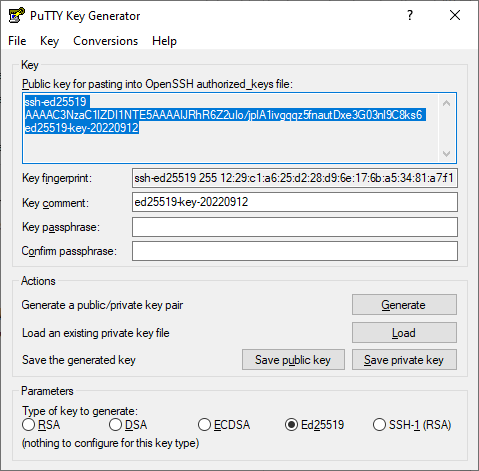
-
In Key passphrase, enter a strong password. Enter it again in the field below.
-
Click Save private key and save the private key. Do not share its key phrase with anyone.
-
Click Save public key and save the public key to a file named
<key_name>.pub.
Add a new key to the root user account
You can use the following methods for adding a new SSH key.
Tip
To paste clipboard text to the KVM console, use the Paste text here field in the upper right corner.
If you can connect to the server as root with the password generated when leasing the server, you can add a new public SSH key without using a Rescue CD:
-
Connect to the BareMetal server’s KVM console.
-
Authenticate as root in the KVM console:
-
When prompted for username, type
rootand press ENTER:my-server login: root -
In the
Password:prompt that appears, enter the root password generated when leasing the server.
-
-
Navigate to the directory containing the root user’s SSH keys. Here is an example:
cd /root/.ssh/ -
Replace the
authorized_keysfile contents with your new public SSH key:echo "<new_SSH_key>" | tee authorized_keysTo add a new key while keeping exising ones, use the
-aflag with theteecommand:echo "<new_SSH_key>" | tee -a authorized_keysNote
At this stage, you can also change the root password, modify other server OS settings to ensure proper booting and network connectivity, and diagnose and troubleshoot errors.
-
Log out from the root session in the KVM console:
logout -
Test your new SSH key by using it to connect to the server from your local computer:
ssh root@<server_public_IP_address>
If you can no longer authenticate as root with the password generated when leasing the server, you can add a new public SSH key using the Rescue CD boot image. Proceed with the following steps in the KVM console.
To add a new SSH key for root or modify BareMetal server settings:
-
Start the server from the Rescue CD image.
In the main SystemRescue menu, select Boot SystemRescue using default options, press ENTER and wait for SystemRescue to load.
-
View information about server storage devices, including disks and their partitions:
fdisk -lResult:
Disk /dev/sda: 838.36 GiB, 900185481216 bytes, 1758174768 sectors
Disk model: SAMSUNG MZ7GE900
Units: sectors of 1 * 512 = 512 bytes
Sector size (logical/physical): 512 bytes / 512 bytes
I/0 size (minimum/optimal): 512 bytes / 512 bytes
Disklabel type: gpt
Disk identifier: D79F5407-DEEC-4A1D-983F-3AC5********

Device      Start      End         Sectors      Size  Type
/dev/sda1   2048       614399      612352       299M  BIOS boot
/dev/sda2   614400     21585919    20971520     10G   Linux filesystem
/dev/sda3   21585920   34168831    12582912     6G    Linux filesystem
/dev/sda4   34168832   1732861951  1698693120   810G  Linux filesystem


Disk /dev/sdb: 838.36 GiB, 900185481216 bytes, 1758174768 sectors
Disk model: SAMSUNG MZ7GE900
Units: sectors of 1 * 512 = 512 bytes
Sector size (logical/physical): 512 bytes / 512 bytes
I/0 size (minimum/optimal): 512 bytes / 512 bytes
Disklabel type: gpt
Disk identifier: CDZACB4C-1618-4BAF-A6BB-D2B9********

Device      Start      End         Sectors      Size  Type
/dev/sdb1   2048       614399      612352       299M  BIOS boot
/dev/sdb2   614400     21585919    20971520     10G   Linux filesystem
/dev/sdb3   21585920   34168831    12582912     6G    Linux filesystem
/dev/sdb4   34168832   1732861951  1698693120   810G  Linux filesystem

Disk /dev/md127: 6 GiB, 6438256640 bytes, 12574720 sectors
Units: sectors of 1 * 512 = 512 bytes
Sector size (logical/physical): 512 bytes / 512 bytes
I/0 size (minimum/optimal): 512 bytes / 512 bytes

Disk /dev/md126: 9.99 GiB, 10729029632 bytes, 20955136 sectors = 512 bytes
Units: sectors of 1 * 512 = 512 bytes
Sector size (logical/physical): 512 bytes / 512 bytes
I/0 size (minimum/optimal): 512 bytes / 512 bytes

Disk /dev/md125: 809.88 GiB, 869596659712 bytes, 1698430976 sectors
Units: sectors of 1 * 512 = 512 bytes
Sector size (logical/physical): 512 bytes / 512 bytes
I/0 size (minimum/optimal): 512 bytes / 512 bytes

Disk /dev/loop: 824.97 MiB, 865046528 bytes, 1689544 sectors
Units: sectors of 1 * 512 = 512 bytes
Sector size (logical/physical): 512 bytes / 512 bytes
I/O size (minimum/optimal): 512 bytes / 512 bytes
In the example above, the
fdiskutility displayed information about the/dev/sdaand/dev/sdbphysical disks, their partitions, and the partitions of the server’s RAID array:/dev/md127,/dev/md126, and/dev/md125.The
/dev/sdaand/dev/sdbdisks are configured in a RAID array, and the809.88 GiB/dev/md125partition contains the server OS root filesystem. This is the partition you need to mount. -
Mount the partition with the BareMetal server OS root filesystem:
mount /dev/md125 /mnt -
Create a new SystemRescue shell environment using the server OS’s previously mounted BareMetal filesystem:
chroot /mnt /bin/bash -
Navigate to the directory containing the root user’s SSH keys. Here is an example:
cd /root/.ssh/ -
Replace the
authorized_keysfile contents with your new public SSH key:echo "<new_SSH_key>" | tee authorized_keysTo add a new key while keeping exising ones, use the
-aflag with theteecommand:echo "<new_SSH_key>" | tee -a authorized_keysNote
At this stage, you can also change the root password, modify other server OS settings to ensure proper booting and network connectivity, and diagnose and troubleshoot errors.
-
After completing all required operations in the server’s filesystem, exit the recovery environment.
exit -
Unmount the BareMetal server filesystem:
umount /dev/md125 /mntResult:
umount: /mnt: not mounted. -
Disable the virtual CD drive in the KVM console:
- Click the CD icon or select Media → Virtual Media Wizard... in the top menu of the KVM console window.
- In the window that opens, click Disconnect under CD/DVD Media1.
- Click Close.
-
Restart the server:
reboot -
Test your new SSH key by using it to connect to the server from your local computer:
ssh root@<server_public_IP_address>