Generating an image using YandexART
With YandexART, you can generate images in asynchronous mode. In response to an asynchronous request, the model will return an operation object containing the operation ID you can use to follow up the operation's progress and get the result once the generation is complete. Generating a result in asynchronous mode can take from a few minutes up to several hours.
Getting started
To use the examples:
You can start working from the management console right away.
You also need to assign the ai.languageModels.user role to the service account; in the example, we will utilize YandexGPT Pro to generate a prompt for YandexART.
-
Get and save the service account's API key.
The following examples use API key authentication. Yandex Cloud ML SDK also supports IAM token and OAuth token authentication. For more information, see Authentication in Yandex Cloud ML SDK.
-
Use the pip
pip install yandex-ai-studio-sdk
-
Get API authentication credentials as described here: Authentication with the Yandex Cloud AI Studio API.
To access the YandexART API, first assign the
ai.imageGeneration.userrole to the user or service account you will use to authenticate with the API. -
Install these tools:
Generate an image
Note
YandexART logs user prompts to keep improving its responses. Do not use sensitive information and personal data in your prompts.
-
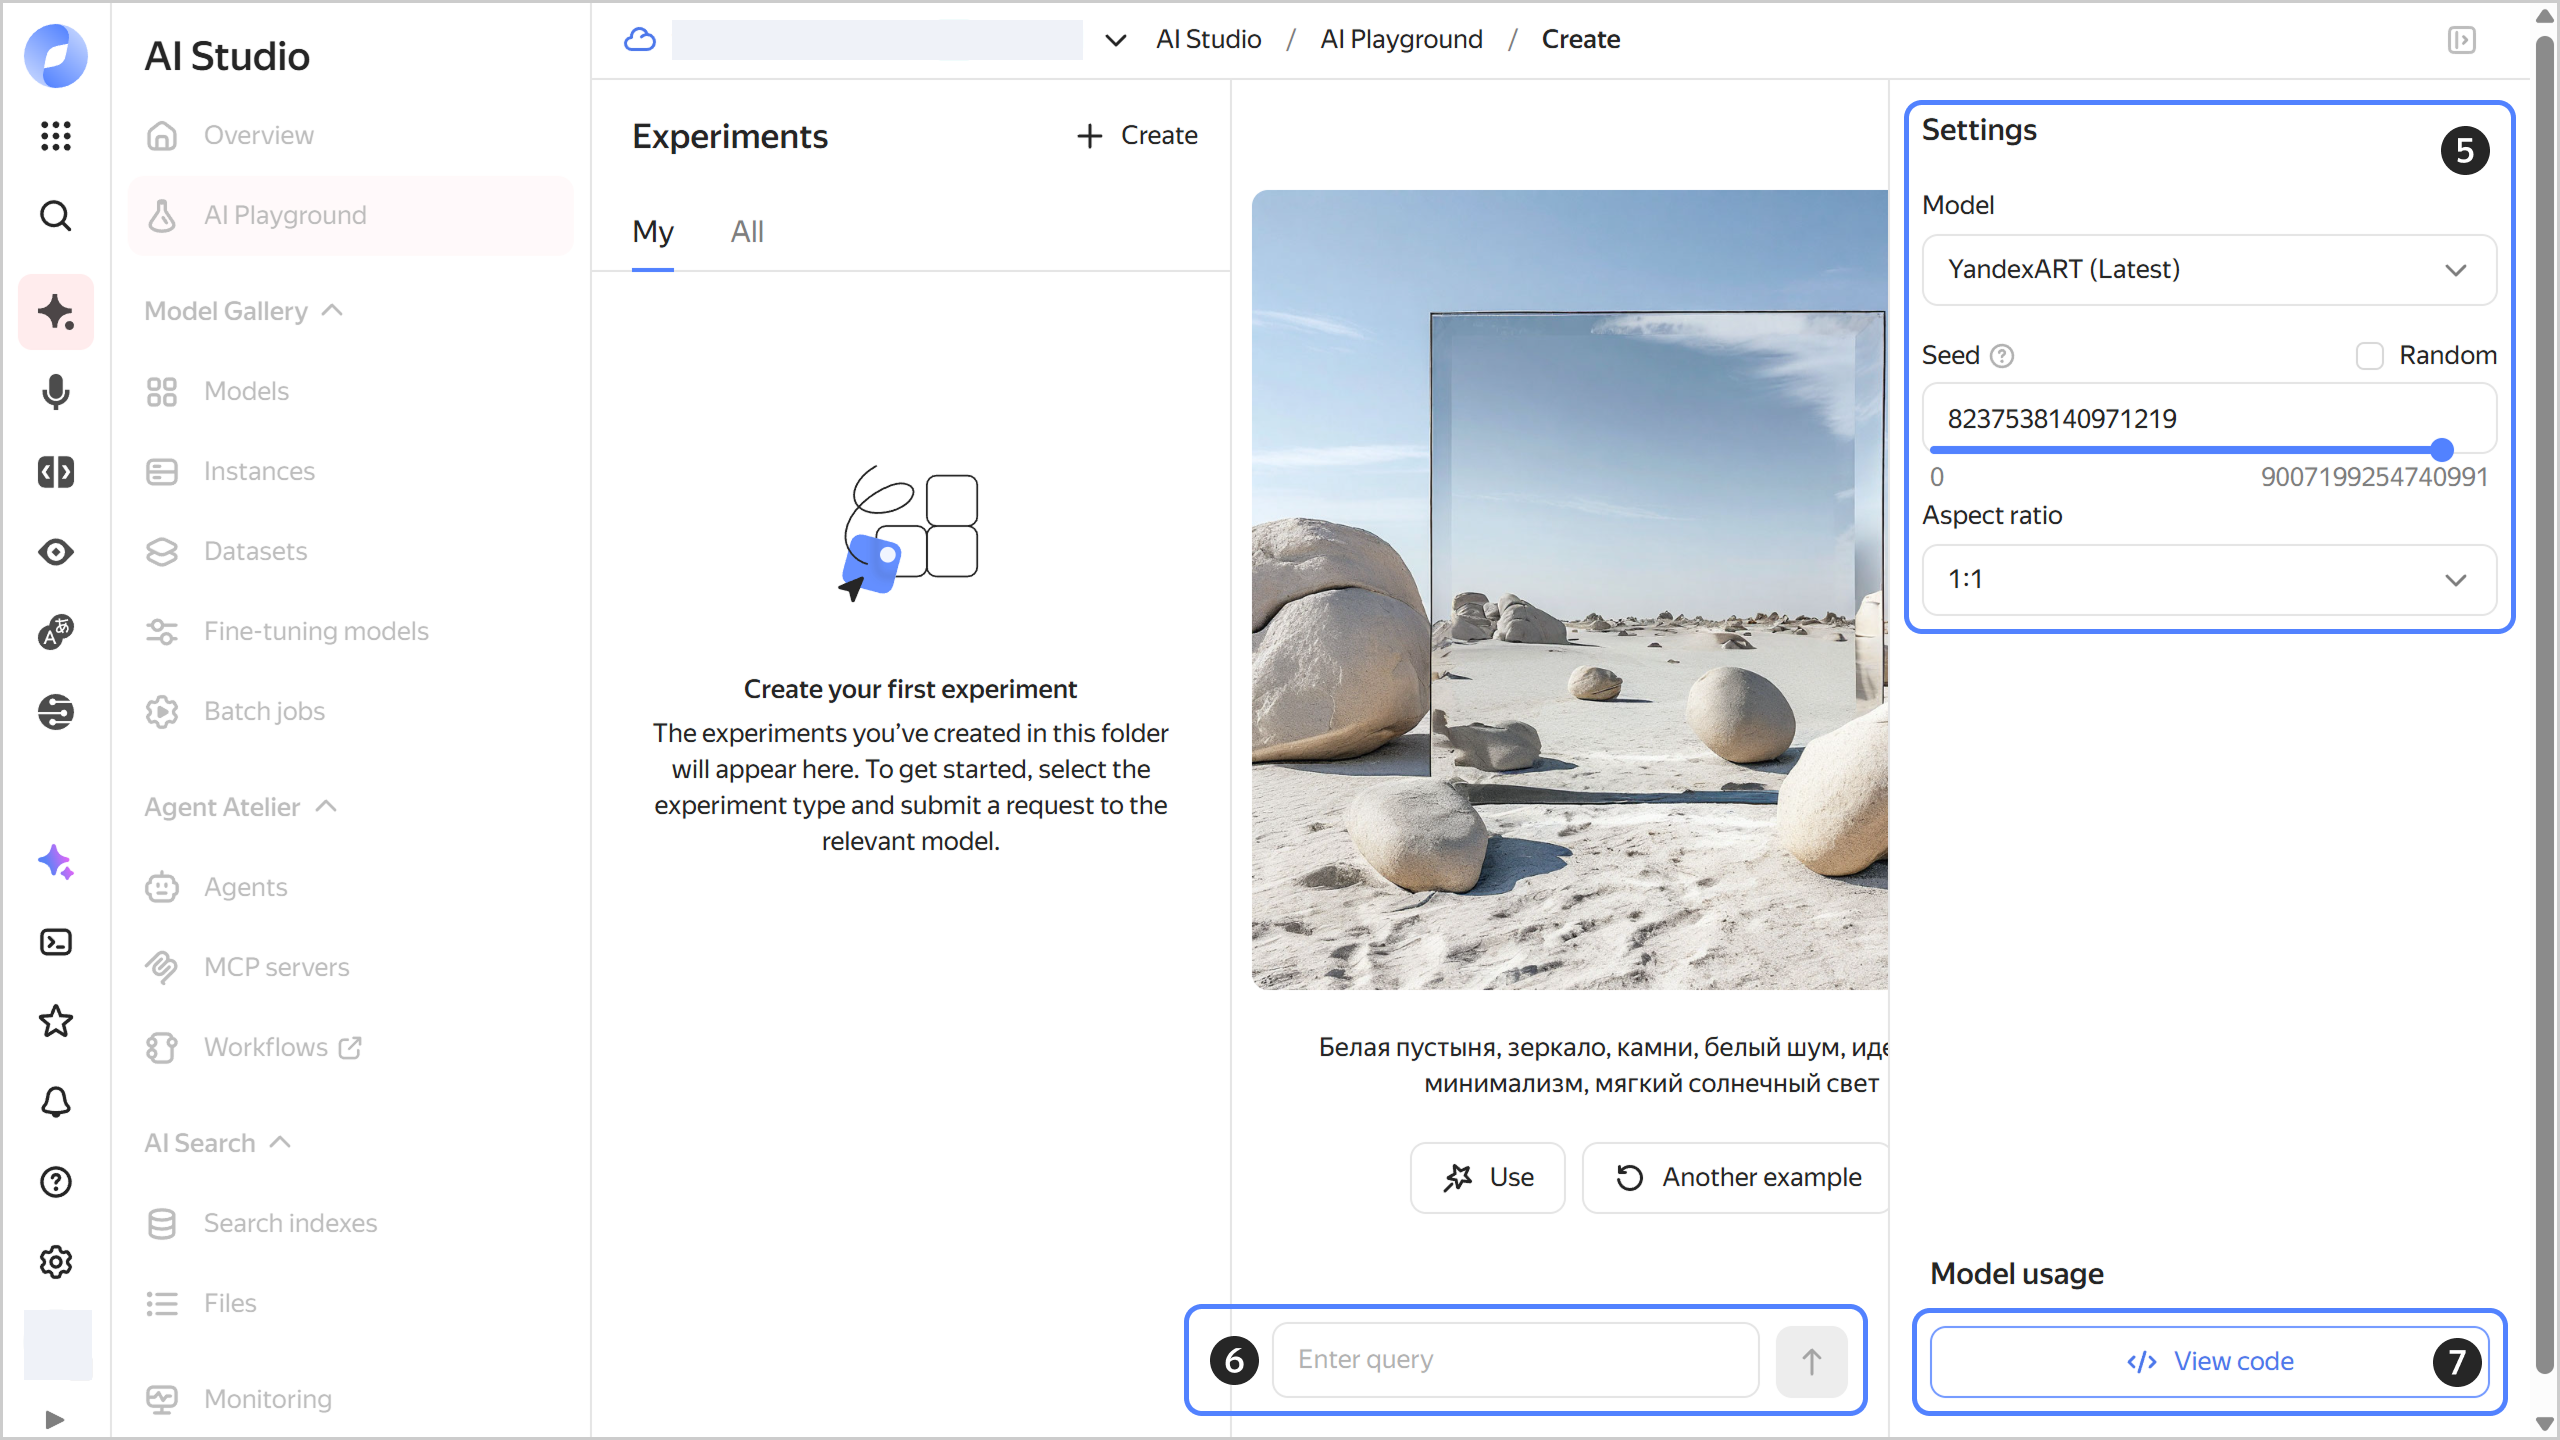
In the management console
ai.playground.userrole or higher. -
Go to AI Studio.
-
In the panel that opens, click

-
Select the generation type: Image generation.
-
Under Settings, specify the following generation settings:
- Seed: Number used to generate the image. You can specify the number yourself or set a random value. The same prompt and seed will produce the same generation results.
- Aspect ratio: Select the required image aspect ratio.
-
Type your query in the input field below and click
All your dialogs are saved in the Experiments panel on the right. Click
-
Under Model usage, click

This code includes four independent examples illustrating different uses of the SDK interface:
- Example 1: A simple request consisting of one text description.
- Example 2: A request of two text descriptions with the result saved to a file named
./image.jpeg. - Example 3: A request of two text descriptions with weight specified.
- Example 4: A combination of a request to YandexGPT Pro (to generate an extended prompt) and a request to YandexART (to generate an image based on that prompt).
The code in the example does not return an operation object but waits for the models to execute their requests and stores the result in the result variable.
-
Create a file named
generate-image.pyand paste the following code into it:#!/usr/bin/env python3 from __future__ import annotations import pathlib from yandex_ai_studio_sdk import AIStudio message1 = "a red cat" message2 = "Miyazaki style" def main(): sdk = AIStudio( folder_id="<folder_ID>", auth="<API_key>", ) model = sdk.models.image_generation("yandex-art") # configuring model for all of future runs model = model.configure(width_ratio=1, height_ratio=2, seed=50) # Sample 1: simple run operation = model.run_deferred(message1) result = operation.wait() print(result) # Sample 2: run with several messages, saving the result to file path = pathlib.Path("./image.jpeg") try: operation = model.run_deferred([message1, message2]) result = operation.wait() path.write_bytes(result.image_bytes) finally: path.unlink(missing_ok=True) # Sample 3: run with several messages specifying weight operation = model.run_deferred([{"text": message1, "weight": 5}, message2]) result = operation.wait() print(result) # Sample 4: example of combining YandexGPT and YandexART models gpt = sdk.models.completions("yandexgpt") messages = gpt.run( [ "you need to create a prompt for a yandexart model", "of " + message1 + "in" + message2, ] ) print(messages) operation = model.run_deferred(messages) result = operation.wait() print(result) if __name__ == "__main__": main()Where:
Note
As input data for a request, Yandex Cloud ML SDK can accept a string, a dictionary, an object of the
TextMessageclass, or an array containing any combination of these data types. For more information, see Yandex Cloud ML SDK usage.message1: Main part of the image generation prompt.message2: Clarifying part of the image generation prompt.
-
<folder_ID>: ID of the folder in which the service account was created. -
<API_key>: Service account API key you got earlier required for authentication in the API.The following examples use API key authentication. Yandex Cloud ML SDK also supports IAM token and OAuth token authentication. For more information, see Authentication in Yandex Cloud ML SDK.
-
Run the file you created:
python3 generate-image.pyResult:
ImageGenerationModelResult(model_version='', image_bytes=<889288 bytes>)
ImageGenerationModelResult(model_version='', image_bytes=<1062632 bytes>)
GPTModelResult(alternatives=(Alternative(role='assistant', text='Here is an example of what a request to a YandexART model may look like:\n\n"Create an image of a red cat in Hayao Miyazaki anime style. Make the background in soft pastel shades with details emphasizing the atmosphere of magic and comfort."\n\n*Note that this is just an example and you can adapt it to your needs.*', status=<AlternativeStatus.FINAL: 3>),), usage=Usage(input_text_tokens=31, completion_tokens=76, total_tokens=107), model_version='07.03.2024')
ImageGenerationModelResult(model_version='', image_bytes=<1180073 bytes>)
The example below is intended to be run in MacOS and Linux. To run it in Windows, see how to work with Bash in Microsoft Windows.
-
Create a file with the request body, e.g.,
prompt.json:{ "modelUri": "art://<folder_ID>/yandex-art/latest", "generationOptions": { "seed": "1863", "aspectRatio": { "widthRatio": "2", "heightRatio": "1" } }, "messages": [ { "text": "a pattern of pastel-colored succulents of multiple varieties, hd full wallpaper, sharp focus, many intricate details, picture depth, top view" } ] }Where:
modelUri: YandexART model ID which contains the Yandex Cloud folder ID.seed: Generation seed.text: Text description of the image to use for generation.aspectRatio(optional): Aspect ratio of the image to generate:widthRatio: Width (1by default).heightRatio: Height (1by default).
-
To send a request to the neural network using the ImageGenerationAsync.generate method, run the following command:
curl \
  --request POST \
  --header "Authorization: Bearer <IAM_token_value>" \
  --data "@prompt.json" \
  "https://ai.api.cloud.yandex.net/foundationModels/v1/imageGenerationAsync"
Where:
<IAM_token_value>: Your account's IAM token.prompt.json: JSON file with the request parameters.
The service will return the
operationobject in response:{"id":"fbveu1sntj**********","description":"","createdAt":null,"createdBy":"","modifiedAt":null,"done":false,"metadata":null}Save the operation
idyou get in the response. -
Generating an image may take from a few seconds up to a few hours. Wait for a while and send a request to
https://operation.api.cloud.yandex.net:443/operations/<operation_ID>to get the generation result. When the image is ready, you will get the result in a Base64-encodedimage.jpeg.curl --request GET --header "Authorization: Bearer <IAM_token_value>" https://operation.api.cloud.yandex.net:443/operations/<operation_ID> | jq -r '.response | .image' | base64 -d > image.jpegWhere:
<IAM_token_value>: IAM token you obtained when getting started.<operation_ID>:idfield value obtained in response to the generation prompt.
See also
- Overview of Yandex AI Studio AI models
- Examples of working with ML SDK on GitHub