Processing Yandex Cloud Logging logs
Yandex Cloud Logging is a service for reading and writing logs of Yandex Cloud services and user applications.
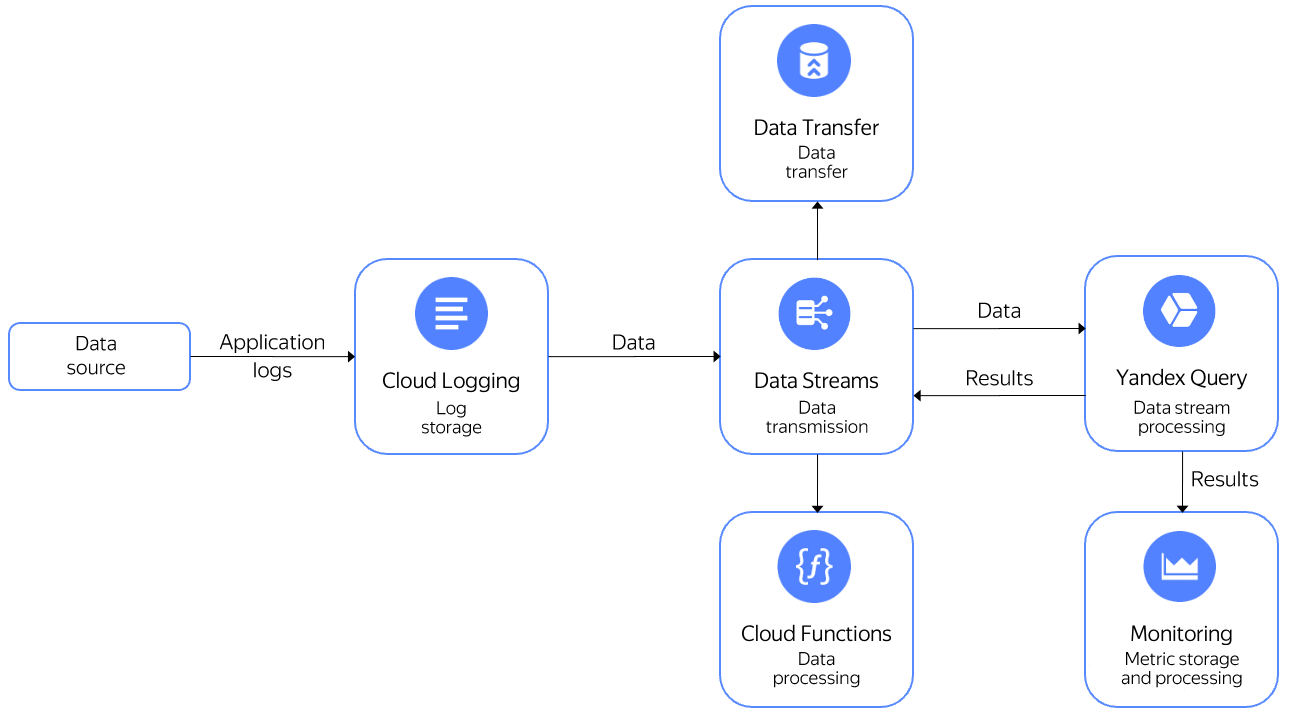
You can send logs to a Yandex Data Streams stream to process in real time using Yandex Query. You can do the following with processed data:
- Send it to Yandex Monitoring to make charts and use it in alerting.
- Write it to a stream in Data Streams and then send to Yandex Cloud Functions for processing.
- Write it to a stream in Data Streams and then transfer to Yandex Data Transfer to distribute to various storage systems.

In this tutorial, you will send Cloud Logging logs to a Data Streams stream and then query them using Query. The query will return the number of messages per host grouped by 10s interval.
For this tutorial:
- Create a data stream in Data Streams.
- Create a Cloud Logging log group.
- Start sending data to the log group.
- Connect Query to your data stream.
- Query the data.
Getting started
Sign up for Yandex Cloud and create a billing account:
- Navigate to the management console
- On the Yandex Cloud Billing
ACTIVEorTRIAL_ACTIVEstatus. If you do not have a billing account, create one and link a cloud to it.
If you have an active billing account, you can navigate to the cloud page
Learn more about clouds and folders here.
Install the Yandex Cloud command-line interface.
Create a data stream in Data Streams
Create a data stream named cloud-logging-stream.
Create a log group in Cloud Logging
Create a log group named cloud-logging-group. When setting the log group parameters, specify cloud-logging-stream created in the previous step.
Start sending data to the log group
To start sending data to the log group, run this command:
while true; do yc logging write \
  --group-name=cloud-logging-group \
  --message="test_message" \
  --timestamp="1s ago" \
  --level=INFO \
  --json-payload='{"request_id": "1234", "host":"test_host"}' \
  --folder-id b1kmrhakmf8a********; \
  sleep 1; \
done
-
--group-name: Name of the log group to send messages to. -
--message: Message text. -
--json_payload: Additional message data in JSON format. -
--folder-id: ID of the folder the log group is created in.Note
You can leave out the
--group-name,--message, and--json-payloadparameters and provide only the values, e.g.,cloud-logging-group "test_message" '{"request_id": "1234", "host":"test_host"}'.
Connect Query to your data stream
- Create a connection named
cloud-logging-connectionof theData Streamstype. - On the binding creation page:
- Select Automatically fill settings for Cloud Logging.
- Enter a name for the binding:
cloud-logging-binding. - Specify the data stream:
cloud-logging-stream. - Set the
json-listformat.
- Click Create.
Query the data
Open the query editor in the Query interface and run this query:
$cloud_logging_data =
SELECT
    CAST(JSON_VALUE(data, "$.timestamp") AS Timestamp) AS `timestamp`,
    JSON_VALUE(data, "$.jsonPayload.host") AS host
FROM bindings.`cloud-logging-binding`;

SELECT
    host,
    COUNT(*) AS message_count,
    HOP_END() AS `timestamp`
FROM $cloud_logging_data
GROUP BY
    HOP(`timestamp`, "PT10S", "PT10S", "PT10S"),
    host
LIMIT 2;
Result:
| # | host | message_count | timestamp |
|---|---|---|---|
| 1 | "test_host" | 3 | 2023-05-09T10:34:00.000000Z |
| 2 | "test_host" | 4 | 2023-05-09T10:34:10.000000Z |
Note
Data from a stream source is transferred as an infinite stream. To stop data processing and output the result to the console, the data in the example is limited with the LIMIT operator that sets the number of rows in the result.