Analyzing data with Jupyter

Yandex Query supports integration with Jupyter and VSCode through the cell (%%yq) and line (%yq) Python magic commands. The integration allows you to streamline data collection and analysis for a more efficient and straightforward workflow.
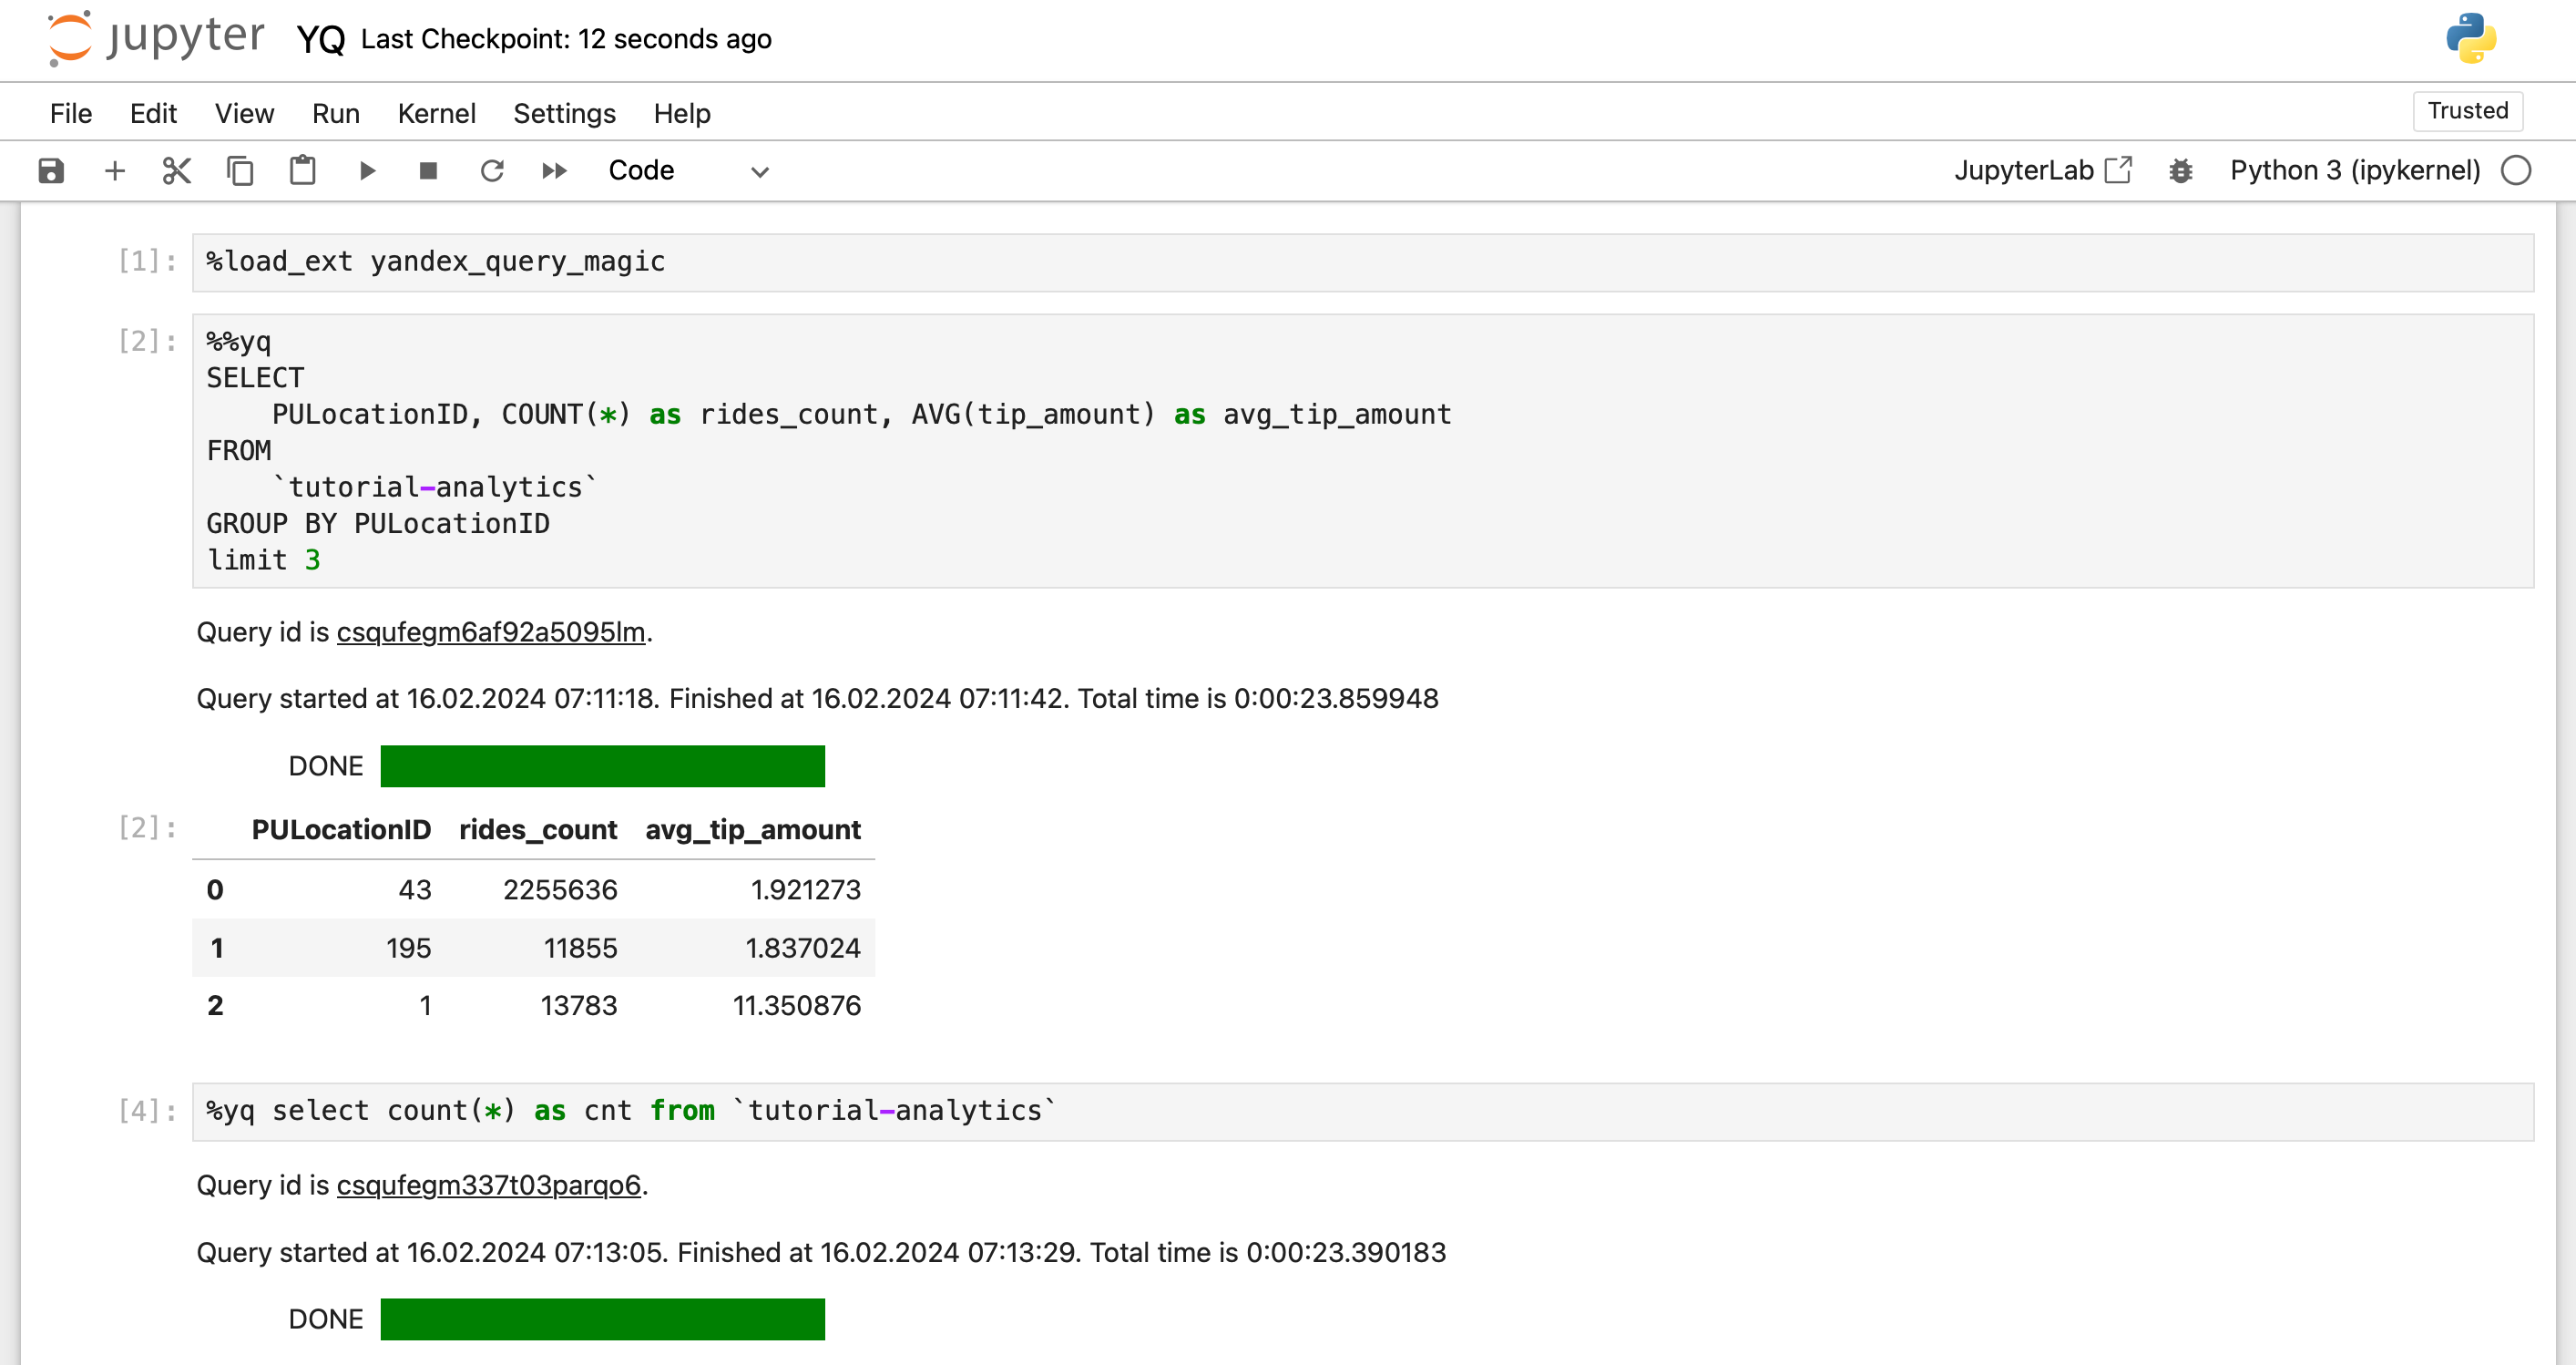
To analyze Query data with Jupyter:
- Install and configure the
yandex_query_magicpackage. - Try creating query templates.
- Process the execution results.
Getting started
-
Sign up for Yandex Cloud and create a billing account:
- Navigate to the management console and log in to Yandex Cloud or create a new account.
- On the Yandex Cloud Billing page, make sure you have a billing account linked and it has the
ACTIVEorTRIAL_ACTIVEstatus. If you do not have a billing account, create one and link a cloud to it.
If you have an active billing account, you can create or select a folder for your infrastructure on the cloud page.
-
Get access to the JupyterLab or Jupyter Notebook environment.
Installing and configuring the yandex_query_magic package
Install the yandex_query_magic package by running this command in the notebook cell:
%pip install yandex_query_magic --upgrade
-
Install the yandex_query_magic package using pip:
pip install yandex_query_magic --upgrade -
Enable the Jupyter extension for the Jupyter Notebook UI controls:
%jupyter contrib nbextension install --userIf you get the
"No module named 'notebook.base'"error, try upgrading to Jupyter Notebook 6.4.12:pip install --upgrade notebook==6.4.12
Configuring the package
To configure the yandex_query_magic package, you can use the yq_settings line command with the following arguments specified:
%yq_settings --folder-id <folder_ID> ...
Available parameters:
--folder-id <folder_id>: ID of the folder to run Query queries. The folder hosting a VM instance with Jupyter is used by default.--vm-auth: Authentication with the VM account key. For more information, see Using Yandex Cloud from within a VM.--env-auth <environment_variable>: Authentication with the authorized key kept in the environment variable. Use this mode when you cannot access the file system of the computer running Jupyter. For example, in Yandex DataSphere. In which case create a DataSphere secret and specify its name in the--env-authparameter.--sa-file-auth <authorized_key>: Authentication with authorized keys. For more information, see Creating an authorized key.
Testing the package
You can use the %yq line magic command with a single-line SQL query. In this case, the %yq keyword is used to run the query.
If Jupyter is running on a VM with an attached service account, upload the extension to Jupyter:
%load_ext yandex_query_magic
%yq SELECT "Hello, world!"
Where:
%yq: Jupyter magic name.SELECT "Hello, world!": Text of the query to Query.
If the VM does not have any attached service accounts:
-
Create a service account and assign the
yq.viewerrole to it. -
Create an authorized key for the service account.
-
Run the following commands specifying the path to the authorized key file:
%load_ext yandex_query_magic
%yq_settings --sa-file-auth '<path_to_key_file>'
%yq SELECT "Hello, world!"
Here is an example:
%load_ext yandex_query_magic
%yq_settings --sa-file-auth '/home/test/authorized_key.json'
%yq SELECT "Hello, world!"
The path to the
authorized_key.jsonfile is specified relative to the directory the current Jupyter Notebook file is saved in.
To send multi-line SQL queries, you need to use %%yq cell magic. The query text must begin with the %%yq keyword:
%%yq --folder-id <folder_ID> --name "My query" --description "Test query" --raw-results

SELECT
    col1,
    COUNT(*)
FROM table
GROUP BY col1
Where:
--folder-id: ID of the folder to run Query queries. The default folder is the one specified earlier through%yq_settings. If not specified, the folder in which the VM is running is used.--name: Query name.--description: Query description.--raw-results: Returns the unprocessed results of a query run in Query. For the format specification, refer to YQL to JSON type mapping.
Query templating using Mustache syntax
You can use query templates shared between Jupyter and Query to work with queries and perform routine operations without writing any code. For this, Query comes with built-in Mustache syntax support. You can use it to write queries, placing all template keywords and directives inside double curly brackets ({{}}). You can use Mustache syntax either with Jinja2 or with the built-in Mustache interpreter.
Built-in mustache templates {{ yq-name }} allow you to insert Jupyter runtime variables into SQL queries. Such variables will be automatically converted into required Query data structures. Here is an example:
myQuery = "select * from Departments"
%yq {{myQuery}}
The system will interpret the {{myQuery}} Mustache string as the name of the variable containing the required text and will send select * from Departments to Query for execution.
Mustache templates streamline Jupyter and Query integration. Suppose you have a Python list lst=["Academy", "Physics"] containing the names of departments whose data you want to process. If Query did not support Mustache syntax, you would need to convert the Python list into a string first and then insert it into your SQL query. Query example:
var lstStr = ",".join(lst)
sqlQuery = f'select "Academy" in ListCreate({lstStr});
%yq {{sqlQuery}}
This example showcases how working with complex data types requires you to understand the specifics of Query SQL syntax. With Mustache syntax, the query becomes simpler:
%yq select "Academy" in {{lst}}
Here, the system will automatically recognize lst as a Python list, insert the SQL fragment required for list processing, and send the following query text to Query:
%yq select "Academy" in ListCreate("Academy", "Physics") as lst
Jinja2
We recommend using the built-in Mustache syntax for routine tasks in Jupyter and Query. For advanced templating, use Jinja2.
To install Jinja2, run this command:
%pip install Jinja2
Example of using a Jinja template with the for loop:
{% for user in users %}
    command = "select * from users where name='{{ user }}'"
{% endfor %}
You can also use Jinja templates for data processing operations. In the following example, the operations performed on the department name vary based on the student’s department:
{% if student.department == "Academy" %}
    {{ student.department|upper }}
{% elif upper(student.department) != "MATHS DEPARTMENT" %}
    {{ student.department|capitalize }}
{% endif %}
To make Jinja convert data according to Query rules, use the to_yq filter. Here is how the Python list from the previous example (lst=["Academy", "Physics"]) looks in a Jinja template:
%%yq --jinja2
select "Academy" in {{lst|to_yq}}
To disable templating, use the --no-var-expansion argument:
%%yq --no-var-expansion
...
Built-in Mustache templates
Built-in mustache templates are enabled by default in Yandex Query to streamline basic operations with Jupyter variables:
lst=["Academy", "Physics"]
%yq select "Academy" in {{lst}}
Using Pandas DataFrame variables
Here is an example of using yandex_query_magic and Mustache syntax with Pandas DataFrame:
-
Define a variable in Jupyter:
df = pandas.DataFrame({'_float': [1.0],
                    '_int': [1],
                    '_datetime': [pd.Timestamp('20180310')],
                    '_string': ['foo']})
You can use the df variable when querying Yandex Query. During query execution, the system uses the df value to create a temporary table also named df. This table can then be used within the Yandex Query query.
-
Retrieve the data:
%%yq
SELECT
    *
FROM mytable
INNER JOIN {{df}}
    ON mytable.id=df._int
Pandas to Query type mapping:
| Pandas type | YQL type | Note |
|---|---|---|
| int64 | Int64 | Exceeding the int64 limit will result in a query error. |
| float64 | Double | |
| datetime64[ns] | Timestamp | Microsecond precision. Entering nanoseconds in the nanosecond field will raise an exception. |
| str | String |
Using Python dict variables
Here is an example of using yandex_query_magic with Mustache syntax and a Python dict:
-
Define a variable in Jupyter:
dct = {"a": "1", "b": "2", "c": "test", "d": "4"}Now you can use the
dctvariable in Query queries. At query runtime, the system will convertdctinto the relevant YQL Dict object:Key Value a "1" b "2" c "test" d "4" -
Retrieve the data:
%%yq
SELECT "a" in {{dct}}
Python dict to Query type mapping:
| Python type | YQL type | Note |
|---|---|---|
| int | Int64 | Exceeding the int64 limit will result in a query error. |
| float | Double | |
| datetime | Timestamp | |
| str | String |
Another way to convert a dictionary to a Pandas DataFrame is by using a constructor:
df = pandas.DataFrame(dct)
Using Python list variables
Here is an example of using yandex_query_magic with Mustache syntax and a Python dict:
-
Define a variable in Jupyter:
lst = [1,2,3]Now you can use the
lstvariable in Query queries. At query runtime, the system will convertlstinto the relevant YQL Dict object: -
Retrieve the data:
%%yq
SELECT 1 IN {{lst}}
Python list to Query type mapping:
| Python type | YQL type | Note |
|---|---|---|
| int | Int64 | Exceeding the int64 limit will result in a query error. |
| float | Double | |
| datetime | Timestamp | |
| str | String |
Another way to convert a dictionary to a Pandas DataFrame is by using a constructor:
df = pandas.DataFrame(lst,
                      columns =['column1', 'column2', 'column3'])
Jinja templates
Jinja templates make it easy to build SQL queries, allowing you to automatically insert search conditions and other data. This way, you don’t need to write each query from scratch. It can help you streamline your workflow, avoid mistakes, and create more readable code.
With Jinja templates, you can also automate generating queries that contain repeated elements. For example, you can use loops in your template to add a list of values to check in a query. This adds even more flexibility, speeding up the process of writing complex queries when you need to handle large amounts of data.
The steps below explain how to filter Yandex Query data using a Python variable.
-
Define a variable in Jupyter:
name = "John" -
Before you run the following code in a Jupyter cell, set the
jinja2flag. It will tell the system to treat SQL queries as Jinja2 templates:%%yq <other_parameters> --jinja2 SELECT "{{name}}"Settings:
to_yq filter
Jinja2 is a general-purpose templating engine. When handling variables, it uses a standard string representation of data types.
For example, if you have a Python list lst=["Academy", "Physics"], here is how you can use it in a Jinja template:
%%yq --jinja2
select "Academy" in {{lst}}
Running this code will result in the Unexpected token '[' error. This error occurs because Jinja converts the lst variable to the ["Academy", "Physics"] string using Python rules and ignores Yandex Query-SQL specifics.
To tell Jinja that it should follow Yandex Query rules, use the to_yq filter. In this case, the previous query in the Jinja syntax will look like this:
%%yq --jinja2
select "Academy" in {{lst|to_yq}}
The to_yq Jinja filter converts data to the Yandex Query syntax in the exact same way as built-in Mustache templates.
Capturing command results
You can capture the output of a line magic command using an assignment:
varname = %yq <query>
To capture a cell magic command’s output, start the query with the target variable name and the << operator:
%%yq
varname << <query>
From there, you can treat the result as any other Jupyter variable.
For example, let’s use a cell magic to capture the result in the output variable:
output = %yq SELECT 1 as column1
And here we use a line magic to capture the result in the output2 variable:
%%yq
output2 << SELECT 'Two' as column2, 3 as column3
Now, you can use these variables just like any other IPython variable. For example, you can print them:
output
By default, %yq and %%yq commands return a Pandas DataFrame. Its columns match SQL column names, and its rows contain query results. You can disable Pandas DataFrame conversion using the --raw-results argument.
In our example, the output variable has the following structure:
| column1 | |
|---|---|
| 0 | 1 |
The output2 variable has the following structure:
| column2 | column3 | |
|---|---|---|
| 0 | Two | 3 |
If your query does not return any results (for example, it is insert into table select * from another_table), the return value will be None. If a query returns multiple results, they will be presented as a list.
When you run a query, yandex_query_magic outputs extra details, e.g., query ID, start time, and query duration:

To hide the progress output for a cell, you can use the %%capture command.
%%capture
%%yq
<query>
This will suppress progress output in the console.