Deploying S2S VPN using strongSwan in Yandex Cloud
Follow this tutorial to deploy a secure site-to-site (S2S) VPN connection between a cloud infrastructure in Yandex Cloud and a remote site using a strongSwan-based IPsec gateway. We will do this using the strongSwan S2S VPN application from the Yandex Cloud Apps folder. This application automates the deployment and basic configuration of your IPsec tunnel, allowing you to:
- Quickly create a secure channel over the public internet.
- Encrypt traffic between subnets.
- Integrate cloud resources into the corporate network while maintaining control over routing.
Note
This off-the-shelf application automates infrastructure deployment in Yandex Cloud.
When using strongSwan S2S VPN at a remote location (your on-premises data center, branch office, or another cloud), manual configuration is required.
To deploy a secure connection:
- Get your cloud ready.
- Create a service account.
- Create a cloud network.
- Reserve a public static IP address.
- Create an SSH key pair.
- Deploy the application.
If you no longer need the resources you created, delete them.
Required paid resources
The cost of infrastructure deployment for this solution includes:
- Fee for a continuously running VM (see Yandex Compute Cloud pricing).
- Fee for a static external IP address (see Yandex Virtual Private Cloud pricing).
- Fee for outbound traffic (see Yandex Virtual Private Cloud pricing).
Get your cloud ready
Sign up for Yandex Cloud and create a billing account:
- Navigate to the management console and log in to Yandex Cloud or create a new account.
- On the Yandex Cloud Billing page, make sure you have a billing account linked and it has the
ACTIVEorTRIAL_ACTIVEstatus. If you do not have a billing account, create one and link a cloud to it.
If you have an active billing account, you can create or select a folder for your infrastructure on the cloud page.
Learn more about clouds and folders here.
Create a service account
Create an s2s-vpn-sa service account to automatically create resources when you install the application. Assign the resource-manager.admin, iam.admin, compute.admin, and vpc.admin roles to it.
-
Navigate to Identity and Access Management.
-
Click Create service account.
-
Name the service account:
s2s-vpn-sa. -
Click Add role and select these roles:
resource-manager.adminiam.admincompute.adminvpc.admin
-
Click Create.
If you do not have the Yandex Cloud CLI yet, install and initialize it.
The folder used by default is the one specified when creating the CLI profile. To change the default folder, use the yc config set folder-id <folder_ID> command. You can also specify a different folder for any command using --folder-name or --folder-id. If you access a resource by its name, the search will be limited to the default folder. If you access a resource by its ID, the search will be global, i.e., through all folders based on access permissions.
-
Create a service account named
s2s-vpn-sa:yc iam service-account create --name s2s-vpn-saResult:
id: nfersamh4sjq********
folder_id: b1gc1t4cb638********
created_at: "2023-03-21T10:36:29.726397755Z"
name: s2s-vpn-sa
Save the ID of the
s2s-vpn-saservice account (id) and the ID of the folder where you created it (folder_id). -
Assign the
resource-manager.admin,iam.admin,compute.admin, andvpc.adminroles for the folder to the service account:yc resource-manager folder add-access-binding <folder_ID> \ --role resource-manager.admin \ --subject serviceAccount:<service_account_ID> yc resource-manager folder add-access-binding <folder_ID> \ --role iam.admin \ --subject serviceAccount:<service_account_ID> yc resource-manager folder add-access-binding <folder_ID> \ --role compute.admin \ --subject serviceAccount:<service_account_ID> yc resource-manager folder add-access-binding <folder_ID> \ --role vpc.admin \ --subject serviceAccount:<service_account_ID>Result:
done (1s)
To create a service account, use the create method for the ServiceAccount resource or the ServiceAccountService/Create gRPC API call.
To assign the roles for a folder to a service account, use the setAccessBindings method for the ServiceAccount resource or the ServiceAccountService/SetAccessBindings gRPC API call.
Create a cloud network
Create a cloud network to host the VM.
- Navigate to Virtual Private Cloud.
- At the top right, click Create network.
- In the Name field, specify
s2s-vpn-network. - In the Advanced field, disable Create subnets.
- Click Create network.
Run this command:
yc vpc network create s2s-vpn-network
Result:
id: enp1gg8kr3pv********
folder_id: b1gt6g8ht345********
created_at: "2023-12-20T20:08:11Z"
name: s2s-vpn-network
default_security_group_id: enppne4l2eg5********
To create a cloud network, use the create REST API method for the Network resource or the NetworkService/Create gRPC API call.
Reserve a public static IP address
Reserve a static public IP address for the VM the application will be installed on.
- Navigate to Virtual Private Cloud.
- In the left-hand panel, select Public IP addresses and click Reserve public IP address.
- In the window that opens, select
ru-central1-bin the Availability zone field and click ** Reserve**.
Create an SSH key pair
To connect to a VM over SSH, you will need a key pair: the public key resides on the VM, and the private one is kept by the user. This method is more secure than with a username and password.
Note
SSH connections using a login and password are disabled by default on public Linux images that are provided by Yandex Cloud.
To create a key pair:
-
Open the terminal.
-
Use the
ssh-keygencommand to create a new key:ssh-keygen -t ed25519 -C "<optional_comment>"You can specify an empty string in the
-Cparameter to avoid adding a comment, or you may not specify the-Cparameter at all: in this case, a default comment will be added.After running this command, you will be prompted to specify the name and path to the key files, as well as enter the password for the private key. If you only specify the name, the key pair will be created in the current directory. The public key will be saved in a file with the
.pubextension, while the private key, in a file without extension.By default, the command prompts you to save the key under the
id_ed25519name in the following directory:/home/<username>/.ssh. If there is already an SSH key namedid_ed25519in this directory, you may accidentally overwrite it and lose access to the resources it is used in. Therefore, you may want to use unique names for all SSH keys.
If you do not have OpenSSH installed yet, follow this guide to install it.
-
Run
cmd.exeorpowershell.exe(make sure to update PowerShell before doing so). -
Use the
ssh-keygencommand to create a new key:ssh-keygen -t ed25519 -C "<optional_comment>"You can specify an empty string in the
-Cparameter to avoid adding a comment, or you may not specify the-Cparameter at all: in this case, a default comment will be added.After running this command, you will be prompted to specify the name and path to the key files, as well as enter the password for the private key. If you only specify the name, the key pair will be created in the current directory. The public key will be saved in a file with the
.pubextension, while the private key, in a file without extension.By default, the command prompts you to save the key under the
id_ed25519name in the following folder:C:\Users\<username>/.ssh. If there is already an SSH key namedid_ed25519in this directory, you may accidentally overwrite it and lose access to the resources it is used in. Therefore, you may want to use unique names for all SSH keys.
Create keys using the PuTTY app:
-
Download and install PuTTY.
-
Add the folder with PuTTY to the
PATHvariable:- Click Start and type Change system environment variables in the Windows search bar.
- Click Environment Variables... at the bottom right.
- In the window that opens, find the
PATHparameter and click Edit. - Add your folder path to the list.
- Click OK.
-
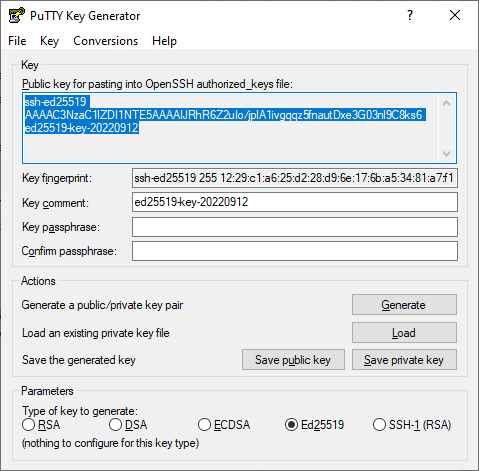
Launch the PuTTYgen app.
-
Select EdDSA as the pair type to generate. Click Generate and move the cursor in the field above it until key creation is complete.
-
In Key passphrase, enter a strong password. Enter it again in the field below.
-
Click Save private key and save the private key. Do not share its key phrase with anyone.
-
Click Save public key and save the public key to a file named
<key_name>.pub.
Deploy the application
Install the application
As a result of the installation, the following Yandex Cloud resources will be automatically created:
Warning
Make sure the target cloud has not reached its quota:
- Number of service accounts
- Number of subnets
- Number of static public IP addresses
- Number of routing tables
- Number of static routes
- Number of security groups
- Number of instances
- Number of disks
- Total SSD capacity
- Total RAM for instances
If any quota has been used up, create a quota increase request and wait for it to be granted.
-
Navigate to Cloud Apps.
-
In the left-hand panel, select Marketplace.
-
In the Search products field, type
strongswan, select strongSwan S2S VPN, and click Use. -
In the window that opens, specify the following:
- Name:
s2s-vpn. - Service account:
s2s-vpn-sa. - VPC network:
s2s-vpn-network. - New subnet CIDR:
10.130.0.0/24. - New subnet zone:
ru-central1-b. - Remote gateway IP address: IP address of the remote VPN gateway that will be added to the strongSwan configuration.
- Remote subnet CIDRs: Comma-separated list of subnets as CIDRs that will be automatically added to the route table.
- SSH key: Contents of the public SSH key created earlier.
- IPsec IKE Proposal:
aes128gcm16-prfsha256-ecp256. - IPsec ESP Proposal:
aes128gcm16. - IPsec PSK: IPsec Pre-Shared Key (PSK) that will be specified in the strongSwan configuration.
- Name:
-
Click Install and wait for the installation to complete.
Bind the route table
To route traffic between a cloud and remote networks through the VPN tunnel, bind the route table and subnet.
- Navigate to Virtual Private Cloud.
- In the left-hand panel, select Subnets.
- In the line of the automatically created
ipsec-sgw-...subnet, click → Link routing table and select the automatically createdipsec-sgw-...table. - Click Link.
Run this command:
yc vpc subnet update <name_of_automatically_created_subnet> \
  --route-table-name=<name_of_automatically_created_table>
Result:
id: e9b6n3jj3gh6********
folder_id: b1g681qpemb4********
created_at: "2024-05-19T13:24:58Z"
name: ipsec-sgw-ru-central1-b
network_id: enppoggov6ub********
zone_id: ru-central1-b
v4_cidr_blocks:
  - 10.1.0.0/16
route_table_id: enp4v8foko6s********
dhcp_options: {}
To associate a route table with a subnet, use the update REST API method for the Subnet resource or the SubnetService/Update gRPC API call.
Warning
The API method will assign default values to all the parameters of the object you are modifying unless you explicitly provide them in your request. To avoid this, list the settings you want to change in the updateMask parameter as a single comma-separated string.
Configure the VM
After you install the application, perform the final configuration of the IPsec gateway on the VM.
-
Connect to the VM over SSH. To this using the
adminusername and the private SSH key you created earlier. -
Get administrator permissions:
sudo su -
Go to the administrator's home folder and run the script:
cd /root
./update.sh
The system will create the
ipsec-*.txtfiles in the/rootfolder. You can use these files as an example when configuring a connection on a remote endpoint.Tip
If the IP ranges of Yandex Cloud and the remote network match, you may need to use Source NAT. Do it by running this command:
iptables \
  -t nat \
  -A POSTROUTING \
  -s <local_subnet> \
  -d <remote_subnet> \
  -j SNAT \
  --to-source <new_address>
How to delete the resources you created
To stop paying for the resources you created:
-
Uninstall strongSwan S2S VPN:
-
Navigate to Cloud Apps.
-
In the line with the application, click → Delete and confirm the deletion.
Deleting the application will delete all resources associated with it.
-
-
Delete the route table.
-
Delete the service account.
-
Delete the static public IP address.
-
Delete the cloud network.