Running a Docker image on a VM using Terraform
To run a Docker image on a VM using a Yandex Container Registry registry via Terraform:
- Get your cloud ready.
- Create the infrastructure.
- Build and push the Docker image to Container Registry.
- Push the Docker image to the VM.
- Check the result.
If you no longer need the resources you created, delete them.
Get your cloud ready
Sign up for Yandex Cloud and create a billing account:
- Navigate to the management console and log in to Yandex Cloud or create a new account.
- On the Yandex Cloud Billing page, make sure you have a billing account linked and it has the
ACTIVEorTRIAL_ACTIVEstatus. If you do not have a billing account, create one and link a cloud to it.
If you have an active billing account, you can create or select a folder for your infrastructure on the cloud page.
Learn more about clouds and folders here.
Required paid resources
The infrastructure support cost includes:
- Fee for a continuously running VM (see Yandex Compute Cloud pricing).
- Fee for a dynamic or static public IP address (see Yandex Virtual Private Cloud pricing).
- Fee for storing a Docker image in the registry and outgoing traffic (see Yandex Container Registry pricing).
Create an SSH key pair
Prepare an SSH key for VM access.
-
Open the terminal.
-
Use the
ssh-keygencommand to create a new key:ssh-keygen -t ed25519 -C "<optional_comment>"You can specify an empty string in the
-Cparameter to avoid adding a comment, or you may not specify the-Cparameter at all: in this case, a default comment will be added.After running this command, you will be prompted to specify the name and path to the key files, as well as enter the password for the private key. If you only specify the name, the key pair will be created in the current directory. The public key will be saved in a file with the
.pubextension, while the private key, in a file without extension.By default, the command prompts you to save the key under the
id_ed25519name in the following directory:/home/<username>/.ssh. If there is already an SSH key namedid_ed25519in this directory, you may accidentally overwrite it and lose access to the resources it is used in. Therefore, you may want to use unique names for all SSH keys.
If you do not have OpenSSH installed yet, follow this guide to install it.
-
Run
cmd.exeorpowershell.exe(make sure to update PowerShell before doing so). -
Use the
ssh-keygencommand to create a new key:ssh-keygen -t ed25519 -C "<optional_comment>"You can specify an empty string in the
-Cparameter to avoid adding a comment, or you may not specify the-Cparameter at all: in this case, a default comment will be added.After running this command, you will be prompted to specify the name and path to the key files, as well as enter the password for the private key. If you only specify the name, the key pair will be created in the current directory. The public key will be saved in a file with the
.pubextension, while the private key, in a file without extension.By default, the command prompts you to save the key under the
id_ed25519name in the following folder:C:\Users\<username>/.ssh. If there is already an SSH key namedid_ed25519in this directory, you may accidentally overwrite it and lose access to the resources it is used in. Therefore, you may want to use unique names for all SSH keys.
Create keys using the PuTTY app:
-
Download and install PuTTY.
-
Add the folder with PuTTY to the
PATHvariable:- Click Start and type Change system environment variables in the Windows search bar.
- Click Environment Variables... at the bottom right.
- In the window that opens, find the
PATHparameter and click Edit. - Add your folder path to the list.
- Click OK.
-
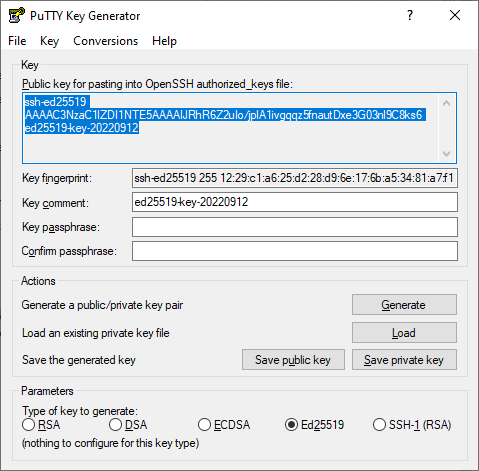
Launch the PuTTYgen app.
-
Select EdDSA as the pair type to generate. Click Generate and move the cursor in the field above it until key creation is complete.
-
In Key passphrase, enter a strong password. Enter it again in the field below.
-
Click Save private key and save the private key. Do not share its key phrase with anyone.
-
Click Save public key and save the public key to a file named
<key_name>.pub.
Warning
Store your private key securely, as you will not be able to connect to the VM without it.
Install and configure Docker
-
Install Docker Engine. Use this guide to install and run Docker for your operating system.
-
After the installation is complete, add the current user to the
dockergroup:sudo groupadd docker sudo usermod -aG docker $USER newgrp docker
For groups to update successfully, you may need to log back into the OS or reboot the computer.
For information on additional Docker settings in Linux, see this developer guide.
If you are working on a device with a GUI, you can also install Docker Desktop for Linux.
Download and install the Docker Desktop distribution for macOS. For more information, see this developer guide.
-
Download and install the Docker Desktop distribution for Windows.
-
After the installation is complete, add the current user to the
docker-usersgroup:-
Run Computer Management as administrator:
compmgmt.msc -
Expand the (Local) Computer Management menu, then go Utilities → Local Users and Groups → Groups and open the
docker-usersgroup. -
Click Add and add the required user to the group.
-
Click OK.
-
-
Run Docker Desktop and make sure the app's status is
running.
For information on additional Docker settings in Windows, see this developer guide.
Create the infrastructure
With Terraform, you can quickly create a cloud infrastructure in Yandex Cloud and manage it using configuration files. These files store the infrastructure description written in HashiCorp Configuration Language (HCL). If you change the configuration files, Terraform automatically detects which part of your configuration is already deployed, and what should be added or removed.
Terraform is distributed under the Business Source License. The Yandex Cloud provider for Terraform is distributed under the MPL-2.0 license.
For more information about the provider resources, see the guides on the Terraform website or its mirror.
To create an infrastructure using Terraform:
-
Install Terraform, get the credentials, and specify the source for installing the Yandex Cloud provider (see Configure your provider, Step 1).
-
Set up your infrastructure description files:
Ready-made configurationManually-
Clone the repository with configuration files:
git clone https://github.com/yandex-cloud-examples/yc-run-docker-on-vm.git -
Navigate to the repository directory. Make sure it contains the
run-docker-on-vm-config.tffile with the new infrastructure configuration.
-
Create a folder for the infrastructure description file.
-
Create a configuration file named
run-docker-on-vm.tfin the folder:Contents of the run-docker-on-vm.tf file
# Declaring variables for confidential parameters

locals {
  zone             = "<default_availability_zone>"
  username         = "<VM_user_name>"
  ssh_key_path     = "<path_to_public_SSH_key>"
  target_folder_id = "<ID_of_folder_to_place_VM_in>"
  registry_name    = "<registry_name>"
  sa_name          = "<service_account_name>"
  network_name     = "<cloud_network_name>"
  subnet_name      = "<subnet_name>"
  vm_name          = "<VM_name>"
  image_id         = "<image_ID>"
}

# Configuring a provider

terraform {
  required_providers {
    yandex    = {
      source  = "yandex-cloud/yandex"
      version = ">= 0.47.0"
    }
  }
}

provider "yandex" {
  zone = local.zone
}

# Creating a Container Registry repository

resource "yandex_container_registry" "my-registry" {
  name       = local.registry_name
  folder_id  = local.target_folder_id
}

# Creating a service account

resource "yandex_iam_service_account" "registry-sa" {
  name      = local.sa_name
  folder_id = local.target_folder_id
}

# Assigning roles to a service account

resource "yandex_resourcemanager_folder_iam_member" "registry-sa-role-images-puller" {
  folder_id = local.target_folder_id
  role      = "container-registry.images.puller"
  member    = "serviceAccount:${yandex_iam_service_account.registry-sa.id}"
}

# Creating a cloud network

resource "yandex_vpc_network" "docker-vm-network" {
  name = local.network_name
}

# Creating a subnet

resource "yandex_vpc_subnet" "docker-vm-network-subnet-a" {
  name           = local.subnet_name
  zone           = local.zone
  v4_cidr_blocks = ["192.168.1.0/24"]
  network_id     = yandex_vpc_network.docker-vm-network.id
}

# Creating a boot disk

resource "yandex_compute_disk" "boot-disk" {
  name     = "bootvmdisk"
  type     = "network-hdd"
  zone     = local.zone
  size     = "10"
  image_id = local.image_id
}

# Creating a VM instance

resource "yandex_compute_instance" "docker-vm" {
  name               = local.vm_name
  platform_id        = "standard-v3"
  zone               = local.zone
  service_account_id = "${yandex_iam_service_account.registry-sa.id}"

  resources {
    cores  = 2
    memory = 2
  }

  boot_disk {
    disk_id = yandex_compute_disk.boot-disk.id
  }

  network_interface {
    subnet_id = "${yandex_vpc_subnet.docker-vm-network-subnet-a.id}"
    nat       = true
  }

  metadata = {
    user-data = "#cloud-config\nusers:\n  - name: ${local.username}\n    groups: sudo\n    shell: /bin/bash\n    sudo: 'ALL=(ALL) NOPASSWD:ALL'\n    ssh_authorized_keys:\n      - ${file("${local.ssh_key_path}")}"
  }
}
For more on the properties of resources used in Terraform, see these provider guides:
-
-
Under
locals, set the following parameters for the new resources:zone: Availability zone the VM will reside in.username: VM user name.ssh_key_path: Path to the public SSH key to authenticate the user on the VM. For more information, see Creating an SSH key pair.target_folder_id: ID of the folder to host the VM.registry_name: Name of the registry in Container Registry.sa_name: Service account name.network_name: Name of the cloud network.subnet_name: Subnet name.vm_name: VM name.image_id: ID of the image to create the VM from. For more information, see Getting a list of public images.
-
Create the resources:
-
In the terminal, navigate to the configuration file directory.
-
Make sure the configuration is correct using this command:
terraform validateIf the configuration is valid, you will get this message:
Success! The configuration is valid. -
Run this command:
terraform planYou will see a list of resources and their properties. No changes will be made at this step. Terraform will show any errors in the configuration.
-
Apply the configuration changes:
terraform apply -
Type
yesand press Enter to confirm the changes.
-
After creating the infrastructure, build and push the Docker image to Container Registry.
Build and push the Docker image to Container Registry
The example below is for MacOS and Linux. To run it on Windows, check the details on working with Bash in Microsoft Windows.
-
Open the terminal.
-
To make command execution easier, add the following variables:
-
Username and your VM's public IP to the
${PUBLIC_IP}variable:export PUBLIC_IP=<username>@<VM_public_IP_address> -
ID of the previously created registry in
crpc9qeoft23********format to the${REGISTRY_ID}variable:export REGISTRY_ID=<registry_ID>
-
-
Authenticate as yourself:
OAuth tokenIAM tokenDocker credential helperOAuth token authentication is deprecated
This authentication method will no longer be supported. Consider using IAM tokens or API keys.
-
If you do not have an OAuth token yet, get one by following this link.
-
Run this command:
echo <OAuth_token> | docker login --username oauth --password-stdin cr.yandexResult:
Login Succeeded
Note
The IAM token has a short lifetime of up to 12 hours. This makes it a good method for applications that automatically request an IAM token.
-
Get an IAM token.
-
Run this command:
yc iam create-token | docker login --username iam --password-stdin cr.yandexResult:
...
Login Succeeded
-
If you do not have a CLI profile yet, create one.
-
Configure Docker to use
docker-credential-yc:yc container registry configure-dockerResult:
Credential helper is configured in '/home/<user>/.docker/config.json'The current user’s profile stores the settings.
Warning
The credential helper only works if you use Docker without
sudo. To learn how to configure Docker to run under the current user withoutsudo, see the official documentation. -
Make sure that Docker is configured.
The following line must appear in the
/home/<user>/.docker/config.jsonconfiguration file:"cr.yandex": "yc" -
You can now use Docker, for example, to push Docker images. You do not need to run the
docker logincommand for that.
-
-
Create a file called Dockerfile:
touch .dockerfile -
Open Dockerfile in a text editor, e.g.:
nano .dockerfile -
Add the lines below to the file:
FROM ubuntu:latest CMD echo "Hi, I'm inside" -
Build the Docker image:
docker build . -t cr.yandex/${REGISTRY_ID}/ubuntu:hello -f .dockerfileResult:
... Successfully built b68ee9b6b1af Successfully tagged cr.yandex/crpmnjr98tm5********/ubuntu:hello -
Push the built Docker image to Container Registry:
docker push cr.yandex/${REGISTRY_ID}/ubuntu:helloResult:
The push refers to repository [cr.yandex/crpc9qeoft23********/ubuntu]
cc9d18e90faa: Pushed
0c2689e3f920: Pushed
47dde53750b4: Pushed
hello: digest: sha256:42068479274f1d4c7ea095482430dcba24dcfe8c23ebdf6d32305928******** size: 943
Push the Docker image to the VM
-
Use SSH to connect to the VM.
-
On the VM, install and configure Docker.
-
Authenticate under the service account tied to the machine:
curl --header Metadata-Flavor:Google 169.254.169.254/computeMetadata/v1/instance/service-accounts/default/token | \
cut -f1 -d',' | \
cut -f2 -d':' | \
tr -d '"' | \
docker login --username iam --password-stdin cr.yandex
Result:
Login Succeeded -
To make it easier to run commands, add the ID of the registry you created earlier to the
${REGISTRY_ID}variable:export REGISTRY_ID=<registry_ID> -
Download the Docker image to the VM:
docker pull cr.yandex/${REGISTRY_ID}/ubuntu:helloResult:
hello: Pulling from crpc9qeoft23********/ubuntu
6a5697faee43: Pulling fs layer
ba13d3bc422b: Pulling fs layer
...
Digest: sha256:42068479274f1d4c7ea095482430dcba24dcfe8c23ebdf6d32305928********
Status: Downloaded newer image for cr.yandex/crpc9qeoft23********/ubuntu:hello
cr.yandex/crpc9qeoft23********/ubuntu:hello
Check the result
Run the Docker image on the VM:
docker run cr.yandex/${REGISTRY_ID}/ubuntu:hello
Result:
Hi, I'm inside
How to delete the resources you created
To delete the infrastructure and stop paying for the resources you created:
-
Open the
run-docker-on-vm-config.tffile and delete your infrastructure description from it. -
Apply the changes:
-
In the terminal, navigate to the configuration file directory.
-
Make sure the configuration is correct using this command:
terraform validateIf the configuration is valid, you will get this message:
Success! The configuration is valid. -
Run this command:
terraform planYou will see a list of resources and their properties. No changes will be made at this step. Terraform will show any errors in the configuration.
-
Apply the configuration changes:
terraform apply -
Type
yesand press Enter to confirm the changes.
-