Connecting to a Linux VM over SSH

To connect to a VM via SSH, you need a key pair with the public key located on the VM and the private key kept by the user. This method is more secure than connecting with a username and password.
To enable another user to connect to your VM, add an SSH key for them by following this guide.
Note
When creating a VM accessible via OS Login, specify SSH keys in the metadata. This way, you will be able to connect to the VM via SSH even if you disable OS Login access for it.
To connect to a Linux VM via SSH:
- Create an SSH key pair.
- Copy the public key to the SSH key field on the VM creation page.
- Connect to the VM.
Creating an SSH key pair
-
In the management console, select the folder where you want to create your VM.
-
Navigate to Compute Cloud.
-
In the left-hand panel, select Virtual machines.
-
Click Create virtual machine.
-
Under Access, click Add key.
-
In the window that opens, select
Generate keyand click Add.When adding a new SSH key, an archive containing the key pair will be created and downloaded. In Linux or macOS-based operating systems, unpack the archive to the
/home/<user_name>/.sshdirectory. In Windows, unpack the archive to theC:\Users\<user_name>/.sshdirectory. You do not need additionally enter the public key in the management console.The system will add the SSH key to your organization user profile. If the organization has disabled the ability for users to add SSH keys to their profiles, the added public SSH key will only be saved in the user profile inside the newly created resource.
UNPROTECTED PRIVATE KEY FILE warning
On Unix-like systems, after you unpack a private key to the .ssh directory, the key gets permissions that are too high. This causes the UNPROTECTED PRIVATE KEY FILE warning when connecting to the VM. To reduce the permissions, run this command:
chmod 600 <path_to_private_key_file>
-
Open the terminal.
-
Use the
ssh-keygencommand to create a new key:ssh-keygen -t ed25519 -C "<optional_comment>"You can specify an empty string in the
-Cparameter to avoid adding a comment, or you may not specify the-Cparameter at all: in this case, a default comment will be added.After running this command, you will be prompted to specify the name and path to the key files, as well as enter the password for the private key. If you only specify the name, the key pair will be created in the current directory. The public key will be saved in a file with the
.pubextension, while the private key, in a file without extension.By default, the command prompts you to save the key under the
id_ed25519name in the following directory:/home/<username>/.ssh. If there is already an SSH key namedid_ed25519in this directory, you may accidentally overwrite it and lose access to the resources it is used in. Therefore, you may want to use unique names for all SSH keys.
If you do not have OpenSSH installed yet, follow this guide to install it.
-
Run
cmd.exeorpowershell.exe(make sure to update PowerShell before doing so). -
Use the
ssh-keygencommand to create a new key:ssh-keygen -t ed25519 -C "<optional_comment>"You can specify an empty string in the
-Cparameter to avoid adding a comment, or you may not specify the-Cparameter at all: in this case, a default comment will be added.After running this command, you will be prompted to specify the name and path to the key files, as well as enter the password for the private key. If you only specify the name, the key pair will be created in the current directory. The public key will be saved in a file with the
.pubextension, while the private key, in a file without extension.By default, the command prompts you to save the key under the
id_ed25519name in the following folder:C:\Users\<username>/.ssh. If there is already an SSH key namedid_ed25519in this directory, you may accidentally overwrite it and lose access to the resources it is used in. Therefore, you may want to use unique names for all SSH keys.
Create keys using the PuTTY app:
-
Download and install PuTTY.
-
Add the folder with PuTTY to the
PATHvariable:- Click Start and type Change system environment variables in the Windows search bar.
- Click Environment Variables... at the bottom right.
- In the window that opens, find the
PATHparameter and click Edit. - Add your folder path to the list.
- Click OK.
-
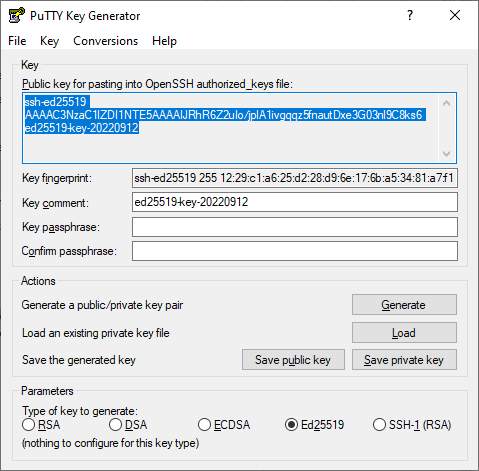
Launch the PuTTYgen app.
-
Select EdDSA as the pair type to generate. Click Generate and move the cursor in the field above it until key creation is complete.
-
In Key passphrase, enter a strong password. Enter it again in the field below.
-
Click Save private key and save the private key. Do not share its key phrase with anyone.
-
Click Save public key and save the public key to a file named
<key_name>.pub.
Warning
Store your private key securely, as you will not be able to connect to the VM without it.
Copying a public key to the clipboard
The previously created public key has the following format:
<key_type> <public_key_body> <optional_comment>
Here is an example:
ssh-ed25519 AAAAC3NzaC1lZDI1NTE5ABFLIFyapYheN7OZNhTaNqEHefjmU5mtzK********+gRPCz user@Desktop
Tip
The <optional_comment> section is not used when connecting over SSH, so you can skip it.
Open the <key_name>.pub file using any text editor, such as Notepad, and copy the key from it. The key must be written as a single line (without returns or line breaks).
You can also copy the key using the command line:
In the terminal, use one of the following methods to copy the key:
-
Manually. To do this, output the file content to the screen:
cat <key_file_path>/<key_name>.pubThis will display the public key. Copy it to the clipboard.
-
Use the appropriate command:
- For Linux:
cat <key_file_path>/<key_name>.pub | xclip -selection clipboard. - For macOS:
cat <key_file_path>/<key_name>.pub | pbcopy.
The above-mentioned commands copy the entire content of the file, including the optional comment.
- For Linux:
-
Run
cmd.exeorpowershell.exe. -
Use one of the following methods to copy the key:
-
Manually. To do this, output the file content to the screen:
type <key_file_path>\<key_name>.pubThis will display the public key. Copy it to the clipboard.
-
Use the appropriate command:
type <key_file_path>\<key_name>.pub | clipThe above-mentioned command copies the entire content of the file, including the optional comment.
-
After that, paste the public key into the SSH key field when creating a VM in the management console.
Connecting to a VM
You can connect to a VM with the RUNNING status over SSH. It may take some time for all services to initialize after the VM starts. If you get a connection error, try again in a few minutes.
The VM security groups must allow incoming TCP traffic on port 22.
To connect, specify the VM public IP address. You can find out the public IP address in the management console: on the VM page, go to the Network section and find the Public IPv4 address field. If you created your VM with an internal IP address only, assign it a public IP address.
You can also use internal IP addresses and FQDNs to establish an SSH connection between VMs within a single cloud network in Yandex Cloud.
In the terminal, run this command:
ssh <username>@<VM_public_IP_address>
Where:
-
<user_name>: VM account user name. If you created your VM via the CLI,yc-useris the default user. -
<VM_public_IP_address>: VM public IP address for internet access.You can learn the public IP address of a VM from the Public IPv4 address field of the network interface under Network on the VM page in the management console or by using the
yc compute instance get <VM_name>YC CLI command.
If you have multiple private keys, specify the one you need:
ssh -i <key_path/key_file_name> <username>@<VM_public_IP_address>
If this is your first time connecting to the VM, you will get this unknown host warning:
The authenticity of host '51.250.83.243 (51.250.83.243)' can't be established.
ED25519 key fingerprint is SHA256:6Mjv93NJDCaf/vu3NYwiLQK4tKI+4cfLtkd********.
This key is not known by any other names.
Are you sure you want to continue connecting (yes/no/[fingerprint])?
Tip
Before entering yes, make sure that the key fingerprint (fingerprint) you see in the terminal matches the SSH key fingerprint on the VM. This will protect the connection from server spoofing.
View SSH key fingerprint on the VM
- Get the VM serial port output.
- In the output, find the section that starts with the
BEGIN SSH HOST KEY FINGERPRINTSline and ends with theEND SSH HOST KEY FINGERPRINTSline. In this section, for each encryption algorithm (ED25519,ECDSA, andRSA) there is a fingerprint inSHA256:...format. - Compare the fingerprint for the algorithm of interest with the fingerprint shown by the SSH client in the terminal. The algorithm is stated in the SSH client message.
If the fingerprints match, proceed with the connection. If the fingerprints differ, cancel the connection and check the VM and network settings.
Type yes into the terminal and press Enter.
Make sure the Windows account has read access to the key folder.
To connect to the VM, run the following command in the command line:
ssh <username>@<VM_public_IP_address>
Where:
-
<username>: VM account user name. If you created your VM via the CLI,yc-useris the default user. -
<VM_public_IP_address>: VM public IP address for internet access.You can learn the public IP address of a VM from the Public IPv4 address field of the network interface under Network on the VM page in the management console or by using the
yc compute instance get <VM_name>YC CLI command.
If you have multiple private keys, specify the one you need:
ssh -i <key_path\key_file_name> <username>@<VM_public_IP_address>
If this is your first time connecting to the VM, you will get this unknown host warning:
The authenticity of host '89.169.132.223 (89.169.132.223)' can't be established.
ECDSA key fingerprint is SHA256:DfjfFB+in0q0MGi0HnqLNMdHssLfm1yRanB********.
Are you sure you want to continue connecting (yes/no/[fingerprint])?
Tip
Before entering yes, make sure that the key fingerprint (fingerprint) you see in the terminal matches the SSH key fingerprint on the VM. This will protect the connection from server spoofing.
View SSH key fingerprint on the VM
- Get the VM serial port output.
- In the output, find the section that starts with the
BEGIN SSH HOST KEY FINGERPRINTSline and ends with theEND SSH HOST KEY FINGERPRINTSline. In this section, for each encryption algorithm (ED25519,ECDSA, andRSA) there is a fingerprint inSHA256:...format. - Compare the fingerprint for the algorithm of interest with the fingerprint shown by the SSH client in the terminal. The algorithm is stated in the SSH client message.
If the fingerprints match, proceed with the connection. If the fingerprints differ, cancel the connection and check the VM and network settings.
Type yes in the command line and press Enter.
Establish a connection using PuTTY:
- Run Pageant.
- Right-click the Pageant icon in the task bar.
- In the context menu, select Add key.
- Select a PuTTY-generated private key in
.ppkformat. Enter the password for this key, if it is set.
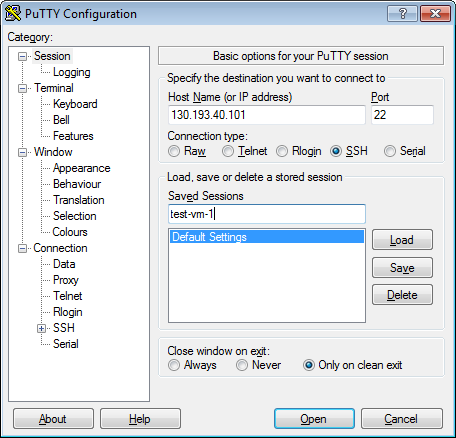
- Run PuTTY.
-
In the Host Name (or IP address) field, enter the public IP address of the VM you want to connect to. Specify port
22and SSH connection type.You can learn the public IP address of a VM from the Public IPv4 address field of the network interface under Network on the VM page in the management console or by using the
yc compute instance get <VM_name>YC CLI command.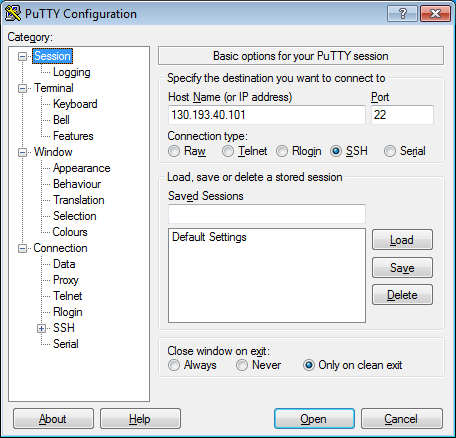
-
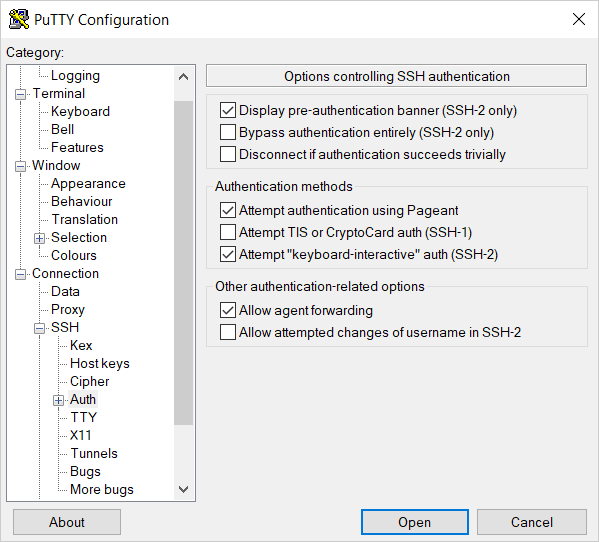
In the tree on the left, select Connection → SSH → Auth.
-
Enable Allow agent forwarding.
-
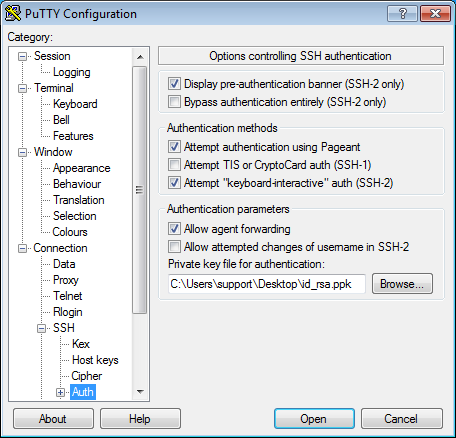
In the tree on the left, select Connection → SSH → Auth → Credentials.
-
In the Private key file for authentication field, select the private key file.
-
Go back to the Sessions menu. In the Saved sessions field, enter any name for the session and click Save. This will save the session settings under the specified name. You can use this session profile to connect with Pageant.
-
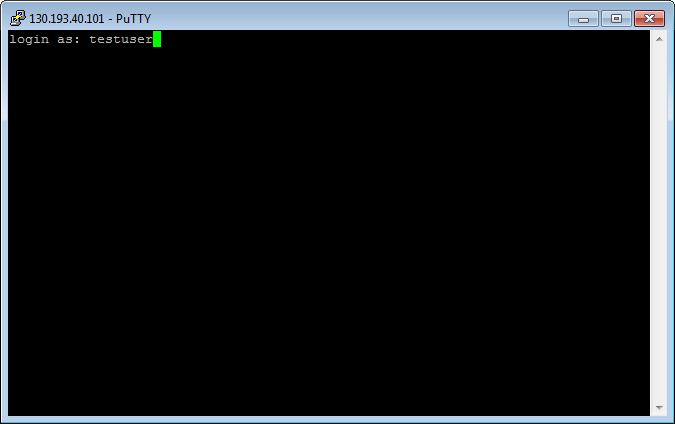
Click Open. If this is your first time connecting to the VM, you may get this unknown host warning:

Click Accept. This will open a terminal window prompting you to enter the username to use for connection. Type the username you specified when creating the VM and press Enter. If you created your VM via the CLI,
yc-useris the default user.If everything is configured correctly, a connection to the server will be established.
-
If you saved the session profile in PuTTY, you can use Pageant for future connections:
- Right-click the Pageant icon in the task bar.
- Select Saved sessions.
- In the saved sessions list, select the session you need.
- On the left-hand panel in the management console, click All services and select Compute Cloud, or find it using the search bar on the dashboard.
- Navigate to the VM you want to connect to.
- Make sure its status is
Running. If the VM is idle, click Start in the top-right corner and wait until its status changes toRunning. - Click Connect in Cloud Shell at the top right.
- Enter a username. The default login is the one specified when creating the VM.
- Paste the contents of the public SSH key file or upload the file.
- Click Connect.
This will open the Cloud Shell terminal at the bottom with an established connection to the VM over SSH.
To close the connection, click or use the exit command.
For more information on how to solve connection issues, see FAQ.
Adding SSH keys for other users
You can add SSH keys for another VM user. To do this, create a new user and add a file with the authorized keys for this user.
Tip
To configure users from within the VM, follow these steps:
-
Connect to the VM under the username you specified when creating the VM in the management console.
Note
To get info on a VM with custom metadata, run this command:
yc compute instance get --full <VM_name> -
Create a new user named
testuserand specifybashas the default shell for this user:sudo useradd -m -d /home/testuser -s /bin/bash testuser -
Switch to the new user:
sudo su - testuser -
Create a folder named
.sshin the new user's home directory:mkdir .ssh -
In the
.sshfolder, create a file namedauthorized_keys:touch .ssh/authorized_keys -
Add the new user's public key to the
authorized_keysfile:echo "<public_key>" >> /home/testuser/.ssh/authorized_keysWhere
<public_key>is the contents of the public key file for SSH access to the VM.The
authorized_keysfile lists all authorized public keys. Each key is specified on a new line in<key_type> <public_key_body> <optional_comment>format. Here is an example of a file with multiple keys:ssh-ed25519 AAAAC3NzaC1lZDI1NTE5ABFLIFyapYheN7OZNhTaNqEHefjmU5mtzK********+gRPCz user1@Desktop ssh-rsa AAAAB3NzaC1yc2EAAAADAQABAAABAQDdlxLIFyapYheN7OZNhTaNqEHefjmU5mtzK********+gRPCzxyz user2@DesktopTo add a new key, specify it on a new line at the end of the file. To preserve access for previous users, do not modify or delete the existing keys.
-
Update access permissions for the
authorized_keysfile and.sshfolder:chmod 700 ~/.ssh chmod 600 ~/.ssh/authorized_keys -
Disconnect from the VM by running
exit. -
Check the connection for the new user:
ssh testuser@<VM_public_IP_address>Where
<VM_public_IP_address>is the VM's public IP address for internet access.You can learn the public IP address of a VM from the Public IPv4 address field of the network interface under Network on the VM page in the management console or by using the
yc compute instance get <VM_name>YC CLI command.