Creating a SpeechKit Hybrid demo stand

- Get started with Yandex Cloud
- Install additional dependencies
- Prepare a repository with the Terraform configuration
- Prepare the SSH keys
- Add variables for the Terraform configuration
- Create an infrastructure using Terraform
- Set up a permanent communication channel with the Yandex Cloud server
- Perform load testing for speech recognition and synthesis
SpeechKit Hybrid enables Yandex SpeechKit speech recognition and synthesis. You can deploy your SpeechKit Hybrid demo stand using Yandex Cloud services through Terraform. This way, you can test recognition and synthesis applications hosted in Docker containers.
Creating a demo stand involves using two machines:
- Local one (in our example, it is Linux-based).
- Virtual one that meets the SpeechKit Hybrid system requirements. This VM runs Docker containers.
Our demo stand uses the Cloud Billing licensing model; this means the info on each request to SpeechKit Hybrid is sent to Yandex Cloud Billing.
To deploy your SpeechKit Hybrid demo stand:
- Get started with Yandex Cloud.
- Install additional dependencies.
- Prepare the SSH keys.
- Add variables for the Terraform configuration.
- Create the infrastructure using Terraform.
- Set up a permanent communication channel with the Yandex Cloud server.
- Perform load testing for speech recognition and synthesis.
In case of errors, use our debugging guide.
Get started with Yandex Cloud
-
Sign up for Yandex Cloud. Signing up is different for individuals and legal entities:
-
Go to the management console and log in to Yandex Cloud.
-
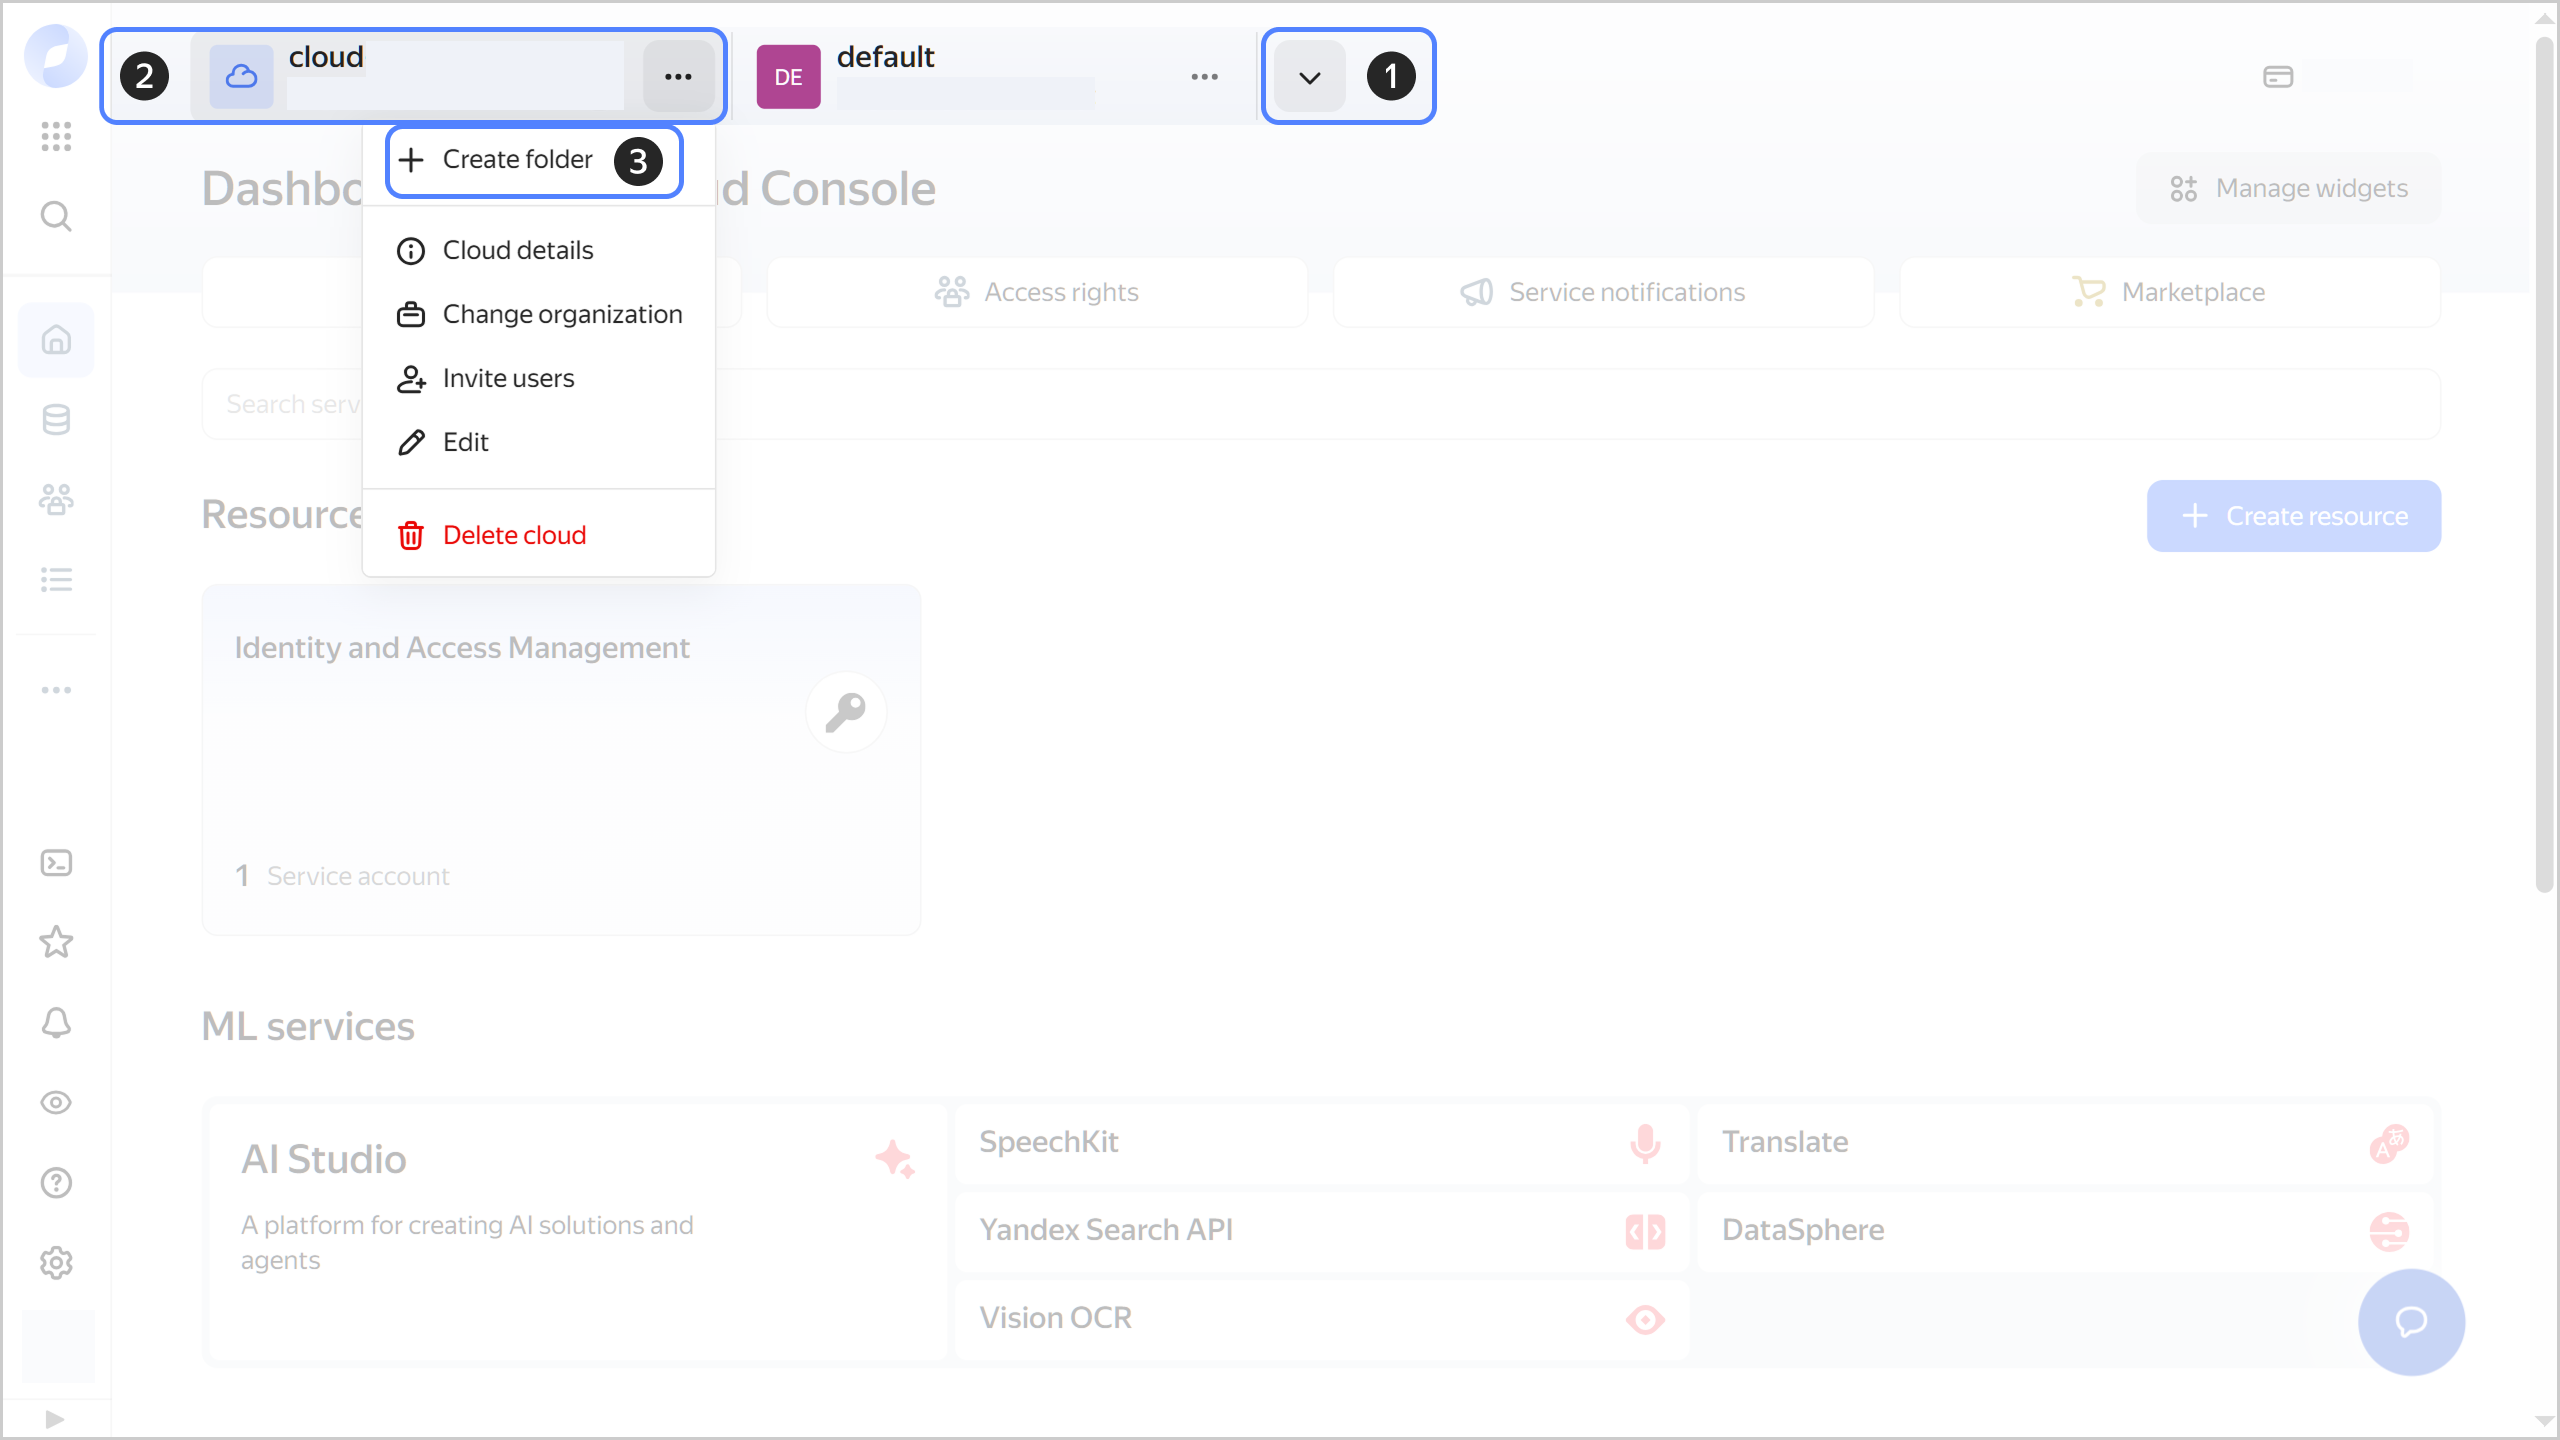
Create a folder in the management console. It will contain your resources:
-
In the management console, in the top panel, click or and select the cloud.
-
To the right of the cloud name, click .
-
Select Create folder.
-
Give your folder a name. The naming requirements are as follows:
- Length: between 3 and 63 characters.
- It can only contain lowercase Latin letters, numbers, and hyphens.
- It must start with a letter and cannot end with a hyphen.
-
Optionally, specify the description for your folder.
-
Select Create a default network. This will create a network with subnets in each availability zone. Within this network, you will also have a default security group, within which all network traffic will be allowed.
-
Click Create.

-
-
Create a service account named
sk-hybrid-example.With a service account, you can flexibly configure access permissions. For more information, see Service accounts.
-
Assign the following roles to the service account:
compute.editor: To create a Yandex Cloud VM.container-registry.images.puller: To work with Docker images in the Yandex Container Registry registry.iam.serviceAccounts.keyAdmin: To create an API key for authentication in Yandex Cloud Billing.
-
Save the ID and the secret part of the key. You cannot request them later.
-
Create a registry in Container Registry.
-
Send the registry ID to the SpeechKit team. The required containers and images will appear in your registry.
Install additional dependencies
On a local machine:
- Install the Yandex Cloud command line interface (CLI).
- Authenticate your service account via the CLI.
- Install Terraform.
Prepare a repository with the Terraform configuration
On a local machine:
-
Clone the repository with the Terraform configuration from which the required infrastructure will be deployed:
git clone git@github.com:yandex-cloud-examples/yc-speechkit-hybrid-deployment.git -
In the terminal, go to the cloned repository directory.
Prepare the SSH keys
You will need the SSH keys for authentication when connecting to the Yandex Cloud VM. To prepare them, perform the following steps on the local machine:
-
If you do not have a pair containing a public and private SSH key, create one:
ssh-keygen -t rsa -f $HOME/.ssh/speechkit_hybridAfter running this command, you will be prompted to enter the password for the private key. If you do not want to provide a password, click Enter.
-
In the directory of the cloned repository, create a symbolic link that points to the public SSH key:
ln -s ~/.ssh/<key_name>.pub ./keys/ssh-user-id-rsa.pubThis command provides the following:
~/.ssh/<key_name>.pub: File with a public SSH key. If you created the key in the previous step, specify~/.ssh/speechkit_hybrid.pub../keys/ssh-user-id-rsa.pub: Symbolic link. The path is relative to the current repository directory.
Add variables for the Terraform configuration
The yc-speechkit-hybrid-deployment repository directory contains the terraform.tfvars.template file. It is a Terraform template by which environment variables are set. These variables are provided to the CLI and Terraform when executing commands.
To set variables for the Terraform configuration, perform the following steps on the local machine:
-
Create a copy of the Terraform template in the
yc-speechkit-hybrid-deploymentrepository directory:cp ./terraform.tfvars.template ./terraform.tfvars -
In the
terraform.tfvarsfile, specify the values of the following variables:CR_REGISTRY_ID: Container Registry registry ID.BILLING_STATIC_API_KEY: Secret part of the API key.
-
(Optional) Add the
NODES_GPU_INTERRUPTIBLE = falsevariable.The Terraform configuration in the repository assumes creating an interruptible VM. You can disable interrupting using the
NODES_GPU_INTERRUPTIBLEvariable. Its default value istrue, and it is specified in thevariables.tffile in theyc-speechkit-hybrid-deploymentrepository.
Create an infrastructure using Terraform
The infrastructure required to work with SpeechKit Hybrid is described in the networks.tf and node-deploy.tf files in the yc-speechkit-hybrid-deployment repository. The networks.tf file contains the configuration of the following entities:
- Network
- Subnet
- Internal DNS zone
- Security group
The node-deploy.tf file contains the VM and SpeechKit Hybrid configuration.
Read more about entity configuration on the Terraform website and in the relevant Yandex Cloud service documentation.
To create the infrastructure, perform the following steps on the local machine:
-
In the terminal, go to the
yc-speechkit-hybrid-deploymentrepository directory. -
Get the
sk-hybrid-exampleservice account authentication credentials You can add the data to environment variables or specify this data in themain.tffile underprovider "yandex". -
Configure and initialize the Terraform providers.
The repository uses the
main.tffile as a configuration file with provider settings, so there is no need to recreate such a file. -
Validate your Terraform configuration files using this command:
terraform validate -
Create an infrastructure:
-
Run this command to view the planned changes:
terraform planIf you described the configuration correctly, the terminal will display a list of the resources to update and their parameters. This is a verification step that does not apply changes to your resources.
-
If everything looks correct, apply the changes:
-
Run this command:
terraform apply -
Confirm updating the resources.
-
Wait for the operation to complete.
-
All the required resources will be created in the specified folder. You can check resource availability and their settings in the management console.
-
Set up a permanent communication channel with the Yandex Cloud server
To work according to the Cloud Billing licensing model, ensure network connectivity between the Yandex Cloud Billing billing.datasphere.yandexcloud.net:443 node and the VM on which SpeechKit Hybrid is deployed. To check the node for availability:
-
On the local machine, get the public IP address of the created VM:
yc compute instance listThe public address will be needed to connect to the VM.
Result example:
+-----------+-------------------------------+---------------+---------+-------------+--------------+
|     ID    |              NAME             |    ZONE ID    | STATUS  | EXTERNAL IP | INTERNAL IP  |
+-----------+-------------------------------+---------------+---------+-------------+--------------+
| fhmjvr*** | sk-hybrid-compose-example-*** | ru-central1-a | RUNNING | 158.160.*** | 192.168.***  |
| ...                                                                                              |
+-----------+-------------------------------+---------------+---------+-------------+--------------+
The public address is specified in the
EXTERNAL IPfield. -
ssh <username>@<VM_public_IP_address>Where
<username>is the VM account username. -
Run this command:
nc -vz billing.datasphere.yandexcloud.net 443If the node is available over the network, the command will return the following result:
Connection to billing.datasphere.yandexcloud.net 443 port [tcp/https] succeeded!
Perform load testing for speech recognition and synthesis
To check whether the SpeechKit Hybrid test installation is valid and its performance is fine, use Docker containers with the load testing utility for speech recognition and synthesis. These containers are described in the node-deploy.tf file, they were created along with the infrastructure.
To run a load test:
-
Connect to the VM over SSH.
-
Make sure ports
8080and9080are open to receive client requests:telnet <VM_public_address> 8080 && telnet <VM_public_address> 9080 -
Run speech recognition:
docker run --rm --name stt-tools \
   --env ENVOY_HOST=<VM_public_address> \
   --env ENVOY_PORT=8080 \
   --env CONNECTIONS=40 \
   cr.yandex/<registry_ID>/release/tools/stt-tools:0.20
In the command, specify the public IP address of the VM and the ID of the previously created Container Registry registry.
Where:
ENVOY_HOST: IP address of the recognition service.ENVOY_PORT: Port of the recognition service (8080by default).CONNECTIONS: Number of simultaneously active channels.
-
Run speech synthesis:
docker run --rm --name tts-tools \
   --network=host \
   --env ENVOY_HOST=<VM_public_address> \
   --env ENVOY_TTS_PORT=9080 \
   --env RPS=20 \
   cr.yandex/<registry_ID>/release/tools/tts-tools:0.20
In the command, specify the public IP address of the VM and the ID of the previously created Container Registry registry.
Where:
ENVOY_HOST: IP address of the speech synthesis service.ENVOY_TTS_PORT: Port of the synthesis service (9080by default).RPS: Number of speech synthesis requests per second.
-
Wait a few minutes while speech recognition and synthesis are performed.
-
Look at the test results in the container logs:
docker logs stt-toolsfor speech recognition.docker logs tts-toolsfor speech synthesis.
Until the
Load finished. Ready to serve requests on 0.0.0.0:17001line appears in the logs, the speech recognition and synthesis services will not be responding to requests. You may need to wait from 2 to 10 minutes.Next, the logs will show a message that the Envoy component has started listening to port
8080for speech recognition and port9080for speech synthesis. This means SpeechKit Hybrid is running and ready to serve client requests. -
Optionally, stop load testing.
During load testing, the
docker runcommands will not respond to the Ctrl + C interrupt signals. If you want to stop the containers from running, run the following command:docker stop stt-toolsfor speech recognition.docker stop tts-toolsfor speech synthesis.