How to create a Telegram bot with AI agent support using Workflows

With serverless technologies, you can create a Telegram bot with text generation model support based on Yandex Cloud AI Studio.
In this tutorial, you will create a bot which provides movie recommendations based on user preferences. You will do this by creating an AI agent, arranging for data storage in Yandex Object Storage and Yandex Lockbox, setting up bot logic in Yandex Workflows, and a webhook to start using a link.
To create a bot:
- Get your cloud ready.
- Create a Telegram bot.
- Create a secret.
- Create a bucket.
- Create a service account.
- Create an AI agent.
- Set up a workflow.
- Set up a webhook for your bot.
- Test your bot.
- Customize the agent.
If you no longer need the resources you created, delete them.
Getting started
Sign up for Yandex Cloud and create a billing account:
- Navigate to the management console and log in to Yandex Cloud or create a new account.
- On the Yandex Cloud Billing page, make sure you have a billing account linked and it has the
ACTIVEorTRIAL_ACTIVEstatus. If you do not have a billing account, create one and link a cloud to it.
If you have an active billing account, you can create or select a folder for your infrastructure on the cloud page.
Learn more about clouds and folders here.
Required paid resources
The cost of Telegram bot support includes:
- Fee for text generation (see Yandex Cloud AI Studio pricing).
- Fee for storing the secret and requests to the secret (see Yandex Lockbox pricing).
- Fee for storage space occupied by data, number of data operations, and outgoing traffic (see Yandex Object Storage pricing).
- Fee for retrieval and storage of logs (see Yandex Cloud Logging pricing).
Create a Telegram bot
Create a bot in Telegram and get a token.
-
To register a new bot, start BotFather and run this command:
/newbot -
Name your bot, e.g.,
Serverless AI Telegram Bot. This is the name users will see when chatting with the bot. -
Specify a username for your bot, e.g.,
ServerlessAITelegramBot. You can use it to find the bot in Telegram. The username must end with...Botor..._bot.As a result, you will get a token. Save it, as you will need it later.
Create a secret
Create a secret to store the Telegram API access token.
- In the management console, select the folder where you are going to create your infrastructure.
- Navigate to Lockbox.
- Click Create secret.
- In the Name field, enter a name for the secret.
- Select the
Customsecret type. - In the Key field, enter
token. - In the Value field, specify the token you got when creating the bot.
- Click Create.
If you do not have the Yandex Cloud CLI yet, install and initialize it.
The folder used by default is the one specified when creating the CLI profile. To change the default folder, use the yc config set folder-id <folder_ID> command. You can also specify a different folder for any command using --folder-name or --folder-id. If you access a resource by its name, the search will be limited to the default folder. If you access a resource by its ID, the search will be global, i.e., through all folders based on access permissions.
-
See the description of the CLI command for creating a secret:
yc lockbox secret create --help -
Create a secret:
yc lockbox secret create \
  --name tg-bot-token \
  --payload '[{"key":"token","text_value":"<bot_token>"}]'
Where:
-
--name: Secret name. -
--payload: Secret contents as a YAML or JSON array:key: Secret key.text_value: Secret value. Specify the token you got when creating the bot.
Result:
id: e6qf05v4ftms******** folder_id: b1g681qpemb4******** created_at: "2025-08-20T12:26:02.961Z" name: tg-bot-token status: ACTIVE current_version: id: e6q768pl3vrf******** secret_id: e6qf05v4ftms******** created_at: "2025-08-20T12:26:02.961Z" status: ACTIVE payload_entry_keys: - token -
To create a secret, use the Create REST API method for the Secret resource or the SecretService/Create gRPC API call.
Create a bucket
Create a bucket to store your chat history with the bot.
- Open the management console.
- Navigate to Object Storage.
- In the top panel, click Create bucket.
- Specify a bucket name that meets these naming conventions.
- Specify the maximum bucket size:
5 GB. - Click Create bucket.
-
See the description of the CLI command for creating a bucket:
yc storage bucket create --help -
Create a bucket in the default folder:
yc storage bucket create \
  --name <bucket_name> \
  --default-storage-class standard \
  --max-size 5368709120
Where:
--name: Bucket name that meets the naming conventions.--default-storage-class: Storage class.--max-size: Maximum bucket size, in bytes.
Result:
name: bot-history-storage
folder_id: b1g681qpemb4********
anonymous_access_flags: {}
default_storage_class: STANDARD
versioning: VERSIONING_DISABLED
max_size: "5368709120"
created_at: "2025-08-20T12:23:21.361186Z"
resource_id: e3erbgk1qmih********
If you do not have the AWS CLI yet, install and configure it.
To create a bucket, assign the storage.editor role to the service account used by the AWS CLI.
In the terminal, run this command:
aws s3api create-bucket \
  --endpoint-url=https://storage.yandexcloud.net \
  --bucket <bucket_name>
Where:
--endpoint-url: Object Storage endpoint.--bucket: Bucket name that meets the naming conventions.
To create a bucket, use the Create REST API method for the Bucket resource, the BucketService/Create gRPC API call, or the create S3 API method.
Create a service account
Create a service account named sa-workflows, which you will use to execute the workflow steps.
-
Open the management console.
-
Navigate to Identity and Access Management.
-
Click Create service account.
-
Enter the service account name:
sa-workflows. -
Click Add role and assign these roles:
storage.uploaderstorage.viewerlockbox.payloadViewerai.languageModels.userai.assistants.editor
-
Click Create.
-
If you do not have jq yet, install it.
-
See the description of the CLI command for creating a service account:
yc iam service-account create --help -
Create a service account:
yc iam service-account create --name sa-workflowsWhere
--nameis the service account name.Result:
id: ajersnus6rb2******** folder_id: b1g681qpemb4******** created_at: "2025-08-20T12:18:41.869376672Z" name: sa-workflows -
Save the service account ID and the folder ID to these variables:
WF_SA=$(yc iam service-account get --name sa-workflows --format json | jq -r .id) FOLDER_ID=$(yc config get folder-id) -
See the description of the CLI command for assigning a role for the folder:
yc resource-manager folder add-access-binding --help -
Assign the following roles for the folder to the service account:
yc resource-manager folder add-access-binding \
  --id $FOLDER_ID \
  --role storage.uploader \
  --subject serviceAccount:$WF_SA

yc resource-manager folder add-access-binding \
  --id $FOLDER_ID \
  --role storage.viewer \
  --subject serviceAccount:$WF_SA

yc resource-manager folder add-access-binding \
  --id $FOLDER_ID \
  --role lockbox.payloadViewer \
  --subject serviceAccount:$WF_SA

yc resource-manager folder add-access-binding \
  --id $FOLDER_ID \
  --role ai.languageModels.user \
  --subject serviceAccount:$WF_SA

yc resource-manager folder add-access-binding \
  --id $FOLDER_ID \
  --role ai.assistants.editor \
  --subject serviceAccount:$WF_SA
Where:
--id: Folder ID.--role: Role.--subject: Service account ID.
Result:
effective_deltas:
  - action: ADD
    access_binding:
      role_id: ai.languageModels.user
      subject:
        id: ajersnus6rb2********
        type: serviceAccount
Create a service account named sa-workflows with the following roles:
storage.uploaderstorage.viewerlockbox.payloadViewerai.languageModels.userai.assistants.editor
To create a service account, use the Create REST API method for the ServiceAccount resource or the ServiceAccountService/Create gRPC API call.
To assign a role to a service account, use the updateAccessBindings REST API method for the ServiceAccount resource or the ServiceAccountService/UpdateAccessBindings gRPC API call.
Create an AI agent
Create a text agent in AI Studio to process user requests.
-
Open the AI Studio interface.
-
Click Create AI agent → Create agent.
-
In the Name field, enter a name for the agent, e.g.,
Cinephile agent. -
In the Instruction field, enter an instruction for the agent:
You are a movie selection consultant

You goal is to help the user find a movie to watch based on their preferences.
On first request, ask them to name some of their favorite movies (one per line).
Use this information to make recommendations and ask clarifying questions.

History of previous conversations: {{ backstory }}
Note
The
{{ backstory }}variable is used to provide conversation history to the agent. It allows the agent to be aware of the user’s previous messages when generating a response. -
Click Create.
-
Copy the ID of the agent you created by clicking ID at the top left. Save it. You will need this ID to set up a workflow.
Set up a workflow
Set up a workflow to read and store chat history, call the AI agent, and send responses to Telegram.
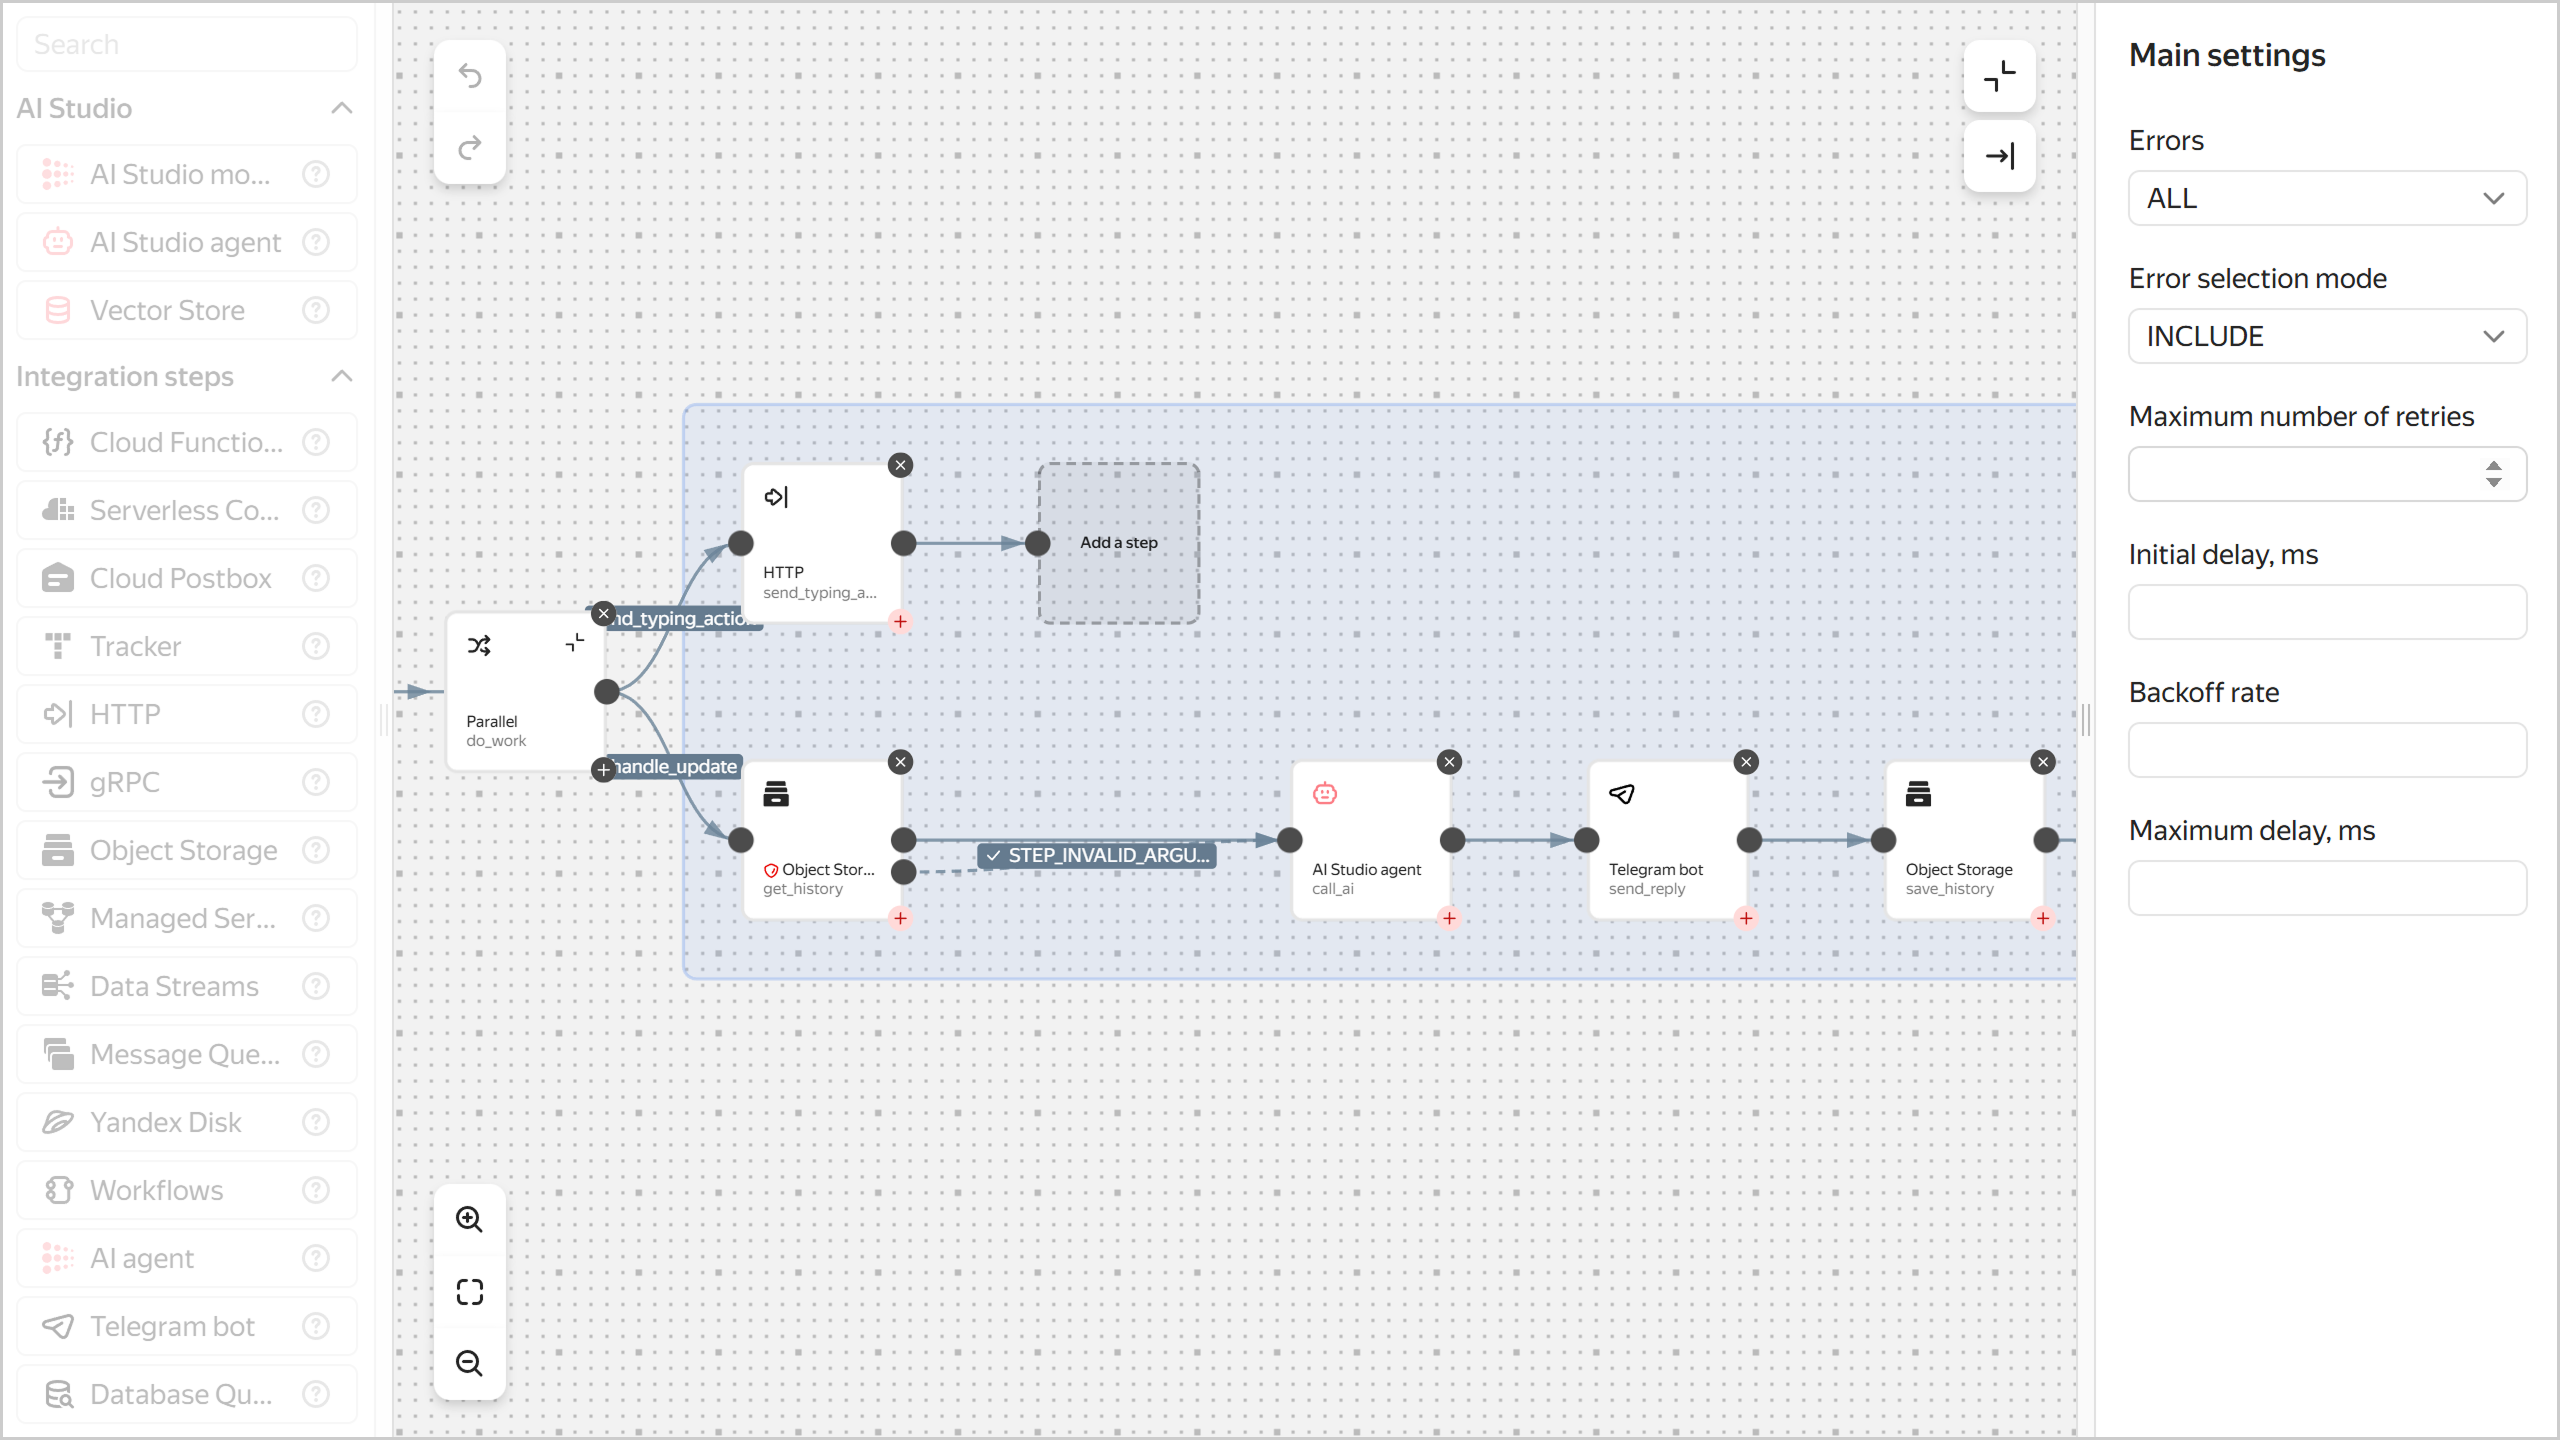
Tip
This guide describes how to create a workflow using the YaWL specification; however, you can also create and edit workflows using the constructor.
Prepare a YaWL specification
Save the workflow YaWL specification to a YAML file, e.g., yawl-spec.yaml.
yawl: '0.1'
start: do_work
steps:
  do_work:
    parallel:
      branches:

        # Step that sends a typing action to make the chat feel more responsive
        send_typing_action:
          start: send_typing_action
          steps:
            send_typing_action:
              httpCall:
                url: >-
                  https://api.telegram.org/bot\(lockboxPayload("<secret_ID>"; "token"))/sendChatAction
                method: POST
                headers:
                  Content-Type: application/json
                body: |
                  \({
                    chat_id: .input.message.chat.id,
                    action: "typing"
                  })

        # Main logic
        handle_update:
          start: get_history
          steps:
            get_history:
              objectStorage:
                bucket: <bucket_name>
                object: history/\(.input.message.chat.id).json
                get:
                  contentType: JSON
                output: '\({history: .Content})'
                next: call_ai
                catch:
                  - errorList:
                      - STEP_INVALID_ARGUMENT # There is no file or it is not JSON -> initialize.
                    errorListMode: INCLUDE
                    output: '\({history: []})'
                    next: call_ai

            call_ai:
              aiStudioAgent:
                promptTemplateId: <agent_ID>
                message: \(.input.message.text)
                variables:
                  backstory: >-
                    History of previous conversations (JSON array of objects)
                    {role,message}): "\(.history)"
                output: '\({reply: .Result})'
                next: send_reply

            send_reply:
              telegramBot:
                token: \(lockboxPayload("<secret_ID>"; "token"))
                sendMessage:
                  chatId: \(.input.message.chat.id)
                  text: \(.reply)
                  replyTo: \(.input.message.message_id)
                  parseMode: MARKDOWN
                next: save_history

            save_history:
              objectStorage:
                bucket: <bucket_name>
                object: history/\(.input.message.chat.id).json
                put:
                  contentType: JSON
                  content: >-
                    \(
                      .history +
                      [
                        {role:"user", message:.input.message.text},
                        {role:"assistant", message:.reply}
                      ]
                    )
Where:
<bucket_name>: Name of the bucket you created earlier.<secret_ID>: ID of the secret you created earlier.<agent_ID>: ID of the agent you created earlier.
Create a workflow
-
Open the management console.
-
Navigate to Serverless Integrations.
-
In the left-hand panel, click Workflows.
-
In the top-right corner, click Create workflow.
-
Select the
YaML specificationmethod. -
In the code editor, paste the text of the previously prepared YaWL workflow specification.
-
Expand Additional parameters:
-
Enter a name for the workflow. The naming requirements are as follows:
- Length: between 3 and 63 characters.
- It can only contain lowercase Latin letters, numbers, and hyphens.
- It must start with a letter and cannot end with a hyphen.
-
Select the
sa-workflowsservice account. -
Under Logging, disable Write logs if you do not want to pay for storing logs.
-
-
Click Create.
-
See the description of the CLI command for creating a workflow:
yc serverless workflow create --help -
Create a workflow:
yc serverless workflow create \
  --yaml-spec <specification_file> \
  --name <workflow_name> \
  --service-account-id $WF_SA
Where:
-
--yaml-spec: Path to the file with the workflow YaWL specification prepared earlier, e.g.,./yawl-spec.yaml. -
--name: Workflow name. The naming requirements are as follows:- Length: between 3 and 63 characters.
- It can only contain lowercase Latin letters, numbers, and hyphens.
- It must start with a letter and cannot end with a hyphen.
-
--service-account-id:sa-workflowsservice account ID.
Result:
id: dfqjl5hh5p90******** folder_id: b1g681qpemb4******** specification: spec_yaml: "yawl: ..." created_at: "2025-03-11T09:27:51.691990Z" name: my-workflow status: ACTIVE log_options: {} service_account_id: aje4tpd9coa******** execution_url: https://serverless-workflows.api.cloud.yandex.net/workflows/v1/execution/dfq0eod50iol********/start -
To create a workflow, use the Create REST API method for the Workflows resource or the Workflow/Create gRPC API call.
Make the workflow public
Make the workflow public so it can be executed via a link without authentication.
- In the management console, select the folder containing the workflow.
- Navigate to Serverless Integrations.
- In the left-hand panel, click Workflows.
- Select the workflow.
- Enable Public workflow.
- Click Save.
-
View the description of the CLI command for updating a workflow:
yc serverless workflow update --help -
Make the workflow public:
yc serverless workflow update \
  --name <workflow_name> \
  --set-is-public
Result:
id: dfqjl5hh5p90********
...
is_public: true
execution_url: https://serverless-workflows.api.cloud.yandex.net/workflows/v1/execution/dfq0eod50iol********/start
To make a workflow public, use the Update REST API method for the Workflows resource or the workflow/Update gRPC API call with isPublic: true.
Note
Any user can execute a public workflow without an IAM token. This is necessary for setting up a Telegram webhook to send workflow execution requests via a link.
Set up a webhook for your bot
Set up a webhook for your bot for it to send workflow execution requests via a link.
Get a workflow execution link
- In the management console, select the folder containing the workflow.
- Navigate to Serverless Integrations.
- In the left-hand panel, click Workflows.
- Select a workflow. The execution link will appear in the Start URL field.
To get an execution link, run this command:
yc serverless workflow get <workflow_name>
Result:
id: dfqjl5hh5p90********
...
is_public: true
execution_url: https://serverless-workflows.api.cloud.yandex.net/workflows/v1/execution/dfq0eod50iol********/start
Save the value of the execution_url field.
To get a workflow execution link, use the get REST API method for the Workflow resource or the WorkflowsService/Get gRPC API call. The execution link will appear in the execution_url field.
Set up a webhook
If you do not have cURL yet, install it.
The example below is for MacOS and Linux. To run it on Windows, check the details on working with Bash in Microsoft Windows.
Set up a webhook for your bot:
Run this command:
curl -s "https://api.telegram.org/bot<bot_token>/setWebhook" \
  -d "url=<execution_url>"
Where:
<bot_token>: Token you got when creating the bot.<execution_url>: Workflow execution link you got in the previous step.
Here is an example:
curl -s "https://api.telegram.org/bot1357246809:AAFhSteLniAw71g8jx6K5kTErO3********/setWebhook" \
  -d "url=https://serverless-workflows.api.cloud.yandex.net/workflows/v1/execution/fd2g4pu20roc********/start"
Result:
{"ok":true,"result":true,"description":"Webhook was set"}
Test your bot
-
Find the Telegram bot you created earlier by its username.
-
Click START to start a chat.
-
Send the bot a list of movie titles, one per line.
Here is an example:
Movie 1
Movie 2
Movie 3
Bot's response:
Hi there! Thank you for letting me know your preferences. Here are the movies I would recommend based on your tastes:
...
Which of these movies would you like to watch? Or do you have some other favorite movies you want me to consider?
What's next
Try editing the agent's instruction in AI Studio to suit your task. For example, edit the agent's instruction to make it select music artists:
You are a music artist selection consultant

You goal is to help the user find music to listen to based on their preferences.
On first request, ask them to name some of their favorite bands, artists,
composers, and genres (one per line).
Use this information to make recommendations, ask clarifying questions.

History of previous conversations: {{ backstory }}
Also, you can:
- Add text or files as sources of information for the agent. For more information, see Text-based agents in AI Studio.
- Configure conversation context management. To learn more, see Conversation context management.
- Use the agent's other tools, such as file search or web search.
How to delete the resources you created
To stop paying for the resources you no longer need, delete them: