Creating a CAPTCHA
SmartCaptcha allows you to create CAPTCHAs of multiple difficulty levels for various incoming requests. The difficulty level is determined by the incoming request parameters.
When creating a CAPTCHA, you can:
- Integrate a CAPTCHA on multiple websites.
- Customize the CAPTCHA appearance, including its background, states, errors, light and dark color themes, and the I'm not a robot button style.
- Select the CAPTCHA challenge type and difficulty level.
- Show various CAPTCHA options based on the incoming request parameters, for example, use different CAPTCHA for the users from different countries.
Note
To enhance your security, we use HTTP request data to train our machine learning (ML) models. You can opt out of sharing this information using the relevant CAPTCHA settings either when you first create a CAPTCHA via the management console or any time afterwards.
-
In the management console, select a folder.
-
Navigate to SmartCaptcha.
-
Click Create captcha.
-
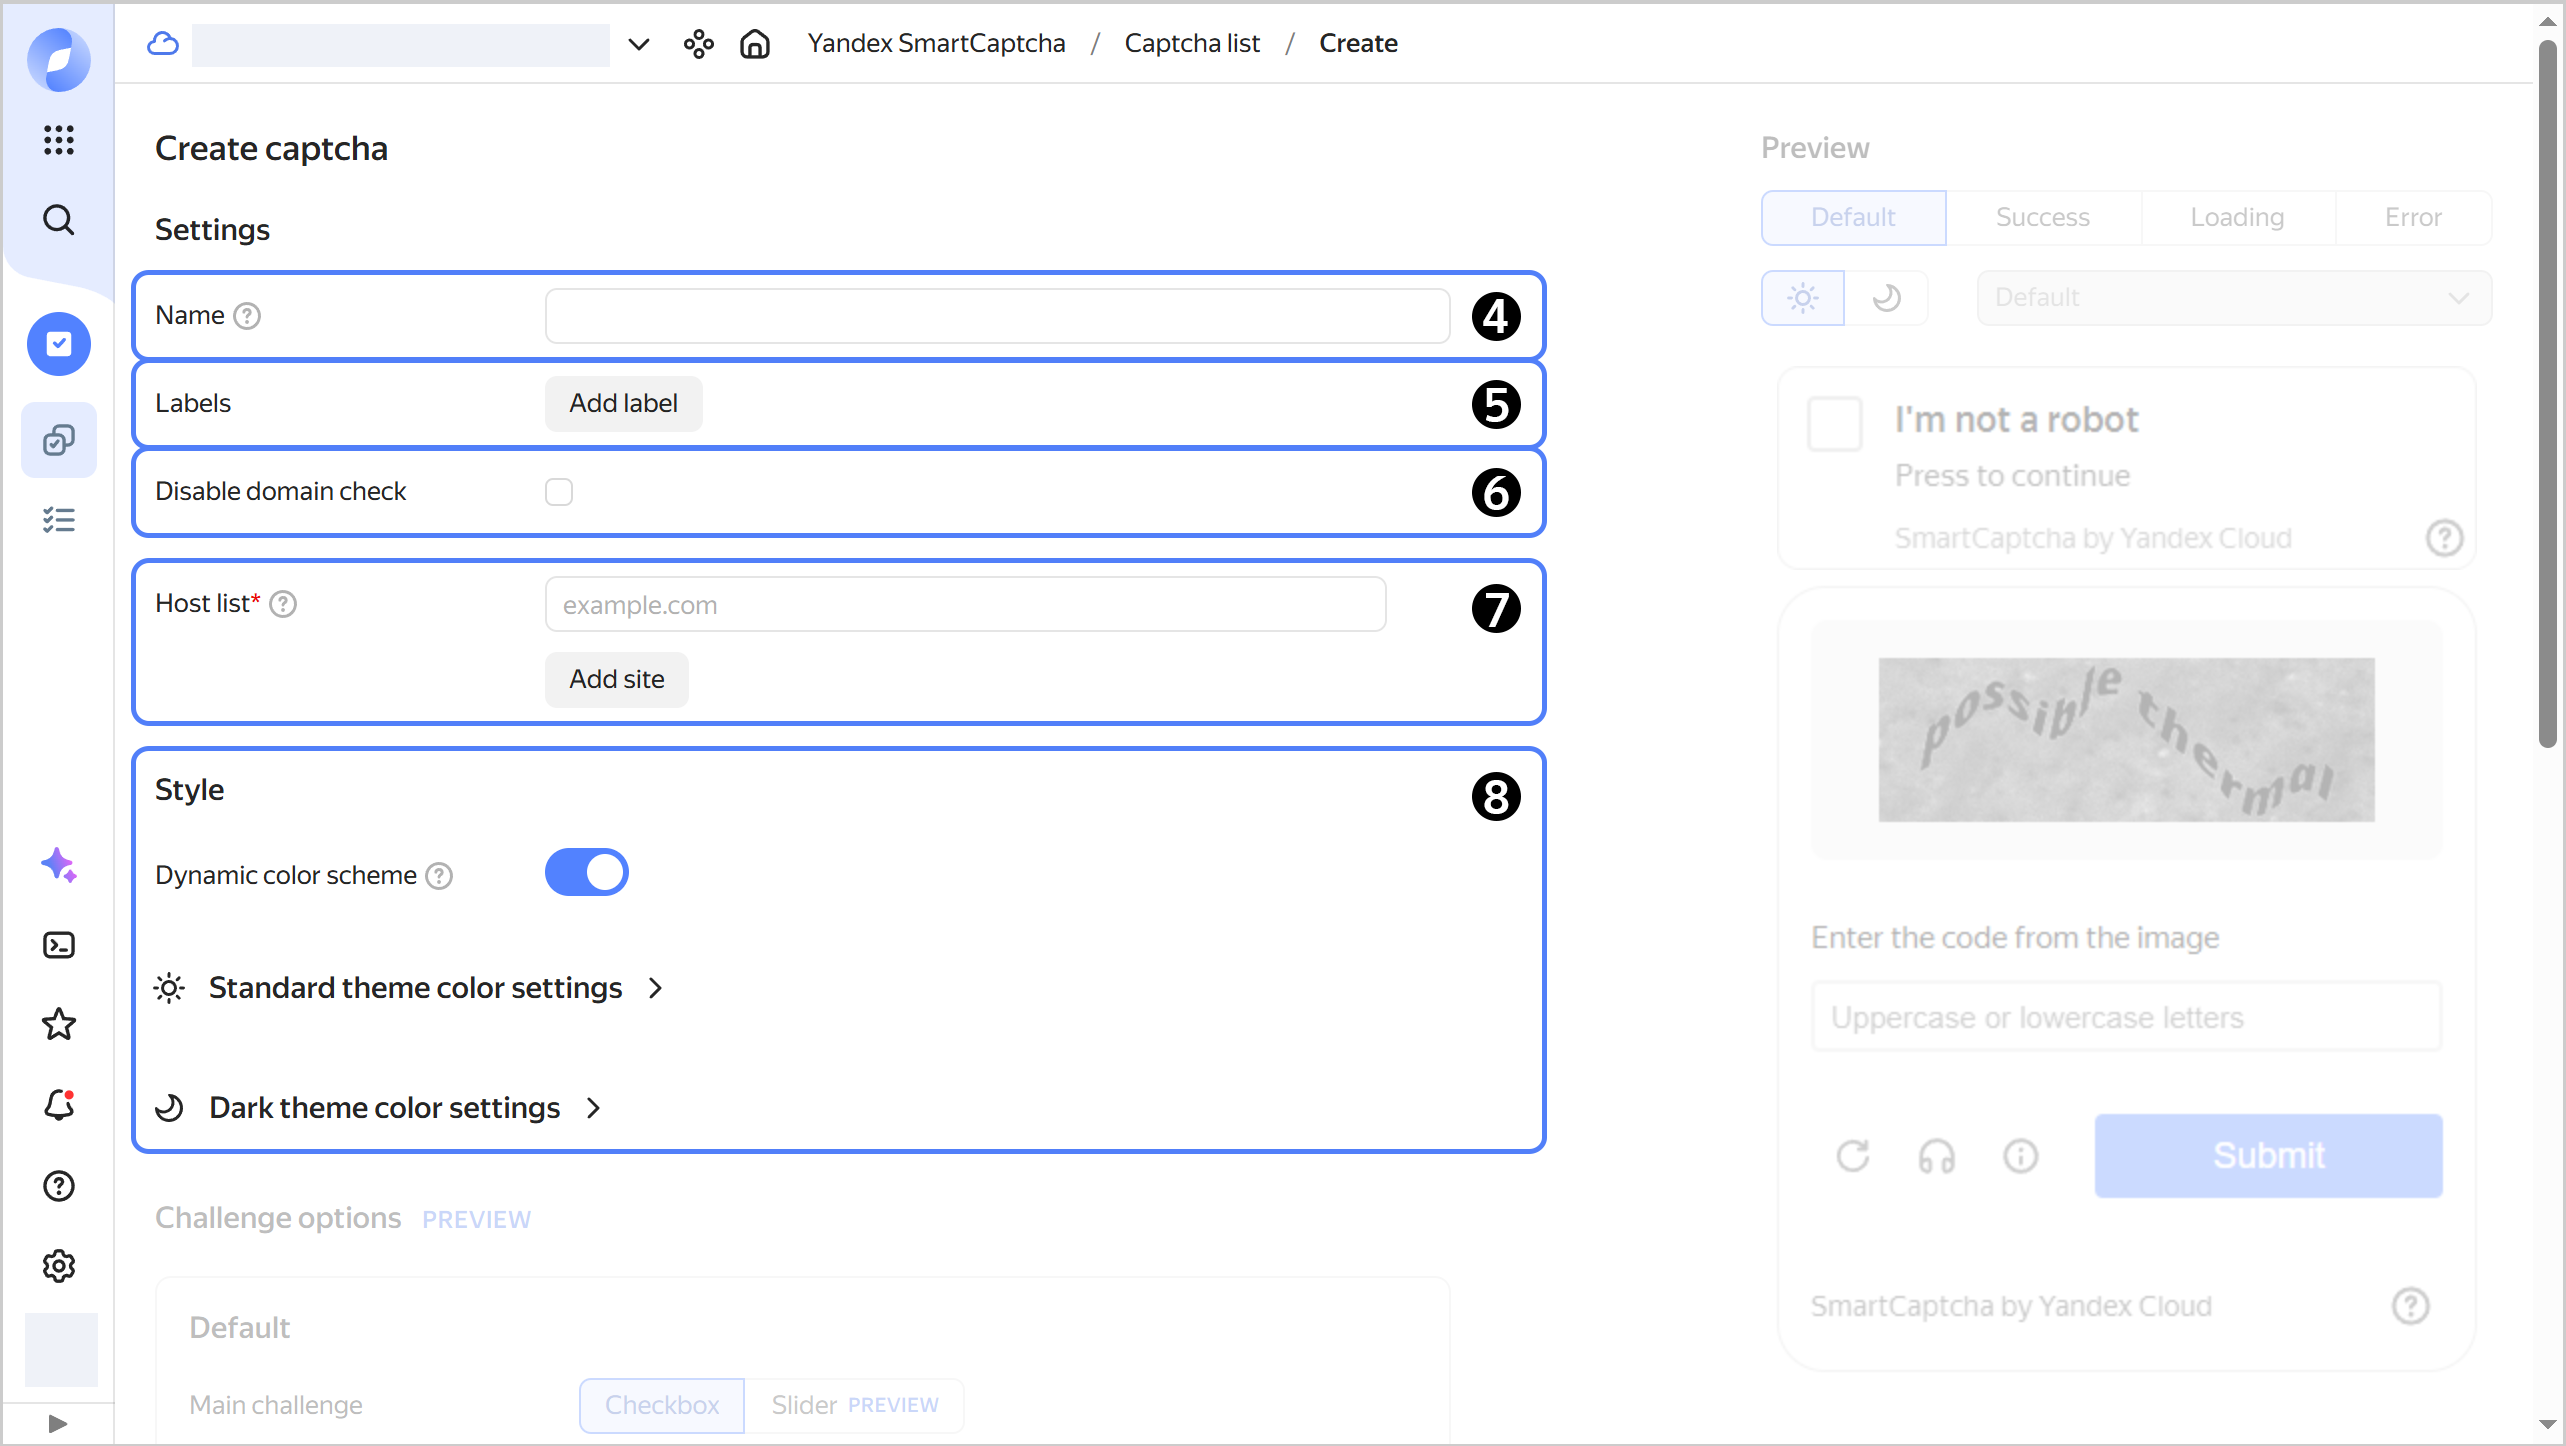
Specify the Name of the CAPTCHA you are creating:
- It must be between 2 and 63 characters in length.
- It can only contain lowercase Latin letters, numbers, and hyphens.
- It must start with a letter and cannot end with a hyphen.
-
Optionally, add labels:
- Click Add label.
- Add a label in
key: valueformat. - Press Enter.
-
Optionally, select Disable domain check.
-
Specify Host list as IP addresses or domain names without
http/httpsat the beginning and/at the end, e.g.,example.com.The CAPTCHA will also work on all subdomains of the specified domains.
-
Set up the Style of the I'm not a robot button and the challenge window:
-
Optionally, enable Dynamic color scheme if you want to automatically adjust the CAPTCHA’s color theme according to your browser’s theme.
-
Under Standard theme color settings and Dark theme color settings, you can add custom properties for various CAPTCHA elements, e.g., the challenge window, either via the form or by describing styles in
JSONformat.
All changes will be displayed in the preview window.
-
-
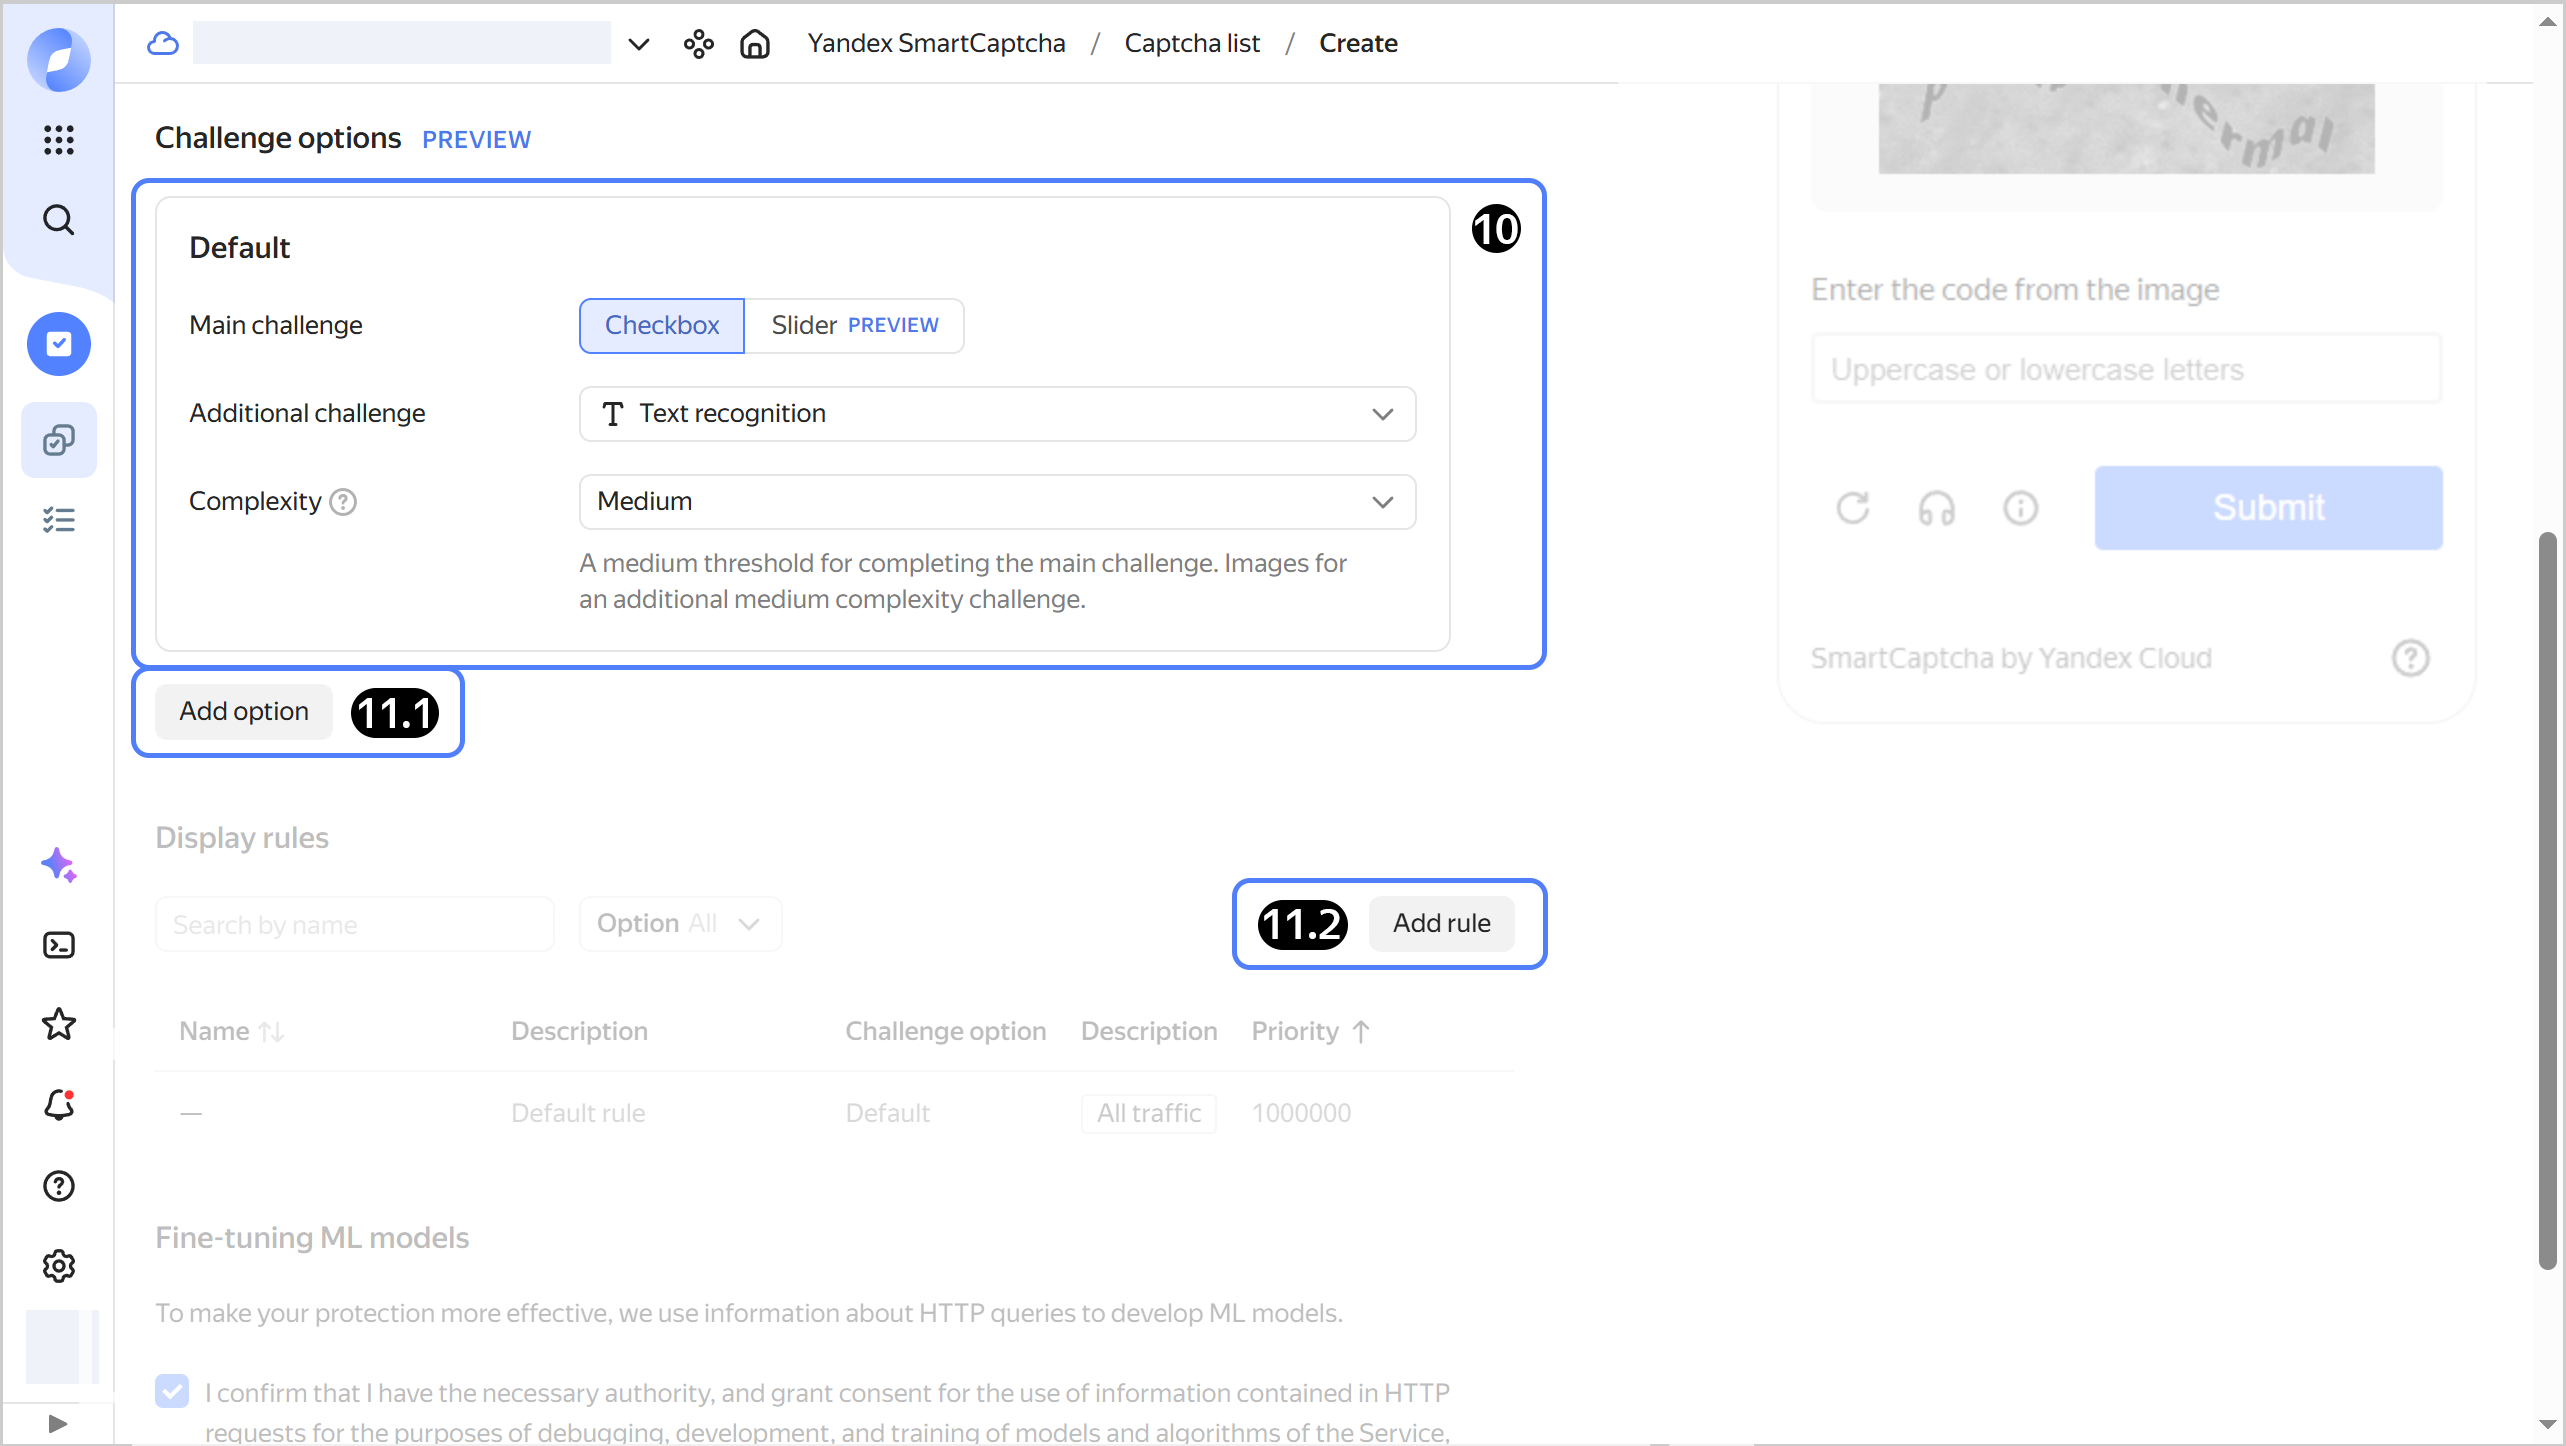
Configure the Challenge options. You can either specify the default CAPTCHA, or add extra challenge options if you want to show different CAPTCHAs for different requests.
-
For the Default option, specify:
-
Main challenge: Type of the main challenge shown to the user.
-
Additional challenge: Type of the additional challenge shown to the user.
-
Complexity: Difficulty level of the challenge shown to the user:
-
Easy: Easy challenge. -
Medium: Medium challenge. -
Hard: Hard challenge. -
Maximum: Hard challenge with an additional question. The user is required to solve an additional challenge, regardless of the outcome of the main challenge.You can see a challenge example in the preview window.
Note
Challenge options and display rules are currently in Preview.
-
-
To show different CAPTCHAs for different requests:
-
Click Add option and configure the settings the same way as you did for the default CAPTCHA.
To delete an option, click . If this option is used in a display rule, you cannot delete it.
-
Add incoming traffic rules that will determine which CAPTCHA option to display:
-
Click Add rule.
-
Specify the rule name and description.
-
Select a CAPTCHA option.
-
Specify the rule priority from
1to999999.Rules are processed from lowest to highest priority, e.g.,
1,2, etc. If the request matches multiple rules, the first matching rule will apply. -
Specify one or more conditions for the incoming traffic:
IP: IP address, CIDR, or IP region.HTTP header: HTTP header string.URI: Requested website path.Host: Domain that received the request.Metadata: Additional data received from the frontend.
-
Click Add.
To delete a rule, click . You cannot delete a default rule.
-
-
Add other CAPTCHA options and incoming traffic rules in the same way.
-
-
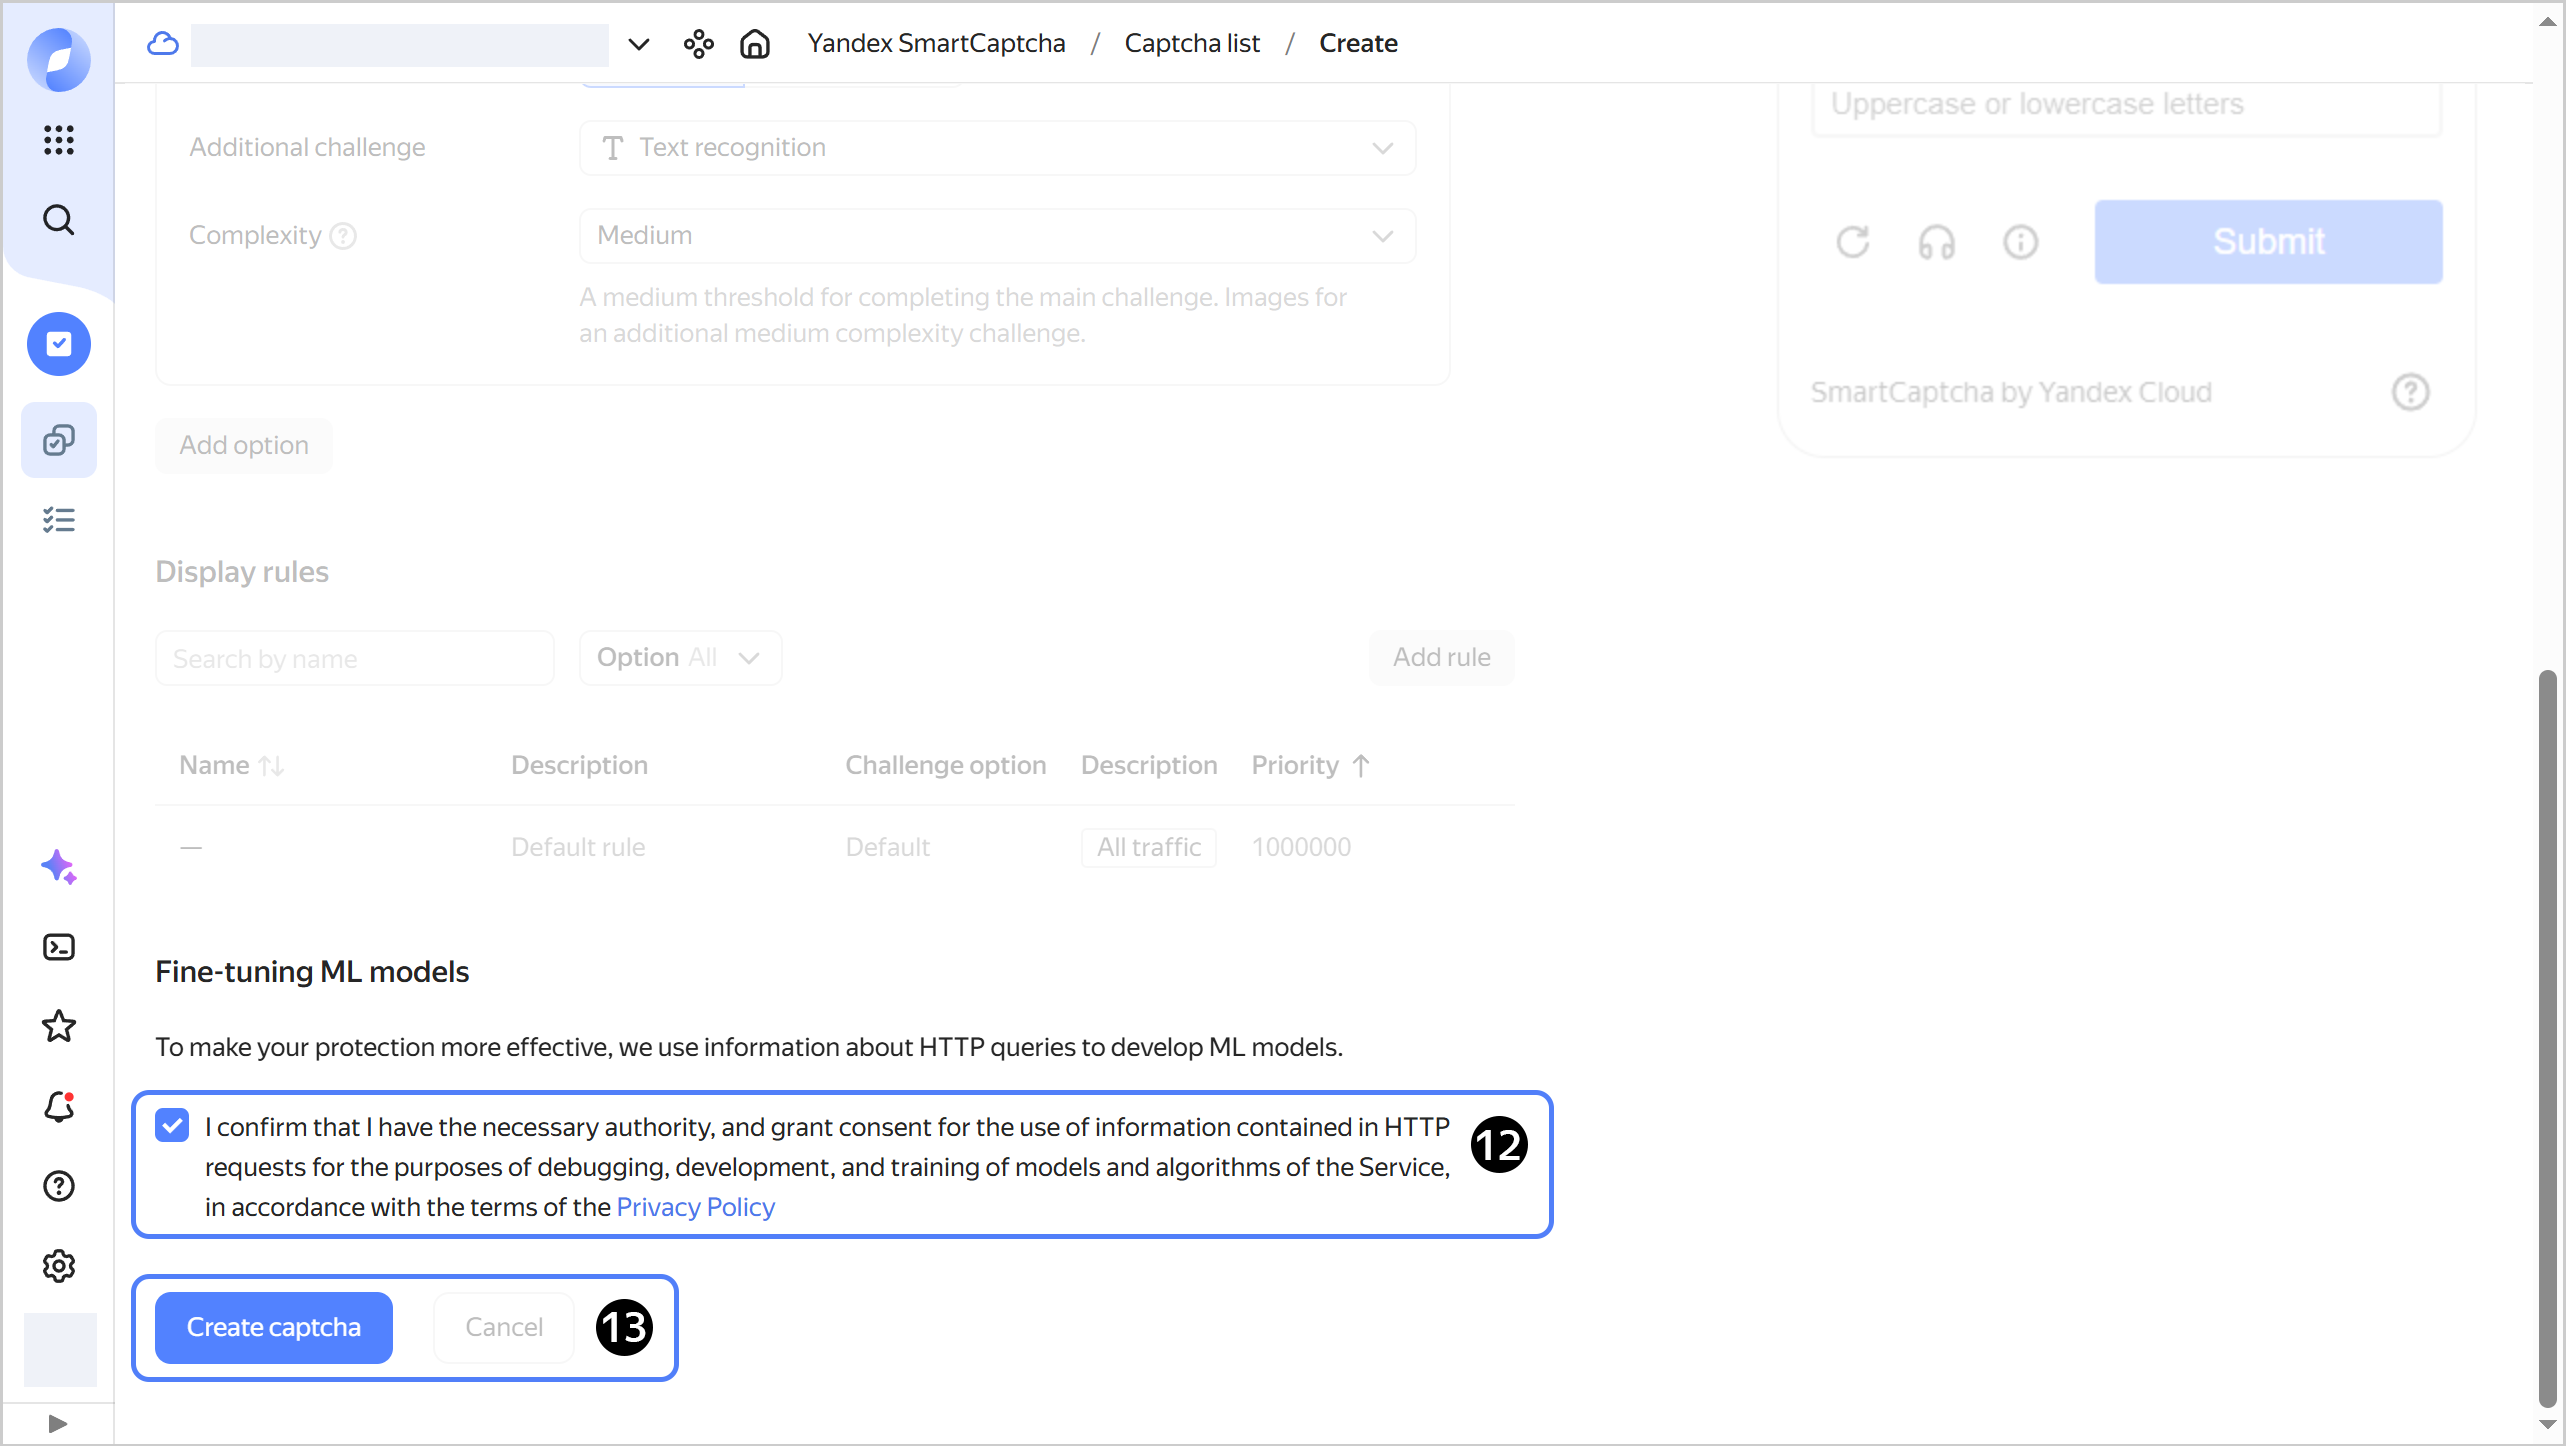
Optionally, under Fine-tuning ML models, you can enable or disable the use of HTTP request data for improving machine learning models.
-
Click Create.
The CAPTCHA will appear on the service’s page under Captcha list.
If you do not have the Yandex Cloud CLI yet, install and initialize it.
The folder used by default is the one specified when creating the CLI profile. To change the default folder, use the yc config set folder-id <folder_ID> command. You can also specify a different folder for any command using --folder-name or --folder-id. If you access a resource by its name, the search will be limited to the default folder. If you access a resource by its ID, the search will be global, i.e., through all folders based on access permissions.
-
See the description of the CLI command for creating a CAPTCHA:
yc smartcaptcha captcha create --help -
Create a CAPTCHA:
yc smartcaptcha captcha create \
  --name <captcha_name> \
  --turn-off-hostname-check \
  --allowed-site <first_host>,<second_host> \
  --pre-check-type <main_challenge_type> \
  --challenge-type <additional_challenge_type> \
  --style-json '{"light":"<json_object>", "dark":"<json_object>"}' \
  --complexity <challenge_difficulty> \
  --security-rules-file <path_to_file_with_options>.yaml \
  --override-variants-file <path_to_file_with_rules>.yaml
Where:
-
--name: CAPTCHA name. -
--turn-off-hostname-check: Disable domain check. This is an optional setting. -
--allowed-site: List of hosts, specified as IP addresses or domain names withouthttp/httpsat the beginning and/at the end, e.g.,example.com. The CAPTCHA will also work on all subdomains of the specified domains. This is an optional setting. -
--pre-check-type: Type of the default main challenge given to the user. The possible values are:CHECKBOX: Checkbox.SLIDER: Slider.
-
--challenge-type: Type of the default additional challenge shown to the user. The possible values are:IMAGE_TEXT: Text recognition.SILHOUETTES: Silhouettes.KALEIDOSCOPE: Kaleidoscope.
-
--style-json: Color theme settings inJSONformat. To set a dynamic color scheme, use thelightanddarkkeys with values as separate JSON objects. You can configure the color scheme for both types in the management console and copy it in JSON format on theJSONtab. This is an optional setting. For more information, see this example. -
--complexity: Default challenge difficulty. The possible values are:EASY: Easy challenge.MEDIUM: Medium challenge.HARD: Hard challenge.FORCE_HARD: Hard challenge with an additional question. The user is required to solve an additional challenge, regardless of the outcome of the main challenge.
Note
Challenge options and display rules are currently in Preview.
-
--override-variants-file: Path to aYAMLfile with challenge options. This is an optional setting.Challenge options file example
- uuid: <option_1_ID>
  description: <option_1_description>
  complexity: <challenge_difficulty>
  pre_check_type: <main_challenge>
  challenge_type: <additional_challenge>
- uuid: <option_2_ID>
  description: <option_2_description>
  complexity: <challenge_difficulty>
  pre_check_type: <main_challenge>
  challenge_type: <additional_challenge>
Where:
uuid: Challenge option’s unique identifier.description: Challenge option description.complexity: Difficulty level of the challenge shown to the user.pre_check_type: Type of the main challenge shown to the user.challenge_type: Type of the additional challenge shown to the user.
-
--security-rules-file: Path to aYAMLfile containing incoming traffic rules that determine which CAPTCHA option to display. This is an optional setting.Incoming traffic rules file example
- name: <rule_1_name>
  priority: "<rule_1_priority>"
  description: <rule_1_description>
  override_variant_uuid: <challenge_option_ID>
  condition:
    host:
      hosts:
        - exact_match: example.com
        - exact_match: example.net
- name: <rule_2_name>
  priority: "<rule_2_priority>"
  description: <rule_2_description>
  override_variant_uuid: <challenge_option_ID>
  condition:
    source_ip:
      geo_ip_match:
        locations:
          - ru
          - kz
Where:
-
name: Rule name. -
priority: Rule priority, from1to999999.Rules are processed from lowest to highest priority, e.g.,
1,2, etc. If the request matches multiple rules, the first matching rule will apply. -
description: Rule description. This is an optional setting. -
override_variant_uuid: ID of the challenge option that will appear if the request matches the rule. If this argument is not specified, the system will display the default challenge. -
condition: One or more conditions for the incoming traffic. This is an optional setting.
-
-
Result:
id: bpnd6cm6qpr5********
folder_id: b1g0ijbfaqsn********
cloud_id: b1gia87mbaom********
client_key: ysc1_2lla0Yn6dhlnEaTv2QNg2BhuA8Nqlyk4L7pZk3dz********
created_at: "2025-03-02T21:38:48.830498Z"
name: my-first-captcha
allowed_sites:
  - exmaple.ru
  - exmaple.kz
complexity: MEDIUM
style_json: '{"focus-color":"rgb(250, 192, 0)","base-background-color":"#fff"}'
turn_off_hostname_check: true
pre_check_type: CHECKBOX
challenge_type: IMAGE_TEXT
security_rules:
  - name: rule1
    priority: "11"
    description: My first security rule.
    condition:
      host:
        hosts:
          - exact_match: example.com
          - exact_match: example.net
    override_variant_uuid: variant-1
  - name: rule2
    priority: "12"
    condition:
      source_ip:
      geo_ip_match:
        locations:
          - ru
          - kz
    override_variant_uuid: variant-2
override_variants:
  - uuid: variant-1
    description: override variant 1
    complexity: EASY
    pre_check_type: CHECKBOX
    challenge_type: SILHOUETTES
  - uuid: variant-2
    description: override variant 2
    complexity: HARD
    pre_check_type: SLIDER
    challenge_type: KALEIDOSCOPE
With Terraform, you can quickly create a cloud infrastructure in Yandex Cloud and manage it using configuration files. These files store the infrastructure description written in HashiCorp Configuration Language (HCL). If you change the configuration files, Terraform automatically detects which part of your configuration is already deployed, and what should be added or removed.
Terraform is distributed under the Business Source License. The Yandex Cloud provider for Terraform is distributed under the MPL-2.0 license.
For more information about the provider resources, see the guides on the Terraform website or its mirror.
If you do not have Terraform yet, install it and configure the Yandex Cloud provider.
To manage infrastructure using Terraform under a service account or user accounts (a Yandex account, a federated account, or a local user), authenticate using the appropriate method.
To create a CAPTCHA:
-
In the Terraform configuration file, describe the resources you want to create:
resource "yandex_smartcaptcha_captcha" "<captcha_name>" {
  name                    = "<captcha_name>"
  turn_off_hostname_check = True
  complexity              = "<challenge_difficulty>"
  pre_check_type          = "<main_challenge_type>"
  challenge_type          = "<additional_challenge_type>"

  style_json = jsonencode({
    light    = jsonencode(<json_object>)
    dark = jsonencode(<json_object>)
  })

  allowed_sites = [
    "<first_host>",
    "<second_host>"
  ]

  # First challenge variant
  override_variant {
    uuid        = "<variant_1_ID>"
    description = "<option_1_description>"

    complexity     = "<challenge_difficulty>"
    pre_check_type = "<main_challenge>"
    challenge_type = "<additional_challenge>"
  }

  # Second challenge variant
  override_variant {
    uuid        = "<variant_2_ID"
    description = "<variant_2_description>"

    complexity     = "<challenge_difficulty>"
    pre_check_type = "<main_challenge>"
    challenge_type = "<additional_challenge>"
  }

  # First rule
  security_rule {
    name                  = "<rule_1_name>"
    priority              = <rule_1_priority>
    description           = "<rule_1_description>"
    override_variant_uuid = "<challenge_variant_ID>"

    condition {
      host {
        hosts {
          exact_match = "example.com"
        }
        hosts {
          exact_match = "example.net"
        }
      }
    }
  }

  # Second rule
  security_rule {
    name                  = "<rule_2_name>"
    priority              = <rule_2_priority>
    description           = "<rule_2_description>"
    override_variant_uuid = "<challenge_variant_ID>"

    condition {
      source_ip {
        geo_ip_match {
          locations = ["ru", "kz"]
        }
      }
    }
  }
}
Where:
-
name: CAPTCHA name. -
turn_off_hostname_check: Disable domain check. This is an optional setting. -
complexity: Difficulty level of the default challenge shown to the user. The possible values are:EASY: Easy challenge.MEDIUM: Medium challenge.HARD: Hard challenge.FORCE_HARD: Hard challenge with an additional question. The user is required to solve an additional challenge, regardless of the outcome of the main challenge.
Note
Challenge options and display rules are currently in Preview.
-
pre_check_type: Type of the default main challenge shown to the user. The possible values are:CHECKBOX: Checkbox.SLIDER: Slider.
-
challenge_type: Type of the default additional challenge shown to the user. The possible values are:IMAGE_TEXT: Text recognition.SILHOUETTES: Silhouettes.KALEIDOSCOPE: Kaleidoscope.
-
style_json: Color theme settings inJSONformat. To set a dynamic color scheme, use thelightanddarkkeys with values as separate JSON objects. You can configure the color scheme for both types in the management console and copy it in JSON format on theJSONtab. This is an optional setting. -
allowed_sites: List of hosts, specified as IP addresses or domain names withouthttp/httpsat the beginning and/at the end, e.g.,example.com. The CAPTCHA will also work on all subdomains of the specified domains. This is an optional setting. -
override_variant: Section containing the challenge option description. This is an optional setting.uuid: Unique challenge option ID.description: Challenge option description. This is an optional setting.complexity: Difficulty level of the challenge shown to the user:pre_check_type: Type of the main challenge shown to the user.challenge_type: Type of the additional challenge shown to the user.
-
security_rule: Section describing incoming traffic rules that determine which CAPTCHA option to display. This is an optional setting.-
name: Rule name. -
priority: Rule priority, from1to999999.Rules are processed from lowest to highest priority, e.g.,
1,2, etc. If the request matches multiple rules, the first matching rule will apply. -
description: Rule description. This is an optional setting. -
override_variant_uuid: ID of the challenge option that will appear if the request matches the rule. If this argument is not specified, the system will display the default challenge. -
condition: One or more conditions for the incoming traffic. This is an optional setting.
-
For more on the properties of the
yandex_smartcaptcha_captcharesource, see this provider guide. -
-
Create the resources:
-
In the terminal, navigate to the configuration file directory.
-
Make sure the configuration is correct using this command:
terraform validateIf the configuration is valid, you will get this message:
Success! The configuration is valid. -
Run this command:
terraform planYou will see a list of resources and their properties. No changes will be made at this step. Terraform will show any errors in the configuration.
-
Apply the configuration changes:
terraform apply -
Type
yesand press Enter to confirm the changes.
Terraform will create all the required resources. You can check the new resources in the management console or using this CLI command:
yc smartcaptcha captcha list -
To create a CAPTCHA, use the create REST API method for the Captcha resource or the Captcha/Create gRPC API call.
Examples
Creating a CAPTCHA for all requests
Create a CAPTCHA named simple-captcha that does not use any incoming traffic rules.
Run this command:
yc smartcaptcha captcha create simple-captcha
Result:
id: bpn7pri980fs********
folder_id: b1g0ijbfaqsn********
cloud_id: b1gia87mbaom********
client_key: ysc1_BFhJblC4DfttmEV6ORqfZK99DuaTQyYxPoF4V6yp********
created_at: "2025-05-29T05:29:05.373420Z"
name: simple-captcha
complexity: MEDIUM
pre_check_type: CHECKBOX
challenge_type: IMAGE_TEXT
-
Describe the resource’s properties in the configuration file:
resource "yandex_smartcaptcha_captcha" "simple-captcha" {
  name           = "simple-captcha"
  complexity     = "HARD"
  pre_check_type = "SLIDER"
  challenge_type = "IMAGE_TEXT"
}
For more on the properties of the
yandex_smartcaptcha_captcharesource, see this provider guide. -
Create a CAPTCHA:
-
In the terminal, navigate to the configuration file directory.
-
Make sure the configuration is correct using this command:
terraform validateIf the configuration is valid, you will get this message:
Success! The configuration is valid. -
Run this command:
terraform planYou will see a list of resources and their properties. No changes will be made at this step. Terraform will show any errors in the configuration.
-
Apply the configuration changes:
terraform apply -
Type
yesand press Enter to confirm the changes.
-
Call the create API method and provide the folder ID and CAPTCHA name in the request body:
{
  "folderId": "b1g0ijbfaqsn********",
  "name": "simple-captcha"
}
Creating a CAPTCHA that uses incoming traffic rules and a customized color scheme
Create a CAPTCHA with incoming traffic rules using the following test specifications:
-
Name:
advanced-captcha. -
Domain check: Disabled.
-
Appearance, as described in
style.json:-
Standard color scheme:
{ "text-color-primary": "#1e1f20", "base-background-color": "#c7d0d6", "popup-image-container-background-color": "#aab4ba", "base-checkbox-background-color": "#5a7080", "base-checkbox-background-color-checked": "#5a7080", "base-checkbox-border": "2px solid #5a7080", "base-checkbox-spin-color": "#5a7080", "popup-textinput-background-color": "#c7d0d6", "popup-action-button-background-color": "#5a7080", "popup-action-button-background-color-hover": "#485863" } -
Dynamic color scheme:
{
  "light": {
    "text-color-primary": "#1e1f20",
    "base-background-color": "#c7d0d6",
    "popup-image-container-background-color": "#aab4ba",
  },
  "dark": {
    "text-color-primary": "#e6e8eb",
    "base-background-color": "#2b2f34",
    "popup-image-container-background-color": "#1f2328",
  }
}
-
-
List of hosts:
example.ru,example.kz. -
The default challenge settings are as follows:
- Challenge difficulty:
HARD. - Main challenge type:
SLIDER. - Additional challenge type:
IMAGE_TEXT.
- Challenge difficulty:
-
First challenge option settings:
- Challenge option ID:
variant-1. - Challenge option description:
Simple variant. - Challenge difficulty:
EASY. - Main challenge type:
CHECKBOX. - Additional challenge type:
SILHOUETTES.
- Challenge option ID:
-
Second challenge option settings:
- Challenge option ID:
variant-2. - Challenge option description:
Hard variant. - Challenge difficulty:
HARD. - Main challenge type:
SLIDER. - Additional challenge type:
KALEIDOSCOPE.
- Challenge option ID:
-
Settings for the first incoming traffic rule:
- Rule name:
rule-1. - Rule priority:
11. - Rule description:
My first security rule. - Challenge option ID:
variant-1. - Incoming traffic conditions: host matches
example.comorexample.net.
- Rule name:
-
Settings for the second incoming traffic rule:
- Rule name:
rule-2. - Rule priority:
12. - Rule description:
My second security rule. - Challenge option ID:
variant-2. - Incoming traffic conditions: IP belongs to the
ruorkzregion.
- Rule name:
Run this command:
yc smartcaptcha captcha create \
  --name advanced-captcha \
  --turn-off-hostname-check \
  --allowed-site example.ru,example.kz \
  --style-json "$(cat ./style.json)" \
  --pre-check-type CHECKBOX \
  --challenge-type IMAGE_TEXT \
  --complexity HARD \
  --override-variants-file captcha-variants.yaml \
  --security-rules-file captcha-rules.yaml
File describing challenge options, captcha-variants.yaml
- uuid: variant-1
  description: Simple variant
  complexity: EASY
  pre_check_type: CHECKBOX
  challenge_type: SILHOUETTES
- uuid: variant-2
  description: Hard variant
  complexity: HARD
  pre_check_type: SLIDER
  challenge_type: KALEIDOSCOPE
File with incoming traffic rules, captcha-rules.yaml
- name: rule1
  priority: "11"
  description: My first security rule
  override_variant_uuid: variant-1
  condition:
    host:
      hosts:
        - exact_match: example.com
        - exact_match: example.net
- name: rule2
  priority: "12"
  description: My second security rule
  override_variant_uuid: variant-2
  condition:
    source_ip:
      geo_ip_match:
        locations:
          - ru
          - kz
-
In the Terraform configuration file, describe the resource properties, including challenge options and incoming traffic rules:
resource "yandex_smartcaptcha_captcha" "advanced-captcha" {
  name                    = "advanced-captcha"
  turn_off_hostname_check = true
  style_json              = "${file("style.json")}"
  complexity              = "HARD"
  pre_check_type          = "SLIDER"
  challenge_type          = "IMAGE_TEXT"

  allowed_sites = [
    "example.ru",
    "example.kz"
  ]

  override_variant {
    uuid        = "variant-1"
    description = "Simple variant"

    complexity     = "EASY"
    pre_check_type = "CHECKBOX"
    challenge_type = "SILHOUETTES"
  }

  override_variant {
    uuid        = "variant-2"
    description = "Hard variant"

    complexity     = "HARD"
    pre_check_type = "SLIDER"
    challenge_type = "KALEIDOSCOPE"
  }

  security_rule {
    name                  = "rule-1"
    priority              = 11
    description           = "My first security rule"
    override_variant_uuid = "variant-1"

    condition {
      host {
        hosts {
          exact_match = "example.com"
        }
        hosts {
          exact_match = "example.net"
        }
      }
    }
  }

  security_rule {
    name                  = "rule-2"
    priority              = 12
    description           = "My second security rule"
    override_variant_uuid = "variant-2"

    condition {
      source_ip {
        geo_ip_match {
          locations = ["ru", "kz"]
        }
      }
    }
  }
}
For more on the properties of the
yandex_smartcaptcha_captcharesource, see this provider guide. -
Create a CAPTCHA:
-
In the terminal, navigate to the configuration file directory.
-
Make sure the configuration is correct using this command:
terraform validateIf the configuration is valid, you will get this message:
Success! The configuration is valid. -
Run this command:
terraform planYou will see a list of resources and their properties. No changes will be made at this step. Terraform will show any errors in the configuration.
-
Apply the configuration changes:
terraform apply -
Type
yesand press Enter to confirm the changes.
-
Call the create API method, providing the following information in the request body:
{
  "folderId": "b1g0ijbfaqsn********",
  "name": "advanced-captcha",
  "allowedSites": [
    "example.ru",
    "example.kz"
  ],
  "complexity": "HARD",
  "styleJson": "styleJson": "{\"text-color-primary\": \"#1e1f20\", \"base-background-color\": \"#c7d0d6\", \"popup-image-container-background-color\": \"#aab4ba\", \"base-checkbox-background-color\": \"#5a7080\", \"base-checkbox-background-color-checked\": \"#5a7080\", \"base-checkbox-border\": \"2px solid #5a7080\", \"base-checkbox-spin-color\": \"#5a7080\", \"popup-textinput-background-color\": \"#c7d0d6\", \"popup-action-button-background-color\": \"#5a7080\", \"popup-action-button-background-color-hover\": \"#485863\" }",
  "turnOffHostnameCheck": "TRUE",
  "preCheckType": "SLIDER",
  "challengeType": "IMAGE_TEXT",
  "securityRules": [
    {
      "name": "rule-1",
      "priority": "11",
      "description": "My first security rule",
      "condition": {
        "host": {
          "hosts": [
            { "exactMatch": "example.com" },
            { "exactMatch": "example.net" }
          ]
        }
      },
      "overrideVariantUuid": "variant-1"
    },
    {
      "name": "rule-2",
      "priority": "12",
      "description": "My second security rule",
      "condition": {
        "geoIpMatch": {
          "ipRangesMatch": {
            "locations": [
              "ru",
              "kz"
            ]
          }
        }
      },
      "overrideVariantUuid": "variant-2"
    }
  ],
  "overrideVariants": [
    {
      "uuid": "variant-1",
      "description": "Simple variant",
      "complexity": "EASY",
      "preCheckType": "CHECKBOX",
      "challengeType": "SILHOUETTES"
    },
    {
      "uuid": "variant-2",
      "description": "Hard variant",
      "complexity": "HARD",
      "preCheckType": "SLIDER",
      "challengeType": "SILHOUETTES"
    }
  ]
}