Yandex Tracker: data export and visualization
Visualizing data from Yandex Tracker
To visualize data from Tracker to DataLens:
- Set up regular export of data to external storage.
- Visualize the required metrics and data using DataLens.
To visualize the data, follow these steps:
- Get your cloud ready.
- Create a DB for storing the Tracker data.
- Create an OAuth token for Tracker access.
- Create a Cloud Functions function for importing the data.
- Create a connection to DataLens.
- Create a dataset.
- Create a chart.
- Create a dashboard in DataLens and add charts to it.
Getting started
Note
We recommend creating a separate Tracker account to use the service.
Sign up for Yandex Cloud and create a billing account:
- Navigate to the management console
- On the Yandex Cloud Billing
ACTIVEorTRIAL_ACTIVEstatus. If you do not have a billing account, create one and link a cloud to it.
If you have an active billing account, you can navigate to the cloud page
Learn more about clouds and folders here.
Required paid resources
- Continuously running Managed Service for ClickHouse® cluster (see Managed Service for ClickHouse® pricing).
- Cloud Functions function usage (see Cloud Functions pricing).
If you no longer need the resources you created, delete them.
Create a DB for storing the Tracker data
- Navigate to the management console
- In the top-left corner, click
- Select Data platform → Managed Service for ClickHouse.
- Click Create ClickHouse cluster.
- Specify the cluster parameters:
- Basic parameters:
- Environment:
PRODUCTION - Version:
22.8 LTS
- Environment:
- Resources:
- Platform:
Intel Ice Lake - Type:
standart - Host class:
s3-c2-m8 (2 vCPU, 8 GB)
- Platform:
- Storage size:
30 GB - Hosts:
- Public access:
Enabled
- Public access:
- DBMS settings:
- User management via SQL:
Disabled - Managing databases via SQL:
Disabled - Username:
tracker_data - DB name:
db1
- User management via SQL:
- Service settings:
- DataLens access:
Enabled - Serverless access:
Enabled
For a full list of settings, see Managed Service for ClickHouse® settings.
- DataLens access:
- Basic parameters:
- Click Create cluster. Wait for the new cluster status to change to
Alive. - Copy and save the host name for further Cloud Functions setup.
Create an OAuth token for Tracker access
-
Go to the Create an app
-
Fill out the fields as follows:
- Service name
- Platforms:
Web services - Redirect URI: Click Enter URL for debugging or type
https://oauth.yandex.ru/verification_code.
-
Under Data access, specify:
Read from trackerWrite to tracker
-
Click Create app.
-
In the window that opens, enter the following URL in the browser search bar:
https://oauth.yandex.ru/authorize?response_type=token&client_id=<app_ID>Where
client_idis the new app's ID in the ClientID field. -
Log in under the Tracker account to be used for data visualization.
-
Save the received OAuth token.
Create a Cloud Functions function for importing the data
- Navigate to the management console
- In the top-left corner, click
- Select Serverless computing → Cloud Functions.
- Click Create function.
- Specify a name for the function and click Create.
- In the Editor window that opens, select the
Pythonruntime environment. - Click Continue.
- In the Method field, click ZIP archive.
- Attach a test archive
- In the Entry point field, specify
tracker_import.handler. - Under Parameters, specify:
- Timeout:
60 - Memory:
1024 - Environment variables:
-
TRACKER_ORG_ID: ID of the Yandex 360 for Business organization.Note
If you are using a Yandex Identity Hub organization (you can check this on the administration page
X-Org-IDheader withX-Cloud-Org-Idin thetracker_import.pyfunction code. -
TRACKER_OAUTH_TOKEN: OAuth token of the Tracker account. -
CH_HOST: Host name. -
CH_DB: Database name. -
CH_USER: Username. -
CH_PASSWORD: Password. -
CH_ISSUES_TABLE:tracker_issues. -
CH_CHANGELOG_TABLE:tracker_changelog. -
TRACKER_INITIAL_HISTORY_DEPTH:1d. -
CH_STATUSES_VIEW:v_tracker_statuses.
-
- Timeout:
- Click Save changes.
- In the Testing tab, click Run test.
- The test result is a data import log:
{ "statusCode": 200, "headers": { "Content-Type": "text/plain" }, "isBase64Encoded": false, "body": "OK" } - Create a trigger to regularly export new data to the DB:
- Open the Cloud Functions section.
- Click
- Set the trigger type to Timer.
- In the Cron expression field, select
Every day. - Under Function settings, click Create.
- Enter the account name. By default, the account is assigned the
functions.functionInvokerrole to work with the trigger. - Click Create.
- Click Create trigger.
Create a connection in DataLens
-
Open the Managed Service for ClickHouse® cluster.
-
On the left side of the window, select
-
Click Create connection.
-
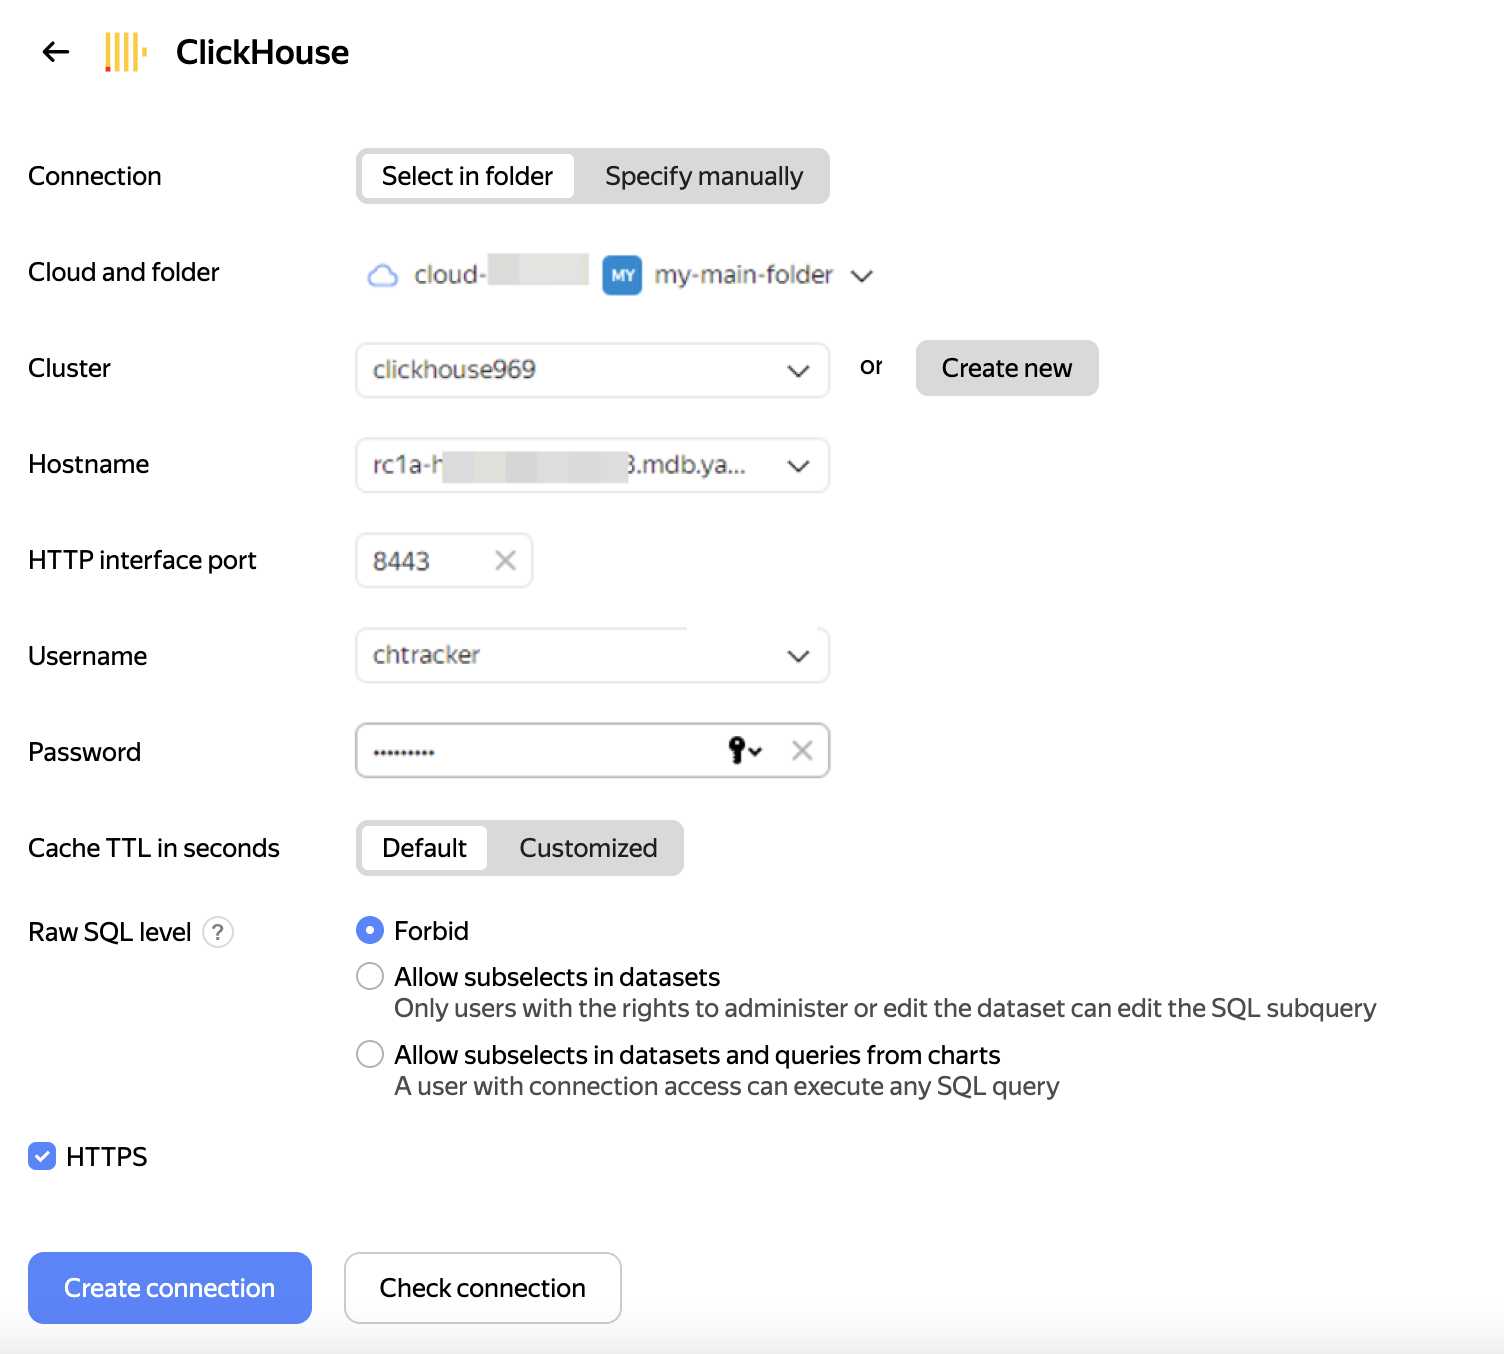
Specify the connection settings:
-
Connection:
Select in folder. -
Cluster: Cluster specified when creating the database.
-
Hostname: Host specified when creating the database.
-
HTTP interface port:
8443. -
Username: Username specified when creating the database.
-
Password: Password specified when creating the database.
-
Cache TTL in seconds:
Default. -
Raw SQL level:
Forbid. -
HTTPS:
Enabled.
-
-
Click Create connection.
Create a dataset
- Go to the connections page
- Select a connection.
- In the top-right corner, click Create dataset.
- Drag one or more tables to the workspace:
db1.v_tracker_issues: Current (most recent) issue cross-section.db1.v_tracker_changelog: Issue parameter change history.Db1.v_tracker_statuses: Status transition time based on the issue change history.
- Click Save.
Create a chart
-
Go to the DataLens
-
Click Create chart.
-
In the top-left corner, click
-
In the Datasets drop-down list, select the dataset you created in the previous step.
-
On the top panel, select a visualization type. By default, the Column chart type is selected.
Create a dashboard and add charts to it
-
On the Yandex DataLens
-
At the top of the dashboard page, click Add→ Chart.
-
Fill in the widget parameters. Pay close attention to the following fields:
- Name: Sets the name of the widget. It is displayed at the top of the widget.
- Chart: Sets the widget you are adding.
- Description: Sets the description of the widget. It is displayed at the bottom of the widget.
- Auto height: Sets the automatic height for Table and Markdown widgets. If this parameter is disabled, you can set the height of the widget on the page using the mouse.
-
Click Add. The widget will be displayed on the dashboard.
-
Save the dashboard:
- In the top-right corner of the dashboard, click Save.
- Enter a name for the dashboard and click Create.
For more information about setting up dashboards, see Yandex DataLens dashboard.
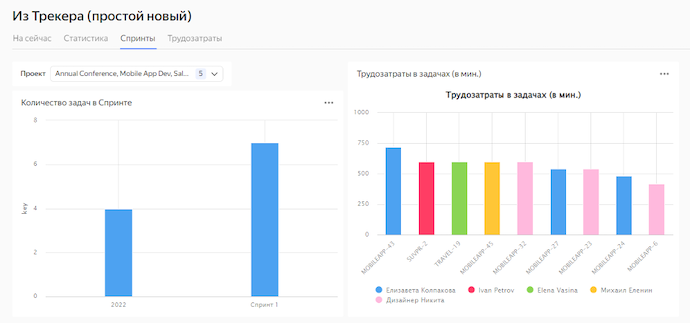
Sample dashboard based on data from the v_tracker_issues table

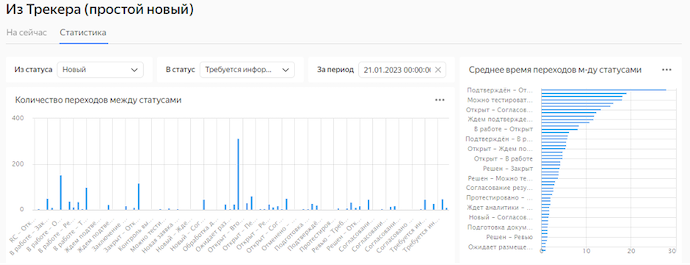
Sample dashboard based on data from the db1.v_tracker_statuses table

How to delete the resources you created
To stop paying for the resources you created:
ClickHouse® is a registered trademark of ClickHouse, Inc