Installing Stackland on Yandex BareMetal
Yandex BareMetal allows you to rent dedicated physical servers, with all their resources only used for your needs. Yandex Cloud Stackland supports Yandex BareMetal as one of its target environments for deployment.
In this tutorial, you will learn how to rent Yandex BareMetal servers and get them ready for Stackland deployment, as well as how to prepare a configuration file for installing Stackland on your rented servers. For details as to deploying a Yandex Cloud Stackland cluster on a ready-to-go infrastructure, see our Installation guide.
If you want to use network boot instead of manually booting the ISO image via the KVM console, see the Installing Stackland on Yandex BareMetal via PXE guide.
To configure the environment, this tutorial employs the Yandex Cloud management console. To use a different Yandex BareMetal interface, refer to the relevant articles.
Introduction
To deploy Stackland, you will need at least four servers:
-
One bastion host (also called a jump host) to deploy your Stackland cluster from and work with it later.
-
Three servers for your new Stackland cluster, connected to a single private network. The minimum Stackland configuration requires three servers, each having the
combinedrole.
When selecting a server configuration, consider the expected workload of your new cluster. For recommended resource requirements for a cluster, see our Installation guide.
The diagram below provides a high-level overview of the installation process:
Step 1: Create a private subnet
For successful deployment, all servers must reside in the same private network. To automatically assign IP addresses to cluster servers, enabling DHCP in this network is a convenient option.
Create a private subnet with a DHCP server:
-
In Yandex BareMetal, open the private network creation form and enable the IP addressing and routing toggle. To open the form, follow this guide: Creating a private subnet.
-
In the Virtual network segment (VRF) field, click Create.
-
In the Create virtual network segment window that opens, click Create VRF.
-
Specify a CIDR for the new subnet. The CIDR can be any from the RFC1918 range; also, you may want to use the
/24mask. For instance, you can set your CIDR to192.168.22.0/24. -
Specify the first address from the selected CIDR (i.e.,
192.168.22.1) as the default gateway. -
Enable the Assign IP addresses via DHCP option.
-
Specify an IP address range, e.g.,
192.168.22.2to192.168.22.120. The range must be wide enough to accommodate all nodes of your future Stackland cluster and one additional host.
Warning
IP addresses assigned to servers via DHCP may change. For more information about how DHCP works, see this Yandex BareMetal article.
Before installation begins, make sure the DHCP-assigned addresses are valid and match those specified in the DNS configuration in Step 5.
Step 2: Renting servers
-
Rent a server for the bastion host as described in this article.
Configure it as follows:
- Select the minimum stock server configuration if it meets your requirements.
- Select Ubuntu 24.04 as your OS.
- In the Private subnet field, select the subnet created in Step 1.
- Assign a Public address / From ephemeral subnet to provide your bastion with internet access.
- Set a password for the
rootuser and add your SSH key.
Once the bastion is created, save its Public IP address and Private IP address, as you will need them later.
You may use a Yandex Cloud VM as your bastion host. To configure network connectivity between the VM and BareMetal servers, follow this tutorial.
Warning
Establishing a private connection between the BareMetal cluster and cloud networks may take up to 24 hours.
-
Rent at least three servers for your new Stackland cluster.
Configure it as follows:
- Select the No OS option, as Stackland comes with its own OS.
- In the Private subnet field, select the subnet created in Step 1.
- Select No address for the public address: all interaction with your Stackland cluster will occur via the bastion.
Wait until your servers are rented. Then, open the Overview tab for each of the future Stackland cluster servers one by one and save their MAC addresses listed under Private network / MAC address.
You will need them in Step 6.
Step 3: Configuring the bastion
The bastion fulfills three primary functions:
- Provides external access to the Stackland cluster, e.g., from the internet or your organization's network.
- Enables Stackland cluster nodes to access the internet.
- Hosts infrastructure services required for Stackland operation, such as DNS and NTP. When deploying within the enterprise environment, they are typically part of the organization's IT infrastructure.
Before starting the setup, access your bastion over SSH using the public IP address listed on the server page. If the server is connected to an ephemeral public subnet, check the actual connection address in the server's public network interface settings.
3.1. Configuring network access
To enable external access to your Stackland cluster, we recommend that you install a VPN server, e.g., OpenVPN or WireGuard. To connect to a virtual network, you can follow the steps from this Yandex Cloud VPC tutorial, adjusting it to your situation.
After installing and configuring the VPN server, configure IPv4 routing and NAT, as your bastion will act as a router for VPN clients. Some VPN servers do this automatically. If required, configure routing manually on the bastion:
-
Install
ufw:sudo apt install ufw. -
Enable IPv4 routing: uncomment the
net.ipv4.ip_forward=1line in/etc/sysctl.confand apply the changes withsudo sysctl -p. -
Edit
/etc/default/ufwand change itsDEFAULT_FORWARD_POLICY, setting it toACCEPT. -
Create a file named
/etc/ufw/before.ruleswith the following contents:*nat :POSTROUTING ACCEPT [0:0] -A POSTROUTING -s <CIDR of subnet to allocate VPN client addresses from> -j MASQUERADE -A POSTROUTING -s <CIDR of private subnet created in Step 1> -j MASQUERADE COMMITThe first
-A POSTROUTINGrule in this file provides NAT translation for VPN clients; the second, handles NAT translation for cluster nodes accessing the Internet (e.g., for downloading container images). Since connections occur via NAT, cluster nodes will not be directly accessible from the internet. For example, if the VPN server is configured to allocate client addresses from the10.8.0.0/24range, the rules above would appear as:*nat :POSTROUTING ACCEPT [0:0] -A POSTROUTING -s 10.8.0.0/24 -j MASQUERADE -A POSTROUTING -s 192.168.22.0/24 -j MASQUERADE COMMIT -
Apply the changes by running these commands:
sudo ufw disable sudo ufw allow 22/tcp comment 'SSH' sudo ufw allow 1194/udp comment 'OpenVPN' sudo ufw allow from 192.168.22.0/24 to any port 53,123 proto udp sudo ufw enable -
Ensure routes to the private subnet created in Step 1 are announced to VPN clients. This is a must for services in the Stackland cluster to be reachable over the VPN connection. For details, see the relevant articles for your chosen VPN server.
3.2. Installing additional services
In addition to the VPN server, install the following on your bastion:
- DNS server (you may want to opt for BIND).
- NTP server, e.g., Chrony.
- Yandex Cloud CLI.
unziputility for extracting the installer ZIP file.
To complete bastion setup, do the following:
-
Install BIND, Chrony, and
unzipfrom Ubuntu repositories as usual:sudo apt install bind9 bind9utils dnsutils chrony unzip -y -
Configure BIND as the system's caching DNS resolver. To do this, edit
/etc/bind/named.conf.optionsand add the IP addresses of those public DNS servers that will perform actual resolution to theforwarders {}section. We recommend using Yandex DNS servers:77.88.8.8and77.88.8.1. Additionally, bind your BIND to the bastion's private IP address (192.168.22.1in the example below).; /etc/bind/named.conf.options options { ... forwarders { 77.88.8.8; 77.88.8.1; }; listen-on { 192.168.22.1; }; ... } -
Specify the bastion's private IP address as the upstream DNS resolver (
DNS=) in the/etc/systemd/resolved.confconfiguration file and reload the service configurations:sudo rndc reconfig sudo systemctl restart systemd-resolvedMany VPN servers allow DNS settings updates on the client when establishing a connection. For implementation details, see the relevant articles for your VPN server; configure its settings accordingly to enable external access to solutions deployed in Stackland.
-
Configure your Chrony to accept NTP requests on the required network interface. Edit your
/etc/chrony/chrony.conf, adding the following lines:allow 192.168.22.0/24 bindaddress 192.168.22.1 -
Replace
192.168.22.0/24with your private subnet's CIDR. Restart Chrony:sudo systemctl restart chrony
Step 4: Booting servers from an installation ISO image
- Navigate to BareMetal / Boot images and create a new BareMetal boot image, specifying
https://storage.yandexcloud.net/stackland-public/stackland/$version/images/stackland-amd64-$version.isofor Links to images in Object Storage. Replace$versionwith your current Stackland version. To learn more, see this Yandex BareMetal guide.
Once your custom ISO image is ready, upload it onto all servers of your future Stackland cluster one by one:
- Connect to the KVM console of each server.
- Open the Media > Virtual Media Wizard menu.
- Under CD/DVD Media, click Browse.
- In the
user-isodirectory, select the boot image you created earlier. - Click Connect to attach your image.
- In the top-right corner, click Reboot to cdrom to boot from the image.
Currently, this operation is only available from the management console, one server at a time.
Server boot takes a few minutes. After boot, a dashboard similar to the one shown below will appear in the KVM console:
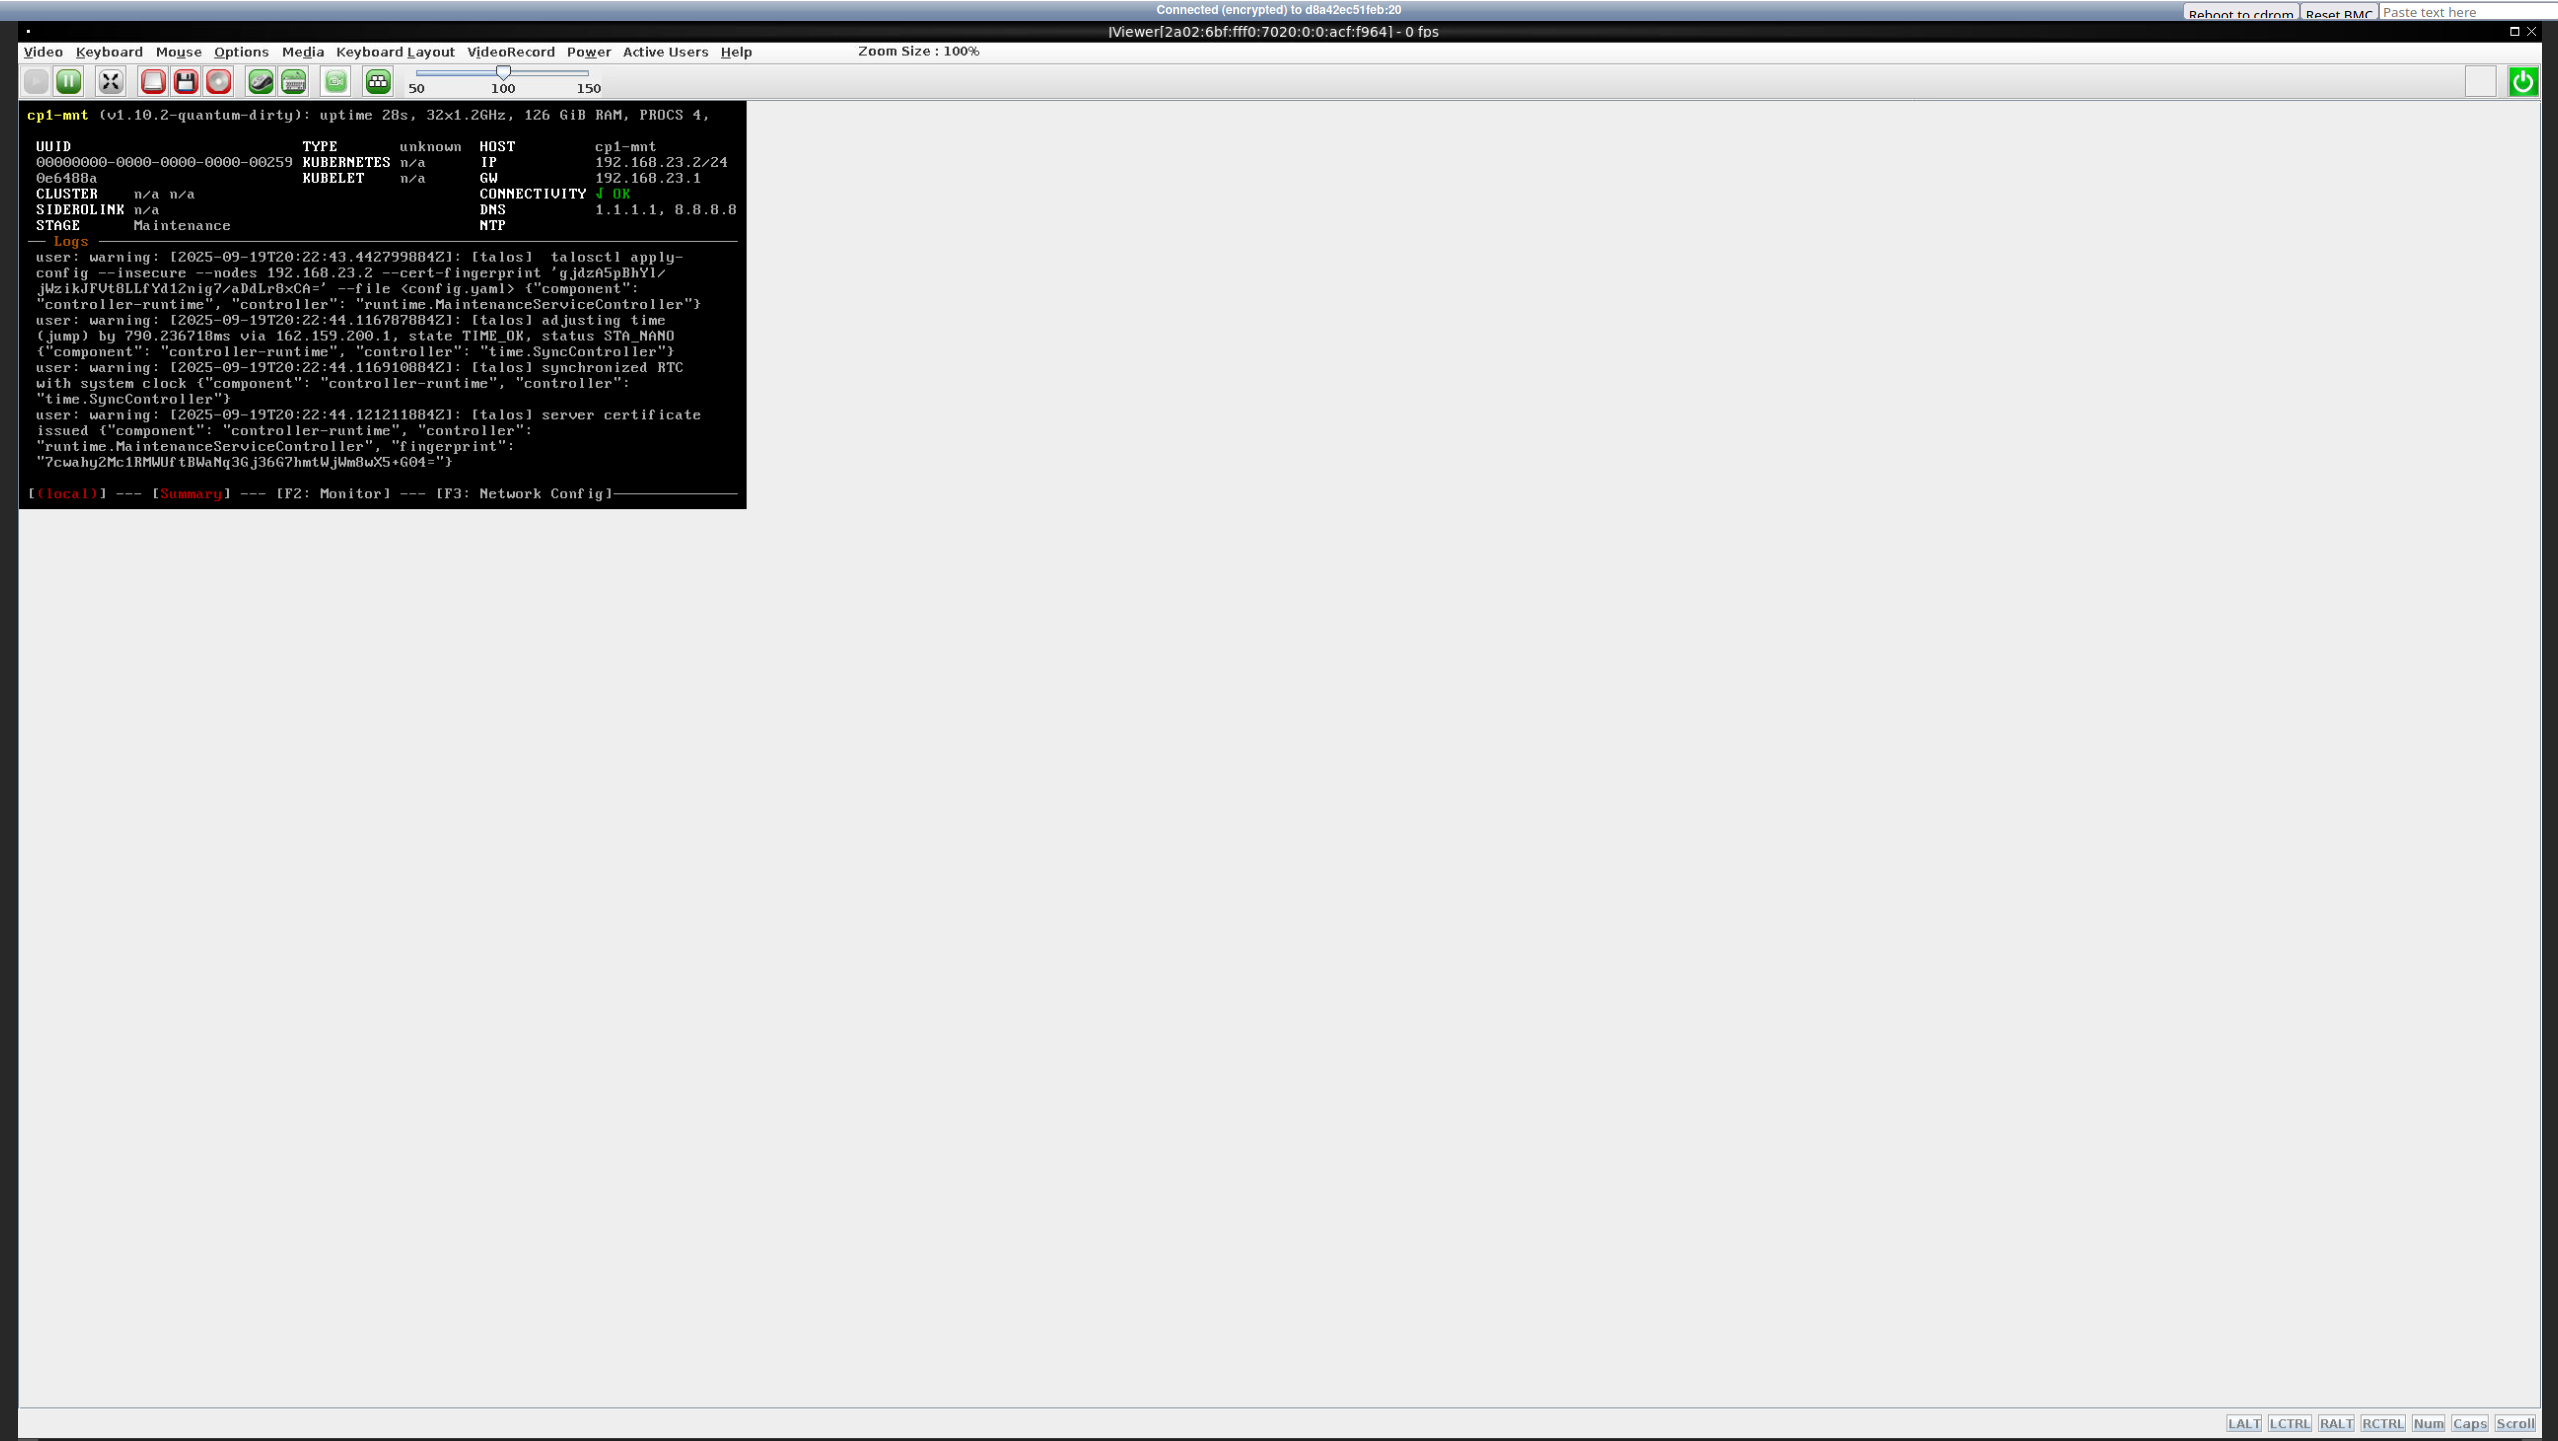
If you see the dashboard and it displays the Maintenance stage, the installation image booted successfully. For each node in your future Stackland cluster, save its assigned IP address from the IP field in the right column; you will need this when preparing the configuration file.
Step 5: Configuring DNS
When deploying Stackland within an enterprise environment, you can use the existing DNS infrastructure. Since BareMetal lacks such infrastructure, you must set it up first. Specifically, you need to delegate a DNS zone, e.g., stackland.internal, to your future Stackland cluster.
-
On your bastion, create a parent zone file (
/etc/bind/db.internal) with the following content:; /etc/bind/db.internal $TTL 1H @ IN SOA ns1.internal. admin.internal. ( 2025091801 ; Serial 3H ; Refresh 30M ; Retry 1W ; Expire 5M) ; Negative Cache TTL ; @ IN NS ns1.internal. ; ns1.internal. IN A 192.168.22.1 stackland.internal. IN NS node1.baremetal.internal. stackland.internal. IN NS node2.baremetal.internal. stackland.internal. IN NS node3.baremetal.internal.Also, create a server zone file. It will be used to map the IP addresses of nodes in the new cluster.
$TTL 15M
@   IN  SOA  ns1.internal. admin.internal. (
            2025091801 3H 30M 1W 5M )
@   IN  NS   ns1.internal.
node1  IN  A  192.168.22.2
node2  IN  A  192.168.22.3
node3  IN  A  192.168.22.4
This example assumes the cluster will be deployed in the
stackland.internalzone. Replace192.168.22.1with the bastion's IP address; replacenode1,node2, andnode3with the names you are going to assign to thecombinednodes; finally, replace192.168.22.[2-4]with their IP addresses you saved in the previous step. -
Edit
/etc/bind/named.conf.local, adding the newly created zone:; /etc/bind/named.conf.local zone "internal" { type master; file "/etc/bind/db.internal"; forwarders {}; }; zone "baremetal.internal" { type master; file "/etc/bind/db.baremetal.internal"; }; -
Reload BIND zones with this command:
sudo rndc reloadBefore rebooting zones, you can check the configuration using the following commands:
named-checkconf
named-checkzone internal /etc/bind/db.internal
named-checkzone baremetal.internal /etc/bind/db.baremetal.internal
If the
stackland.internalzone is configured to delegate to future cluster nodes,named-checkzonemay display warnings about NS records without A/AAAA records in the parent zone. Make sure node names resolve in thebaremetal.internalzone. -
If no errors occur, verify that domain name resolution works as expected:
dig -x 192.168.22.1 -t a ns1.internal.  # 192.168.22.1
host ns1.internal.  # 192.168.22.1
For more details on zone delegation, see our Installation guide.
Step 6: Preparing the configuration file and installation
The installer configuration file follows the format described in our Installation guide. When deploying on BareMetal, pay special attention to the network settings section, as BareMetal servers have multiple network adapters.
The configuration consists of the following three parts:
- Cluster configuration (
StacklandClusterConfig): General cluster settings, including the platform, subnets, and load balancer. - Host configuration (
StacklandHostsList): Settings for individual servers, including roles and network interfaces. - Secrets (
StacklandSecretsConfig): Sensitive data, such as a license key or an internal CA certificate.
For the three-node cluster described above as an example, the configuration file may look as follows:
# Cluster configuration
apiVersion: stackland.yandex.cloud/v1alpha1
kind: StacklandClusterConfig
metadata:
  name: main
spec:
  platform:
    type: "baremetal"                            # Deployment platform
    loadBalancer:
      type: "cilium-l2"                          # Load balancer type
      ipPools:
        - cidrs:
          - 192.168.22.128/25                    # Load balancer IP address range

  cluster:
    baseDomain: "stackland.internal"             # Cluster domain

    networking:
      hostsNetwork:
        - cidr: 192.168.22.0/25                  # Cluster host subnet
      clusterNetwork:
        - cidr: 172.16.0.0/16                    # Cluster pod subnet
      servicesNetwork:
        - cidr: 10.96.0.0/12                     # Cluster service subnet
      virtualIPs:
        api: 192.168.22.127                      # Virtual IP address for the cluster API

    storage:
      defaultStorageClass: "stackland-ssd"       # Default storage class. Edit it based on your server configuration.

  genericHostConfig:
    disksConfig:
      - installDisk:
          name: "/dev/sda"                     # System installation disk
    networkConfig:
      addresses:
        - interface: "eth0"                    # For each host, the interface will be selected in StacklandHostsList individually.
          dhcp: true                           # Use DHCP to get an IP address
      routes:
        - to: "0.0.0.0/0"                      # Default route
          via: "192.168.22.1"
          iface: "eth0"
      resolvers:
        - "192.168.22.1"                       # Bastion's private IP address
      timeservers:
        - "192.168.22.1"                       # Bastion's private IP address

---
# Host configuration
apiVersion: stackland.yandex.cloud/v1alpha1
kind: StacklandHostsList
metadata:
  name: main
spec:
  hosts:
    - hostname: "node1.baremetal.internal"       # First host's FQDN
      role: "combined"                           # Host role: combined, control-plane, or worker

      networkConfig:
        interfaces:
          - macaddress: "06:2A:B7:15:DE:F1"      # MAC address from Step 2
            name: "eth0"                         # Interface name

    - hostname: "node2.baremetal.internal"
      role: "combined"

      networkConfig:
        interfaces:
          - macaddress: "0E:9D:6B:FC:42:88"
            name: "eth0"

    - hostname: "node3.baremetal.internal"
      role: "combined"

      networkConfig:
        interfaces:
          - macaddress: "02:5E:C3:A8:07:D9"
            name: "eth0"
Note
The example above features DHCP for automatic assigning of IP addresses to servers. Make sure the DHCP-assigned IP addresses match those specified in the DNS configuration in Step 5.
Once you have finished editing, save the configuration files in the config/ directory and generate StacklandSecretsConfig with this command:
sladm secrets add --out config/secrets.yaml --license-key key.json
The further installation process is identical to that described in our Installation guide.
Step 7: Checking the cluster validity and next steps
Make sure that:
-
DNS names for the cluster are resolved when accessing from the bastion host.
-
You can establish a VPN connection to the bastion host.
-
With the VPN connection active, you can resolve cluster DNS names and successfully ping node IP addresses.
For the detailed post-installation cluster validation process, see our Installation guide.
If all the above tests are successful, your cluster should be accessible from any machine that establishes a VPN connection to the bastion.
This concludes your Stackland installation on Yandex BareMetal. For further cluster configuration steps. see the relevant articles.