Installation guide
This page outlines the general process of deploying a Yandex Cloud Stackland cluster on a pre-configured infrastructure. You can use it across different environments, e.g., Yandex BareMetal servers or Compute Cloud virtual machines.
The practical infrastructure preparation scenarios are described separately:
Getting started
Infrastructure
To deploy Stackland, you need the following minimum infrastructure:
- Three servers or VMs with 32 vCPUs and 64 GB RAM connected via an L2 network.
- Each server must have at least two disks: one for the system and the other for the data. The latter stores internal data of Stackland components, database files, Object Storage objects, etc.
- The minimum system disk size is 150 GB. For servers with the
control-planeandcombinedroles (see below), you need an SSD or NVMe as the system disk. Servers with theworkerrole can take any system disk type (HDD, SSD, or NVMe). - The cluster must have at least 1 TB of total data storage disk capacity.
- Servers need to be able to synchronize time: preferably a local NTP or an NTP web server.
You will also need a computer or jump host to access the cluster from.
Stackland servers may have one of these three roles:
control-plane: Managing server to deploy core Stackland components on.worker: Server to run user load.combined: Server that combines thecontrol-planeandworkerfunctions.
In small clusters (up to three nodes), you may want to use the combined role that allows running user loads on managing servers. We recommend using at least three nodes with control plane roles (the control-plane or combined role) to ensure cluster fault tolerance, and maintaining an odd number of such servers at all times.
Warning
For managing servers in the cluster, either use only control-plane roles or only combined roles, since you cannot use them both.
If the cluster is deployed on more than three servers, the minimum resources of every server may be reduced to 8 vCPUs and 16 GB RAM; however, the total amount of worker node resources must be at least 96 vCPUs and 192 GB RAM.
Note
Links and configuration examples use a notation with field and section names. For example, $cluster.$baseDomain stands for the baseDomain field in the cluster section.
Network settings
Stackland servers must reside in the same L2 domain. Each host can be assigned one (recommended) or multiple IP ranges, and the infrastructure must ensure routing to these ranges (via BGP announcement, OSPF, static routing, etc.).
Specify the address range from which load balancer IP addresses will be allocated. Ensure it does not overlap with any other ranges in the configuration file. To ensure this, split the range allocated to cluster hosts in half. For example, if the 192.168.1.0/24 range is allocated for the cluster, its lower half (192.168.1.0/25) may be reserved for host IP addresses, while the upper one (192.168.1.128/25), for network load balancers. You can also use a separate subnet (192.168.2.0/24) for load balancer addresses.
We strongly recommend allocating one of the host range IP addresses as a virtual IP address for the Kubernetes API server. To avoid conflicts, do not assign this IP address to any host and keep it outside the range allocated to network load balancers. Stackland ensures that the Kubernetes API stays available at the specified address even if some of the control-plane servers become temporarily unavailable.
IP addresses may be assigned to cluster hosts statically or via DHCP; however, in either case, they must be stable, i.e., must not change during Stackland installation and cluster operation. In addition, have the MAC addresses of your servers’ network interfaces connected to the host network at hand: you will need them to create the cluster configuration file.
Apart from the physical (host) network ranges, Stackland also uses multiple virtual IPv4 ranges to allocate addresses for Kubernetes pods and services. These can be any ranges from the RFC1918 list. You may want to select wide ranges (/16 or /12) that do not overlap with the ones used in the host network.
DNS
The $cluster.$baseDomain DNS zone must be delegated to hosts with the control-plane or combined role (see the hosts: section of the configuration).
If you are unable to delegate the zone, you can use wildcard entries or specify the required entries separately.
The following FQDNs must point to:
api.sys.$cluster.$baseDomain: Virtual IP address of the Kubernetes API ($virtualIPs.$api). If this is also impossible, they must point to IP addresses of nodes from thehostssection with thecontrol-planeorcombinedrole.*.sys.$cluster.$baseDomain: First IP address from the range allocated for load balancers.
If you are unable to use wildcards, then the following FQDNs must point to the first IP address from the range allocated for load balancers:
alertmanager.sys.$cluster.$baseDomainauth.sys.$cluster.$baseDomainconsole.sys.$cluster.$baseDomaindashboard.sys.$cluster.$baseDomaingrafana.sys.$cluster.$baseDomainprometheus.sys.$cluster.$baseDomainstorage.sys.$cluster.$baseDomain
Initial configuration
Before installing Stackland, describe the new cluster infrastructure in configuration files. Stackland configuration files use the YAML format and Kubernetes resource syntax. You can store the configuration in one or more files. The installer automatically loads all files that end with .yml or .yaml from the specified directory. To include multiple resources in a single configuration file, use --- as a separator. We recommend defining each resource in a dedicated file. This helps you manage configuration and track changes more easily.
No matter how resources are distributed across files, the Stackland configuration consists of three parts:
- Cluster configuration (the
StacklandClusterConfigresource): Includes general cluster settings, such as domain, network ranges, platform parameters, and load balancer settings. - Host configuration (the
StacklandHostsListresource): Includes cluster server details, such as host names, roles, and node-specific settings. - Secrets (the
StacklandSecretsConfigresource): Includes secrets, such as a license key or an internal CA certificate. Use thesladm secretscommand to manage this resource.
Below is an example of a configuration file (to make it simple, all resources are combined into one file):
# You can split the configuration into multiple files.
# Below is an example with four documents (including secrets) in a single file.
# This is done for clarity; in a real-life deployment, we recommend putting the documents into separate files.
# Cluster configuration
apiVersion: stackland.yandex.cloud/v1alpha1
kind: StacklandClusterConfig
metadata:
name: main
spec:
platform:
type: "baremetal" # Platform on which the deployment takes place: `baremetal` for physical servers or `vmware` for VMware virtualization
loadBalancer:
type: "cilium-l2" # Load balancer type. Currently only `cilium-l2` (Cilium L2 announcements) is available.
ipPools:
- cidrs:
- 192.168.23.128/25 # Range from which load balancer addresses will be assigned. You can specify it as CIDR notation...
# - ranges:
# - start: 192.168.24.10 # ...or in the form of the first and last address (inclusive)
# end: 192.168.24.12
cluster:
baseDomain: "stackland.internal" # Required. Cluster domain.
networking:
hostsNetwork:
- cidr: 192.168.23.0/25 # Required. Subnet in which the IP addresses of the cluster hosts are located.
clusterNetwork:
- cidr: 172.16.0.0/16 # Required. Subnet from which the IP addresses of the cluster pods are allocated.
servicesNetwork:
- cidr: 10.96.0.0/12 # Required. Subnet from which the IP addresses of the cluster services are allocated.
virtualIPs:
api: 192.168.23.127 # Optional, but highly recommended. Virtual IP address that is assigned to one of the healthy `control-plane` nodes and is transferred to another node if an issue occurs. Select any unoccupied IP address from the hostsNetwork range.
storage:
defaultStorageClass: "stackland-other" # Required. Default storage class: "stackland-hdd", "stackland-ssd", "stackland-nvme", or "stackland-other". The specified storage class must have disks in it; otherwise, the cluster cannot be deployed.
genericHostConfig: # General settings for all cluster hosts. Can be overridden for individual hosts in StacklandHostsList.
disksConfig: # Disk settings. All the properties listed below are also supported at individual host level in StacklandHostsList.
- installDisk:
name: "/dev/sda" # Required. Disk the system will be installed on.
networkConfig: # Network settings. All the properties listed below are also supported at individual host level in StacklandHostsList.
routes: # Optional. Static route settings.
- to: 0.0.0.0/0 # Required. IPv4 CIDR.
via: "192.168.23.1" # Optional. If not specified, the route is available directly.
iface: "eth0" # Required. Name of the interface for which the route is specified.
resolvers:
- 192.168.23.1 # Optional. IP address of the DNS resolver to use on the server nodes.
timeservers:
- 192.168.23.1 # IP address of the time server (NTP). Optional if the Stackland cluster has internet access. Otherwise, specify the address of the internal NTP server.
# genericHostConfigByRole: # General settings to apply to hosts of a specific role. Can be overridden for individual hosts in StacklandHostsList. Cannot be used together with genericHostConfig.
# controlPlane: {...}
# worker: {...}
# combined: {...}
---
# Configuration of control plane hosts
apiVersion: stackland.yandex.cloud/v1alpha1
kind: StacklandHostsList
metadata:
name: control-plane
spec:
hosts: # Settings for the hosts where the cluster will reside.
- hostname: "cp1.stackland.internal" # Required. Host FQDN. If the host has only addresses assigned via DHCP, the name must be resolvable at the time of cluster deployment.
role: "control-plane" # Required. Host role: `control-plane`, `worker`, or `combined`.
networkConfig:
interfaces: # Network interface settings. You can skip this section for single-interface machines: the interface will be automatically named `eth0`.
- macaddress: "f4:52:14:0b:10:a1" # Required. MAC address of the network interface. It is used as the interface ID when running searches.
name: "eth0" # Required. Name (ID) used to refer to the interface from the `addresses` section. It may not match the network interface name assigned by the Linux kernel (`eth0`, `eno1`, etc.)
addresses: # Address settings. You can skip this section for machines with a single network interface: in this case, DHCP at `eth0` is implied.
- interface: "eth0" # Required. Name of one of the interfaces. It must match the one assigned in the interfaces section.
ip: "192.168.23.2/24" # Required. CIDR-formatted IPv4 address the host will be available at during and after installation.
# dhcp: true # Assign address to the interface via DHCP. Prioritized higher than ip: above.
---
# Settings of the payload hosts
apiVersion: stackland.yandex.cloud/v1alpha1
kind: StacklandHostsList
metadata:
name: workers
spec:
hosts:
- hostname: "wrk1.stackland.internal"
role: "worker"
# There is no networkConfig section, because the host has a single DHCP-configured network interface, and the routing, DNS resolver, and NTP settings are no different from the typical ones.
- hostname: "wrk2.stackland.internal"
role: "worker"
disksConfig:
- installDisk:
name: "/dev/sdc" # Overrides the typical value specified in `StacklandClusterConfig`.
# There is no networkConfig section, because the host has a single DHCP-configured network interface, and the routing, DNS resolver, and NTP settings are no different from the typical ones.
features: # Overrides the typical value specified in `StacklandClusterConfig`.
- gpu # GPU support should be enabled on the host.
- nvlink # NVLink support should be enabled on the host.
---
# Secrets (managed via the `sladm secrets` command)
apiVersion: stackland.yandex.cloud/v1alpha1
kind: StacklandSecretsConfig
metadata:
name: main
spec:
# ...
Tip
If an individual component requires a storage class other than the default one, configure it prior to starting the component for the first time. For more information, see Switching storage class of a component.
Prior to installation
You must have a license key to get access to the required Stackland components. We recommend deploying Stackland from a machine running Ubuntu 22.04 or higher, or a Linux distribution with similar features.
Downloading the files
Download sladm and the installation image:
wget https://storage.yandexcloud.net/stackland-public/stackland/26.1.0/sladm-26.1.0-linux-amd64.zip
unzip sladm-26.1.0-linux-amd64.zip
chmod +x sladm

wget https://storage.yandexcloud.net/stackland-public/stackland/26.1.0/images/stackland-amd64-26.1.0.iso
wget https://storage.yandexcloud.net/stackland-public/stackland/26.1.0/images/stackland-amd64-26.1.0.iso.sha256
sha256sum -c stackland-amd64-26.1.0.iso.sha256
Preparing secrets
Before starting the installation, create a StacklandSecretsConfig resource containing the required secrets. Typically, this file is stored separately from other configuration files and not included in the version control system if the latter is used for configuration management. For this reason, the StacklandSecretsConfig resource is usually kept in a dedicated file named secrets.yaml.
Use the following command to initially create the StacklandSecretsConfig resource:
sladm secrets add --out config/secrets.yaml --license-key key.json
Where:
--out: Path to the file to store theStacklandSecretsConfigresource.--license-key: Path to the license key file.
This command creates an internal CA certificate and key for signing Stackland certificates. Your organization security policies might require cross-service communication to be authenticated by the company’s certificate authority. In this case, generate an intermediate CA certificate and key, sign it with your organization's certificate authority, and provide it in sladm secrets add as follows:
sladm secrets add \
  --out config/secrets.yaml \
  --license-key key.json \
  --int-ca-chain ca.crt \
  --int-ca-key ca.key
Here, ca.crt and ca.key stand for the signed intermediate CA certificate and key. For more information about certificate management, see Certificate Manager.
You can update an existing StacklandSecretsConfig resource with the sladm secrets update command. Provide a new license key as well as the intermediate CA certificate and key in any combination, using the same flags as in the sladm secrets add command. Here is an example:
sladm secrets update config/secrets.yaml \
  --int-ca-chain ca.crt \
  --int-ca-key ca.key
This command will replace the intermediate CA certificate and key in your resource. The --regenerate flag forces the system to regenerate all secrets except those you specify explicitly. Here is an example:
sladm secrets update config/secrets.yaml --license-key key.json --regenerate
This command will generate a new self-signed intermediate CA certificate and key. Use --regenerate with caution to avoid losing secrets from clusters you have already deployed.
Pre-configuring servers
Boot your servers from the installation ISO image. On the boot screen, select Talos ISO.
If your servers support network booting and share the same L2 domain with the bastion, you can use PXE instead of an ISO image. This scenario is described in Installing Stackland on Yandex BareMetal via PXE.
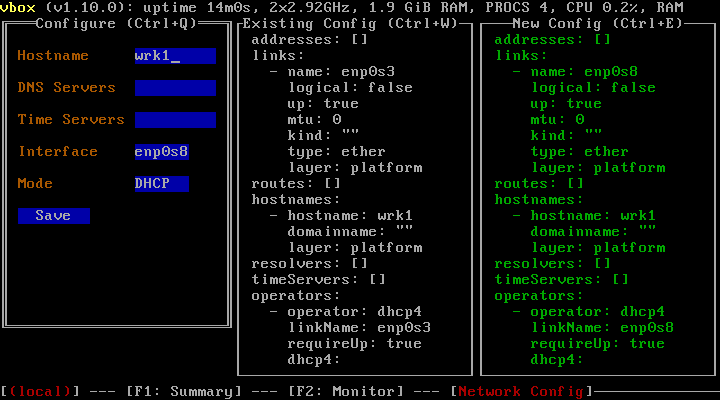
If the cluster's host network does not use DHCP, press F3 after booting and navigate to the server network settings. Fill in the fields according to your configuration:
- Hostname: Host name, e.g.,
cp1.stackland.internal. - DNS Servers:
<DNS server address>, optional during the initial setup. - Time Servers:
<NTP server address>, optional during the initial setup. - Interface: Interface for which to configure network settings, e.g.,
eth0. This interface must have its MAC address specified in the configuration file. - Mode:
Static. - Addresses: Server address, e.g.,
192.168.23.2/24. This address must matchinstallationIPin the cluster configuration file. - Gateway: Gateway address, e.g.,
192.168.23.1. For a cluster without internet access, you can specify any unoccupied address from the host range.
In the same way, configure the other servers.
Installing a cluster
Installation with internet access
Install your cluster using the final configuration file you created in the previous steps:
sladm install --config config/
Where --config: Path to the directory with resource configuration files or to a single configuration file containing all resources.
Before starting the installation, the sladm install command checks whether nodes are ready and shows an error message if it detects any issues. The cluster remains unchanged in this case. If you want to proceed with installation despite issues, use the --ignore-checks flag:
sladm install --config config/ --ignore-checks
You can also run the check separately without starting the Stackland installation:
sladm validate --config config/
Installation without internet access
The air-gapped installation of Stackland targets isolated environments without internet access. It includes three stages: preparing artifacts on an internet-connected machine, transferring them to an isolated machine, and deploying the cluster.
Preparing artifacts on an internet-connected machine
On an internet-connected machine, do the following:
-
Pull the container images:
sladm pull \
  --config config/ \
  --image-bundle full
Where:
--config: Path to the directory with Stackland configuration files.--image-bundle: Image bundle type. Usefullto get all required images.
The command will create a directory named
stackland-26.1.0-full-ociwith container images in OCI format. The directory takes up 20 to 25 GB.Note
The
fullpackage only contains the basic Stackland components. To load images of separately licensed components, such as SpeechSense, use a dedicated command with--image-bundle speechsense. For more information, see Uploading SpeechSense images. -
Prepare the files to move:
stackland-26.1.0-full-oci/: Directory with container images.config/: Directory with configuration files.stackland-26.1.0-amd64.iso: Installation ISO image.sladm: Installer.
Transferring artifacts to an isolated machine
Transfer the artifacts you prepared to the machine that will run the installation. The transfer method depends on the security policies in your organization:
- Removable media (USB and external drives).
- Secure file storage systems.
- Isolated network segments with controlled access.
Warning
Make sure the target machine has enough free space to store all artifacts (at least 25 GB).
Installing a cluster in an isolated environment
On your isolated machine, run the installation using the local image package:
sladm install \
  --config config/ \
  --image-bundle-folder stackland-26.1.0-full-oci \
  --image-bundle full
Where:
--config: Path to the directory with Stackland configuration files.--image-bundle-folder: Path to the directory with pulled container images.--image-bundle: Image bundle type, which must match the one specified when pulling images.
The installer automatically uses images from the local package rather than pulling them from the registry. The installation process takes about an hour and requires no internet access.
Note
For air-gapped installation, the system will deploy all required components from your local image package.
General installation info
Keep in mind that Stackland manages its own infrastructure layer, including the OS. If the servers where you are installing Stackland already have an OS, it will be deleted. Stackland is based on Talos, an open-source minimalistic Linux-based OS. Talos is not a common Linux distribution; in particular, it does not provide remote SSH access or other interactive administration features. Stackland components will apply all required settings automatically.
Resuming installation
If your Stackland installation fails, you do not need to restart it from scratch. After resolving the issue, such as rebooting a faulty node or fixing network settings, you can re-run it using the same sladm install command. The installer automatically identifies the stage where the failure occurred and resumes from that point, skipping completed steps.
The default timeout for installing Stackland is one hour. You can override it with the --installation-timeout flag as needed:
sladm install --config config/ --installation-timeout 2h
If the installation does not complete within the allotted time, re-run it as described above. To speed up the process, use --ignore-checks. In most cases, this is enough to complete the installation successfully.
Once the installation is complete, the system will create a context for the cluster-admin role in the deployed cluster. It will be created in the local file the $KUBECONFIG environment variable ($HOME/.kube/config by default) points to. This is a superuser role that allows performing any operations, including destructive ones. If the access to the kubeconfig file is unlimited on the host from which you ran installation, you may want to specify an alternative path to the created kubeconfig file using --kubeconfig-path:
sladm install \
  --config config/ \
  --kubeconfig-path <path to directory with limited access permissions>/kubeconfig
By default, the installer does not replace the existing kubeconfig file; instead, it adds a new context named admin@$cluster.$baseDomain to it. Before running queries to the cluster, use the kubectl config set-context admin@$cluster.$baseDomain command to activate that context.
The installer will also create artifacts in the _out directory. Once the Stackland cluster is deployed, save the content of this directory, as you might need it when collecting diagnostic data and analyzing potential issues (see Diagnostics and troubleshooting for details).
After the installation is complete, sladm will display the cluster connection details, such as the management console address and default credentials.
Testing the cluster
Once the cluster is deployed, you can access its various components:
https://console.sys.$cluster.$baseDomain: Cluster management console.https://dashboard.sys.$cluster.$baseDomain: Cluster dashboard.https://grafana.sys.$cluster.$baseDomain: Cluster charts in Grafana.https://prometheus.sys.$cluster.$baseDomain: Cluster metrics in Prometheus.https://alertmanager.sys.$cluster.$baseDomain: Cluster alerts in Alertmanager.
Once you make sure the console is available, create a user on whose behalf you will proceed with configuring, and download its kubeconfig.
Installation errors and how to fix them
If the Stackland cluster deployment still fails, resolve the issue and reset all cluster machines to their initial state before re-running the installation. Proceed as follows:
- Boot the server from the Stackland installation image.
- In the menu that opens, select Reset Talos installation and return to maintenance mode.
- Wait until the server reboots.
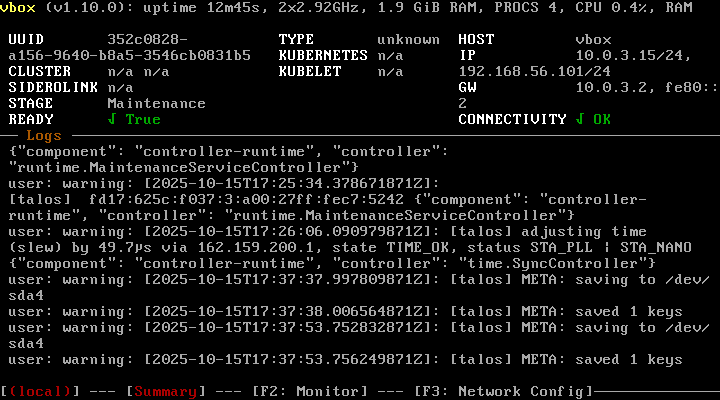
- Make sure you see
Maintenanceunder STAGE on the dashboard displayed on your server's local console (see the image below).
This reset method preserves network settings, including the server IP address. If you need to change them, you can do so manually via the menu accessed by pressing F3 (see the image below). Enter the complete configuration (you cannot edit the existing settings), and then, reboot the server.
Alternatively, you can wipe the hard drive using any preferred method, e.g., by:
- Booting the server from SystemRescueCd and erasing the first few megabytes with the
ddcommand. - Deleting and recreating the disk if deploying in a virtual environment.
If re-installation is also unsuccessful, collect diagnostic data as described in Diagnostics and troubleshooting and contact the Stackland team for assistance.