Getting started with Managed Service for Sharded PostgreSQL

With Managed Service for Sharded PostgreSQL, you can create and maintain sharded PostgreSQL (SPQR) clusters in the Yandex Cloud infrastructure. Sharded PostgreSQL uses a PostgreSQL protocol, enabling you to configure sharding rules and run database queries using the psql client. Sharding rules are configured through the admin console (SPQR router admin console). When connecting to the administrator console, put spqr-console for user name and spqr-console for database name.
To get started:
- Create a Sharded PostgreSQL cluster.
- Create shards in the Sharded PostgreSQL cluster.
- Set up your environment.
- Set up sharding rules.
- Send your requests to the database.
Getting started
-
Navigate to the management console and log in to Yandex Cloud or sign up if not signed up yet.
-
If you do not have a folder yet, create one:
-
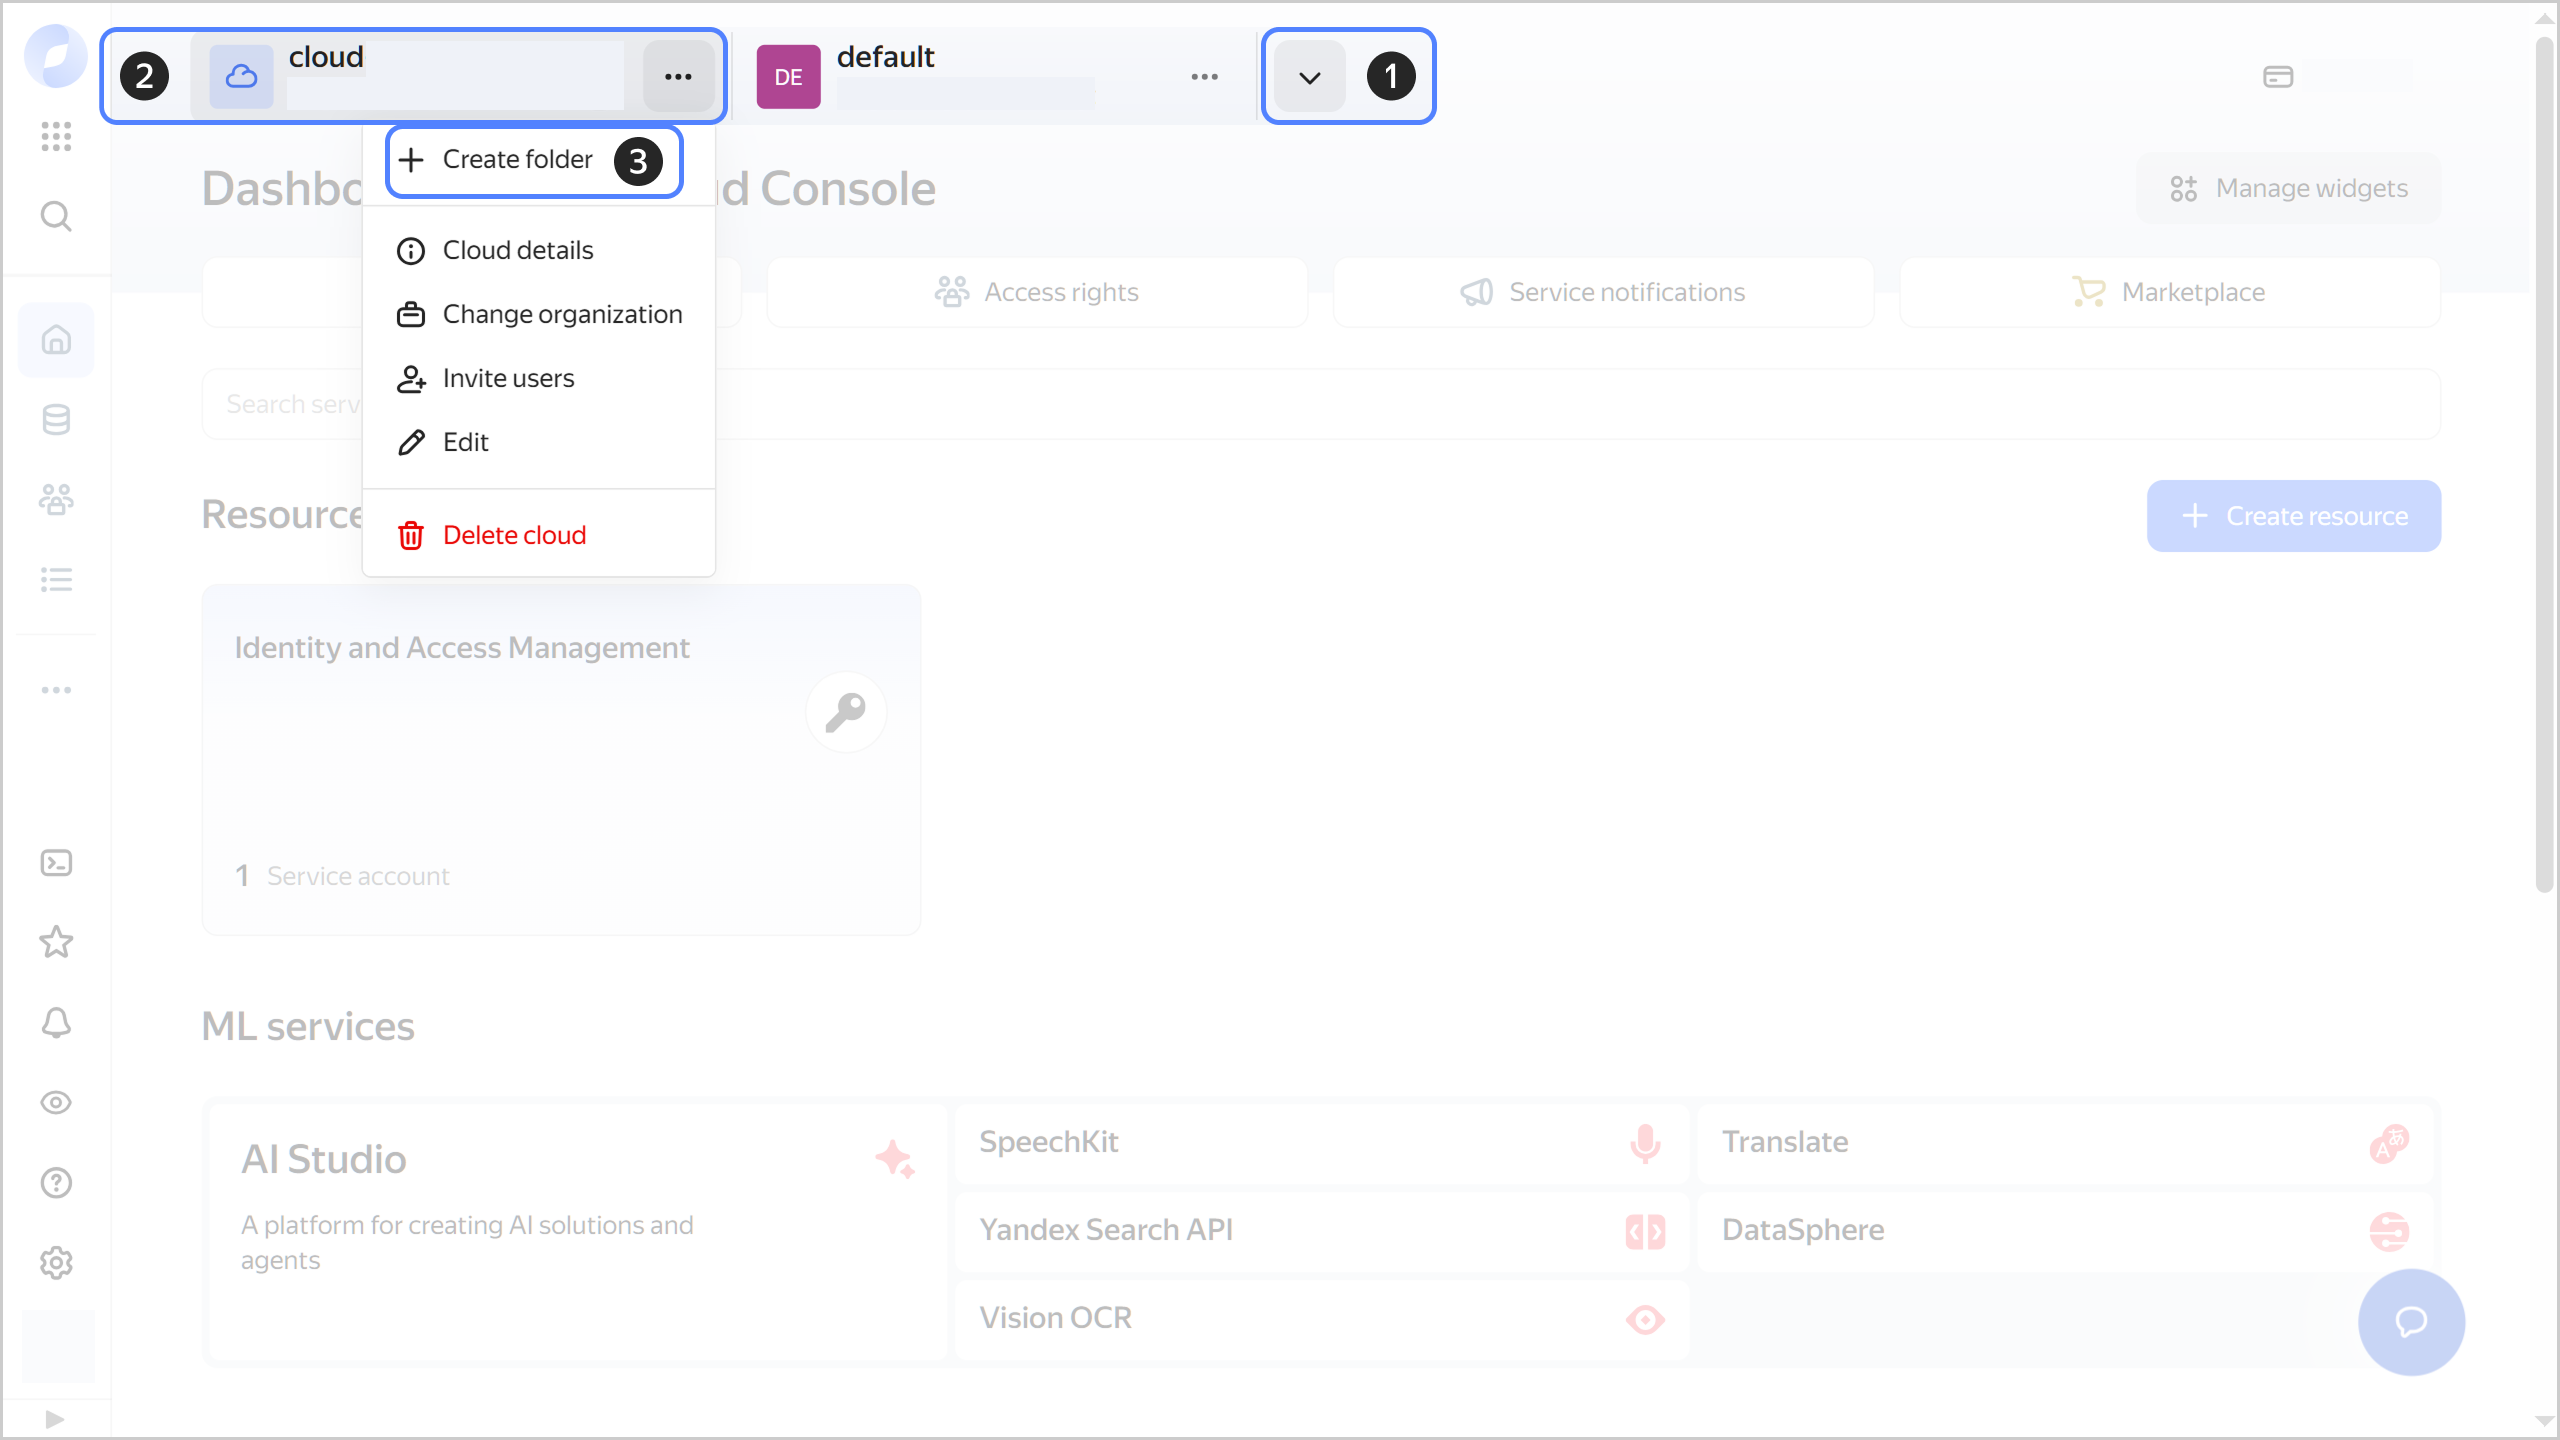
In the management console, in the top panel, click or and select the cloud.
-
To the right of the cloud name, click .
-
Select Create folder.
-
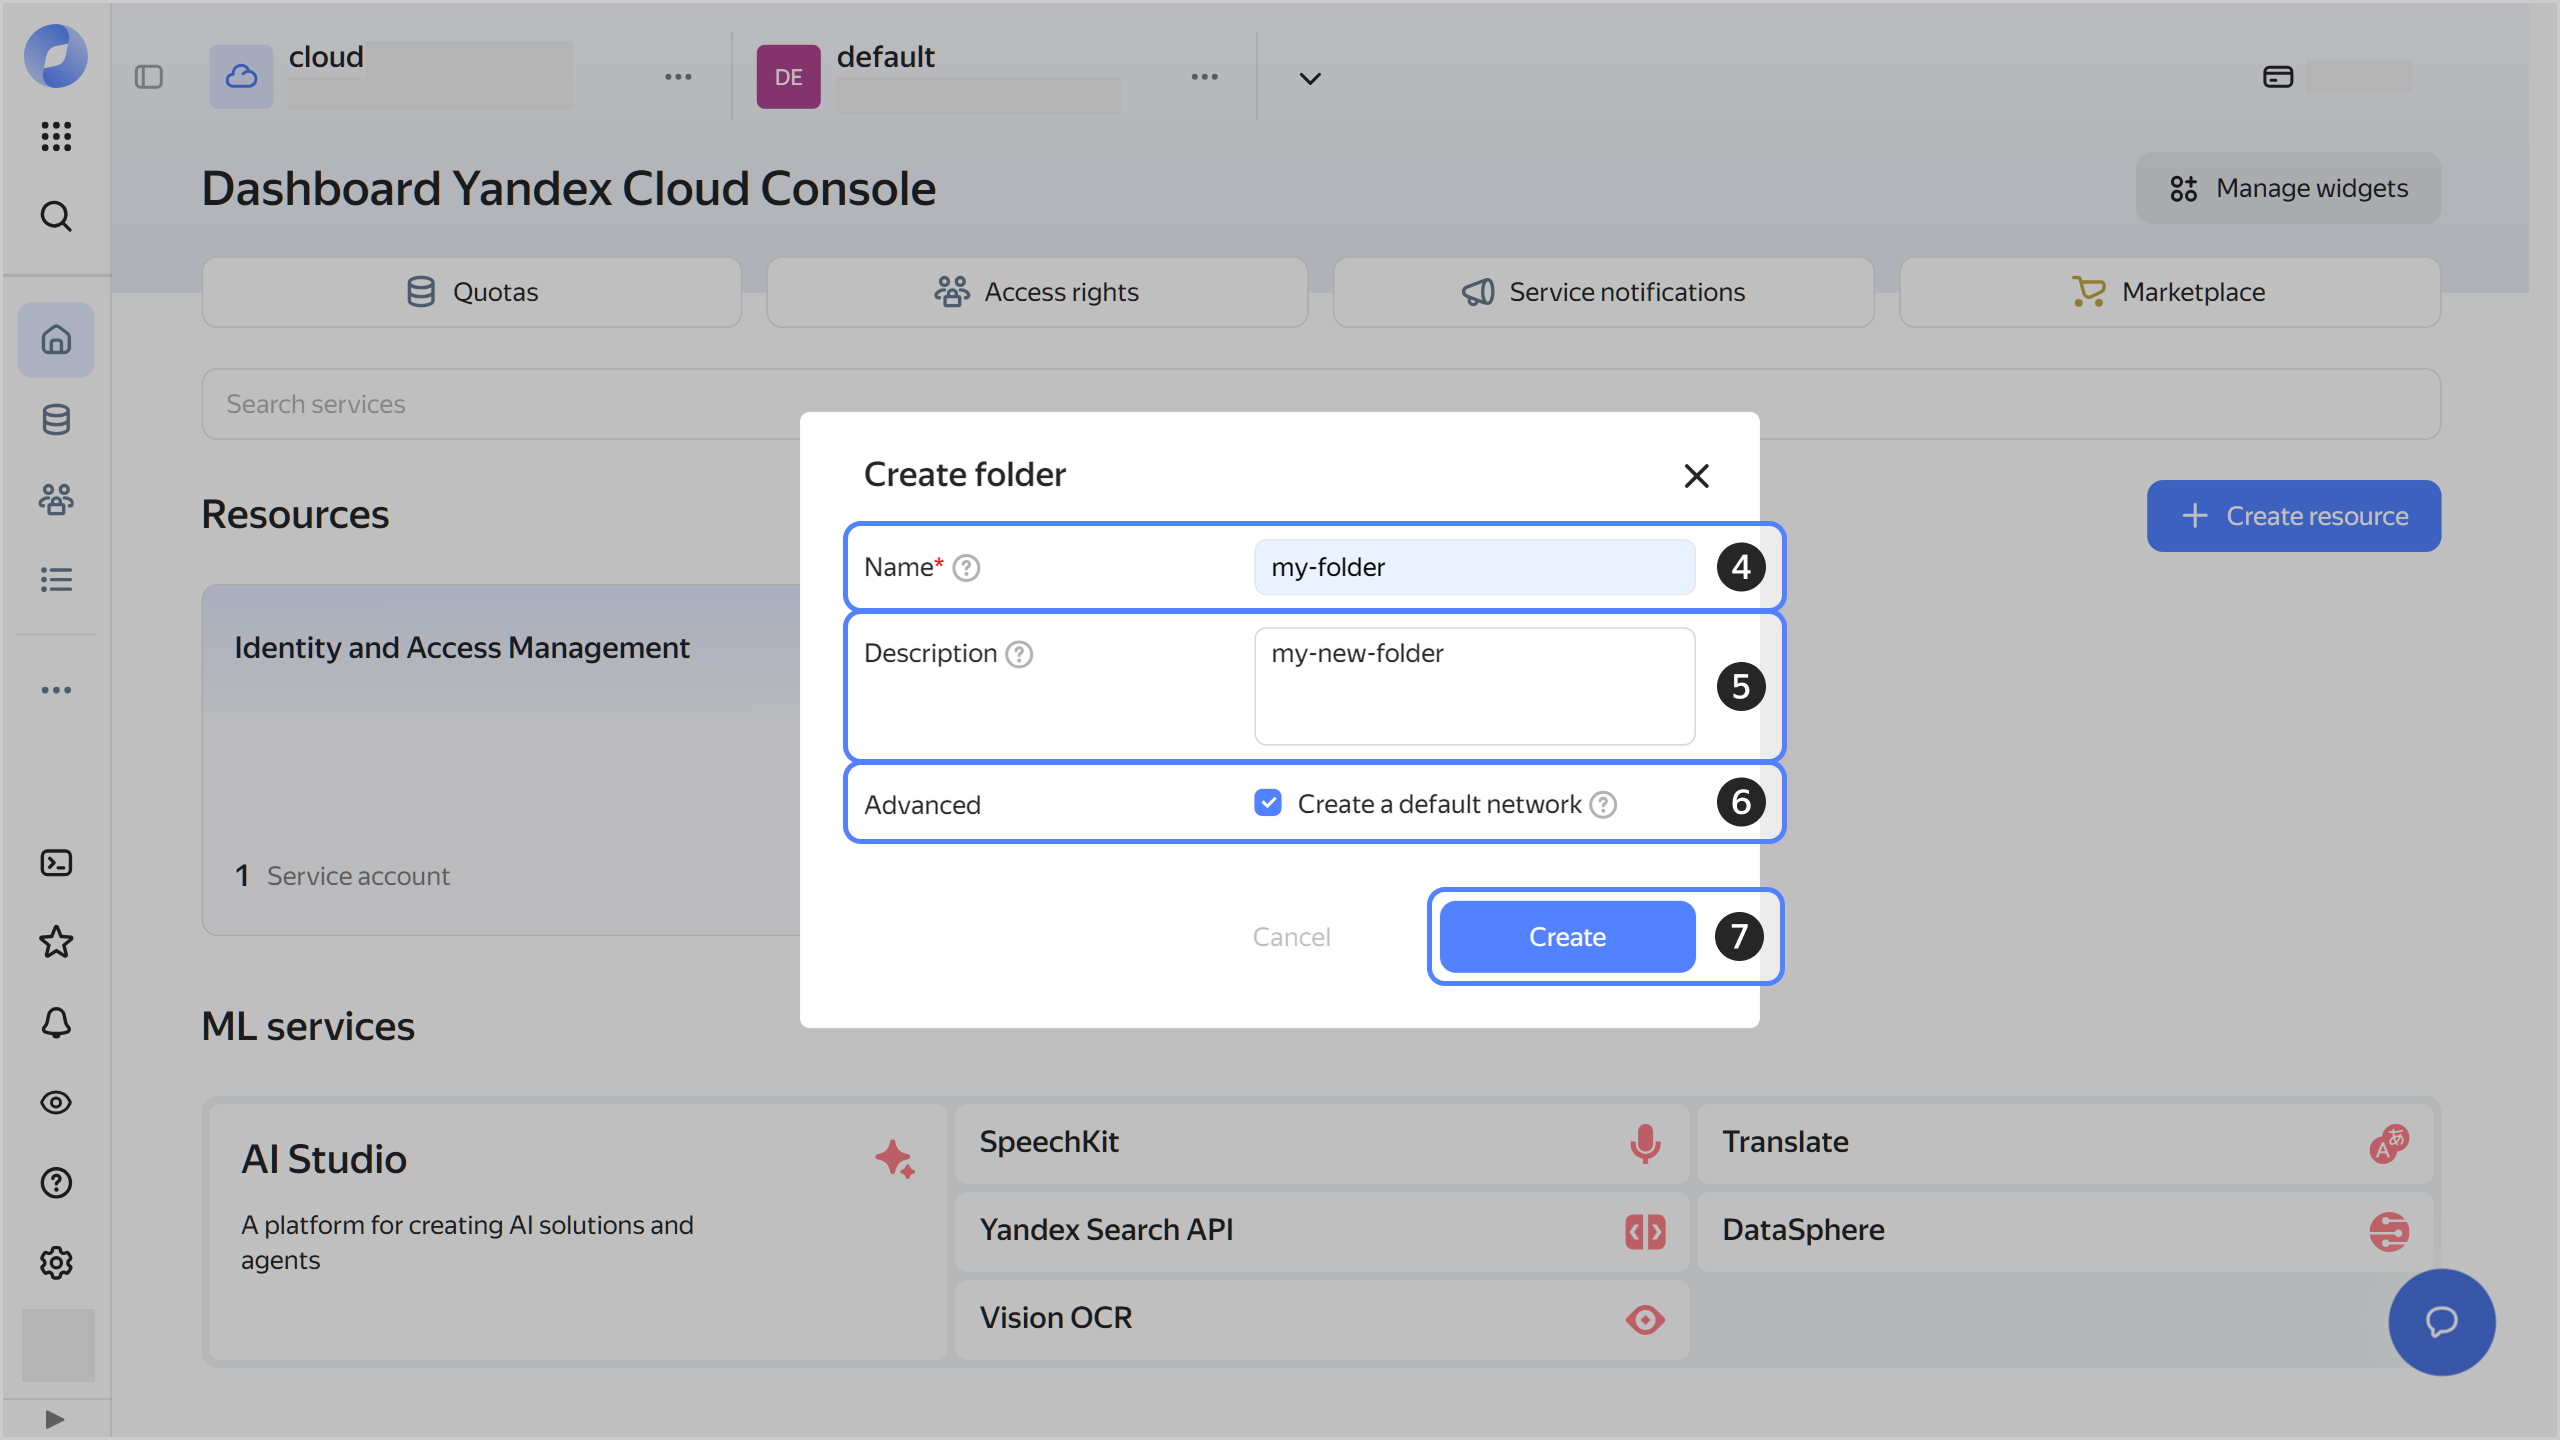
Give your folder a name. The naming requirements are as follows:
- Length: between 3 and 63 characters.
- It can only contain lowercase Latin letters, numbers, and hyphens.
- It must start with a letter and cannot end with a hyphen.
-
Optionally, specify the description for your folder.
-
Select Create a default network. This will create a network with subnets in each availability zone. Within this network, you will also have a default security group, within which all network traffic will be allowed.
-
Click Create.
-
-
Assign the vpc.user and
managed-spqr.editorroles for the folder to your Yandex Cloud account. These roles allow you to create a cluster.Note
If you cannot manage roles, contact your cloud or organization administrator.
-
You can connect to DB clusters from both inside and outside Yandex Cloud:
-
To connect from inside Yandex Cloud, create a Linux VM in the same network as the DB cluster.
-
To connect to the cluster from the internet, enable public access to hosts when creating the cluster.
Note
The next step implies connecting to the cluster from a VM. If your plan is to connect to the cluster from the internet, proceed to creating a cluster.
-
Create a cluster
-
In the management console, select the folder where you want to create a Sharded PostgreSQL cluster.
-
Navigate to Yandex Managed Service for Sharded PostgreSQL.
-
Click Create cluster.
-
In the Cluster name field, enter a name for the cluster.
-
Select the
PRODUCTIONenvironment. -
Select the sharding type:
- Standard: Cluster will consist only of infrastructure hosts.
- Advanced: Cluster will consist only of router hosts and coordinator hosts.
-
Under Network settings:
- Select the cloud network you created before you started out.
- Select the default security group or create a new one.
-
Specify the computing resource configuration:
- For standard sharding, specify the infrastructure host configuration under Infrastructure.
- For advanced sharding, specify the router host configuration under Router.
To specify your computing resource configuration:
-
Select the host class. Host class determines the technical specifications of the VMs the cluster hosts will be deployed on.
-
Under Storage:
-
Under Hosts, specify the availability zones and subnets for the hosts that will be created together with the cluster.
If you plan to connect to the cluster from the internet, enable Public access for the hosts.
-
Under Coordinator, configure the coordinator hosts.
-
Under Database, specify parameters of the database in which you can run queries to tables in shards:
- Database name. It must be unique within the folder.
- Database owner username.
- Password.
-
Under Advanced settings, specify the password for the Sharded PostgreSQL console, where you can configure sharding rules. Learn more about the Sharded PostgreSQL console here.
-
Click Create cluster.
-
Wait until the cluster is ready to work: its status will change to Running, and its state to Alive. To check its state, hover over the cluster status in the Availability column.
Create shards in the cluster
Create two shards in the Managed Service for Sharded PostgreSQL cluster. To create a shard:
-
In the management console, select the folder where you created the Sharded PostgreSQL cluster.
-
Create a Managed Service for PostgreSQL cluster in the same cloud network as the Sharded PostgreSQL cluster.
-
Open your Sharded PostgreSQL cluster and go to the Shards tab.
-
Click Create shard in the top-right corner of the page.
-
In the window that opens:
-
Specify the shard Name.
-
In the Managed Service for PostgreSQL cluster field, select the PostgreSQL cluster you previously created.
The Managed Service for PostgreSQL cluster must be in the same folder and cloud network as the Managed Service for Sharded PostgreSQL cluster.
-
Warning
Make sure the router can connect to shard hosts. For this to work, the shards and the Managed Service for Sharded PostgreSQL cluster must be in the same security group that allows incoming and outgoing TCP connections to port 6432.
Set up your environment
-
Obtain an SSL certificate:
mkdir -p ~/.postgresql && \
wget "https://storage.yandexcloud.net/cloud-certs/CA.pem" \
        --output-document ~/.postgresql/root.crt && \
chmod 0655 ~/.postgresql/root.crt
The certificate will be saved to the
~/.postgresql/root.crtfile. -
Install the required dependencies and the PostgreSQL client:
sudo apt update && sudo apt install -y postgresql-client
-
Install the latest version of PostgreSQL for Windows. Install only the Command Line Tools.
-
Obtain an SSL certificate:
mkdir $HOME\.postgresql; curl.exe -o $HOME\.postgresql\root.crt https://storage.yandexcloud.net/cloud-certs/CA.pemThe certificate will be saved to the
$HOME\.postgresql\root.crtfile.
Set up sharding rules
Warning
If you are using security groups for your cloud network, configure them to allow all relevant traffic between the cluster and the connecting host.
-
Connect to the administrator console:
Linux (Bash)/macOS (Zsh)Windows (PowerShell)psql "host=<host_FQDN> \ port=6432 \ sslmode=verify-full \ sslrootcert=~/.postgresql/root.crt \ dbname=spqr-console \ user=spqr-console"Learn more about connecting to a Managed Service for Sharded PostgreSQL cluster.
& "C:\Program Files\PostgreSQL\<PostgreSQL_major_version>\bin\psql.exe" `
    --host=<host_FQDN> `
    --port=6432 `
    --username=spqr-console `
    --dbname=spqr-console `
    --set=sslmode=verify-full `
    --set=sslrootcert=$HOME\.postgresql\root.crt
Learn more about connecting to a Managed Service for Sharded PostgreSQL cluster.
-
Create a sharding rule:
CREATE DISTRIBUTION ds1 COLUMN TYPES int;A sharding rule named
ds1will be created forinttype columns. -
Link the table to the rule and specify the sharding key:
ALTER DISTRIBUTION ds1 ATTACH RELATION customers DISTRIBUTION KEY id;The
customerstable will be linked to theds1rule. Theidcolumn is the sharding key for thecustomerstable. -
Create key value ranges to distribute data across shards:
CREATE KEY RANGE krid2 FROM 1000 ROUTE TO <shard_2_name> FOR DISTRIBUTION ds1;
CREATE KEY RANGE krid1 FROM 1 ROUTE TO <shard_1_name> FOR DISTRIBUTION ds1;
Warning
Create key value ranges starting with the largest value. Breaking this order will result in the
key range krid2 intersects with key range krid1 in QDBerror. For the range with the largest key value, the right boundary will equal infinity. -
To exit the administrator console, run the
\qcommand.
Send your requests to the database
-
Connect to the database:
Linux (Bash)/macOS (Zsh)Windows (PowerShell)psql "host=<host_FQDN> \ port=6432 \ sslmode=verify-full \ sslrootcert=~/.postgresql/root.crt \ dbname=<DB_name> \ user=<username> \ target_session_attrs=read-write"Learn more about connecting to a Managed Service for Sharded PostgreSQL cluster.
& "C:\Program Files\PostgreSQL\<PostgreSQL_major_version>\bin\psql.exe" `
    --host=<host_FQDN> `
    --port=6432 `
    --username=<username> `
    --dbname=<DB_name> `
    --set=target_session_attrs=read-write `
    --set=sslmode=verify-full `
    --set=sslrootcert=$HOME\.postgresql\root.crt
Learn more about connecting to a Managed Service for Sharded PostgreSQL cluster.
-
Create a table named
customers:CREATE TABLE customers ( id INT, name VARCHAR, phone VARCHAR, acctbal NUMERIC ); -
Start the transaction:
BEGIN; -
Add rows:
-
Add a row to the shard with a value range
krid1:INSERT INTO customers (id, name, phone, acctbal) VALUES (28, 'John Doe', '123-45-67', 1500.50) -
Add a row to the shard with a value range
krid2:INSERT INTO customers (id, name, phone, acctbal) VALUES (3200, 'David Smith', '555-66-77', -50.75)
-
-
Complete the transaction:
COMMIT; -
View rows by specifying the key value in the query, e.g.:
SELECT * FROM customers WHERE id = 28;The
SELECT * FROM customers;query will result in an error because the rows are distributed across different shards. You can only get rows from one shard at a time. To check the distribution of rows across shards, connect to each shard and view the added entries. -
To exit the database, run the
\qcommand.
What's next
- Read about the service concepts.
- Learn more about creating a cluster and connecting to a database.