Data for SpeechKit Brand Voice Lite
SpeechKit Brand Voice Lite allows creating your unique voice based on a minimum of marked-up audio samples. This will get you the ID of a model you will be able to access from your applications via API.
Data required for training
To create a SpeechKit Brand Voice Lite voice of your own, you need to prepare a training dataset consisting of audio recordings and the texts they are based on. Each audio must strictly match the text that comes with it.
The size of the training dataset depends on the speaker's articulation and the purpose of the new voice. For example, a voice used to narrate literary fiction would require more data than a voice for a virtual assistant. You need at least 30 minutes of audio, not counting the silence at the beginning and end of each file. The recommended duration is 60 minutes. For best results, use 90 minutes of audio or more. To create a voice with multiple roles, you will need a separate dataset for each one.
Tip
The result of SpeechKit Brand Voice Lite voice model training directly depends on training data. To get a high-quality SpeechKit Brand Voice Lite voice, adhere to all the recommendations we give for texts and audio.
At least 30% of the training data should contain questions so that the trained voice could reproduce the interrogative tone in texts. You can use ready-made phrases from the SpeechKit team or prepare your texts by yourself. For tips on creating and formatting training texts, see Text requirements.
You can upload a dataset with all audio recordings and transcripts as a single archive, upload audio files one by one, or record an audio for each phrase in the management console using your browser. In either case, make sure you follow the audio recording recommendations and listen through all your audios to ensure high quality of source data for voice model training. Once you start training, you will no longer be able to edit your dataset.
Text requirements
The SpeechKit team provides a ready-made body of texts you only need to vocalize. It contains narrative, interrogative, and exclamatory phrases you would need in most cases to create voices in Russian. You can also prepare your own texts for audio but make certain they meet the following requirements:
- Your texts must be free of grammatical errors.
- The recommended phrase length is no more than 250 characters.
- There must not be any incomplete phrases.
ing time! He won't be happy about that. If you hadn't had that argument, you could have asked for anything you wa.
-
When recording Russian speech, make sure to use the letter ё when needed in the pattern text. You cannot use е instead of ё in any synthesized text.
-
In homographs where the stress may be ambiguous, explicitly indicate the stressed vowel with the
+sign.The +import of goods from foreign countries.: Stress falls on the first syllable.
Goods they im+port from China.: Stress falls on the second syllable. -
The lines of text for synthesis cannot include numbers or abbreviations, such as 15 Smith st., bl. 3 or USD 13.10. Make sure to spell out all numbers and abbreviations.
Fifteen Smith street, block three.
Thirteen dollars and ten cents. -
In questions, specify which word should be **logically stressed** to indicate the intonation of an interrogative sentence.
The sentence Did the cat go to the forest? can be read in three different ways:
- Did the **cat** go to the forest? Meaning Who went to the forest? Was it really the cat?
- Did the cat **go** to the forest? Meaning Did the cat walk or run? or Was the action performed? Is the cat gone or not?
- Did the cat go **to the forest**? Meaning Where did the cat go and why? To the forest, outside, to look for a sausage?
In all sentences, the logical stress emphasizes the main meaning of the sentence.
Audio recording recommendations
Record in a quiet room without background noise. Fan, AC unit, fridge, street noise, background music, echo – all these will get into the recording and strongly affect the quality of your new voice. A room lined with acoustic panels would be the perfect place for your recording session. If recording at home, you can reduce echo with soft surfaces and furniture, such as a carpet, upholstered sofa, etc.
You do not have to use professional equipment to record audio. If you do not have a studio microphone, use the built-in microphone of your laptop, a smartphone, or a headset. The noise reduction feature of most headsets cuts off the beginning and end of the phrase; therefore, we recommend to turn if off. Do not change the hardware settings until you finish your recording. The distance to the microphone should be the same for all your audios.
Where possible, keep the device you are recording with unplugged from power supply: you may get acoustic interference while the battery is charging. Disable sound notifications and switch your smartphone to airplane mode to avoid sounds you do not want in your recording.
Record using maximum quality without compression. If using special sound recording software, make sure that file compression and extra filters are off.
Before you begin, check that there is no hunger, thirst, excessive salivation, or dry mouth. Remove all rustling objects and try not to move your hands and legs too often during the session. Relax, straighten out your back and neck, breathe deeply and freely. The sounds of you breathing must not drown out the audio.
Make the text sound as smooth and natural as possible. Your emotions should be aligned with the text you are reading. Keep your intonation the same for all samples within a particular role. For detailed recommendations on recording roles, see Tips for recording roles.
If you have made a mistake in pronunciation, redo the whole phrase, do not try to correct yourself in the same audio. No inaccuracies, micro repeats, reservations, and word substitutions are allowed. Any articulation defects in the recordings the synthesis models runs on greatly degrade the quality of synthesized speech.
After you record a phrase, listen to the output audio. Make sure all words are clear and distinct, there are small stretches of silence at the beginning and end of the audio, and there is no background noise.
Requirements for audio recordings
If you are using special sound recording software instead the management console via your browser, make sure it meets the following criteria:
| Requirement | Value |
|---|---|
| Sampling frequency | 48 kHz |
| Audio bit depth | 16 bit PCM |
| Number of channels | 1 (mono) |
| Format | WAV |
| Duration | ≤ 15 seconds |
| Silence intervals at the beginning and end | 100–200 ms |
Warning
Each recording should contain a full phrase of one or several sentences. A recording cannot be longer than 15 seconds. The transcripts in the table must exactly match the text in the audio.
Each audio must start and end with an interval of silence; there must be no clipped sounds or words. You cannot simply take a podcast recording an cut into 15-second pieces. If you do so, the segments will have their boundaries in the middle of words or phrases and will not be aligned with logical phrases. You cannot train a high quality model on such data.
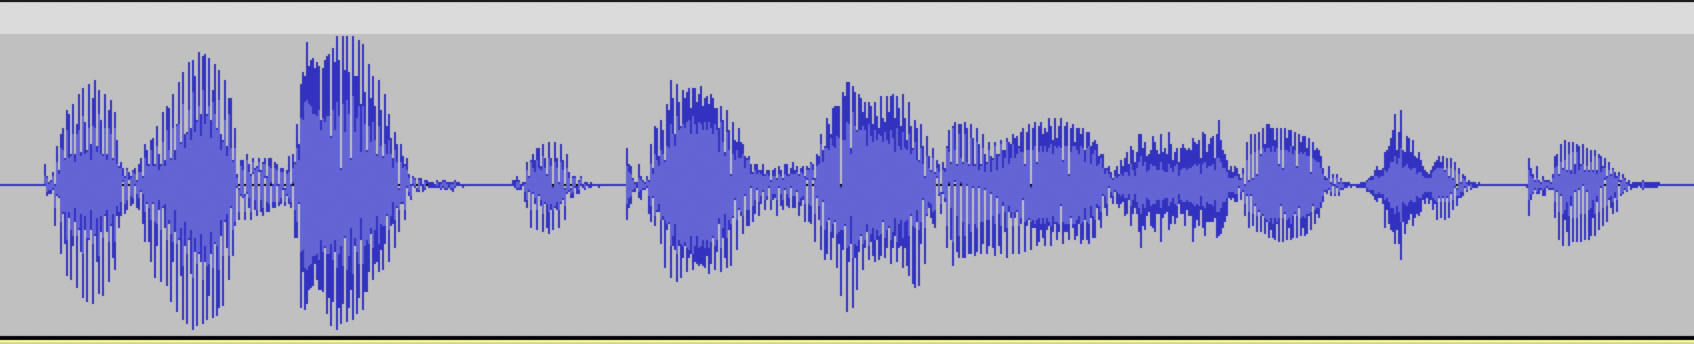
Example of a well-prepared audio: several milliseconds of silence at the beginning and end of the audio, the phrase is complete.
Example of a poorly made audio: no silence intervals at the beginning and end of the audio, the start and end of the phrase are cut off.
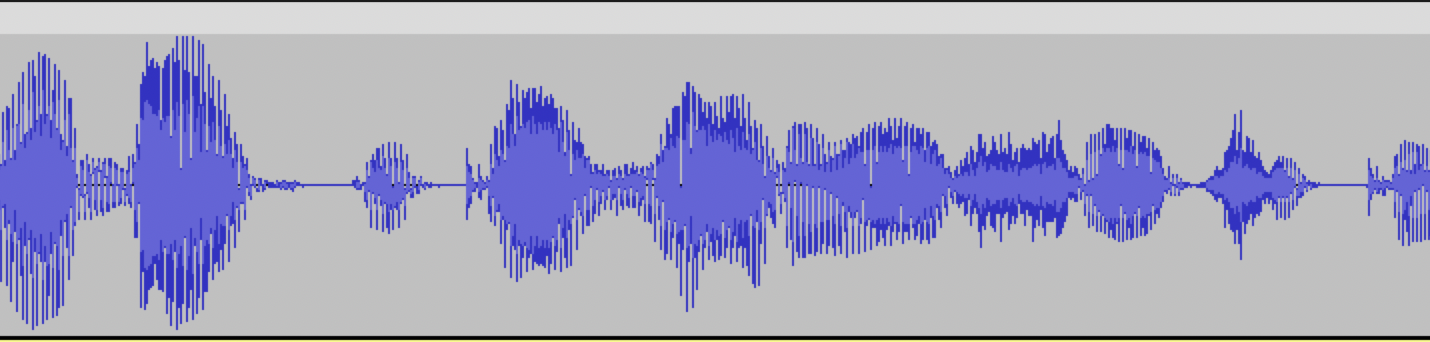
Such audio recordings will have distortions and are not suitable for model training.
How to create a voice
- In the management console, select the folder you are going to use to work with SpeechKit.
- In the list of services, select SpeechKit.
- In the left-hand panel, click Brand Voice Lite.
- Click Create voice.
- Click Create a dataset and select Record audio files.
- Select the data you want to record: click Use a ready-made template or Upload your own texts.
- Click Record audio ⟶ Record next to the text and then read the text aloud.
- Click to listen to the result.
- If your recording contains no background noise, the phrase was recorded fully, and you can hear it well, click Save. To rerecord, click New record.
- Record audio for the remaining texts.
-
Under Use of voice:
- Read and confirm having read the SpeechKit Terms of Use.
- Confirm that you have a written consent of the person whose voice is used in the audio for the use of this audio to create and use speech synthesis.
- Click Create voice to start creating a voice.
- In the management console, select the folder you are going to use to work with SpeechKit.
- In the list of services, select SpeechKit.
- In the left-hand panel, click Brand Voice Lite.
- Click Create voice.
- Click Create a dataset and select Add audio files.
- Select the texts used to record your audio files: click Use a ready-made template or Upload your own texts.
- In the row with the text, click Add audio file.
- Add audio files for the remaining texts.
-
Under Use of voice:
- Read and confirm having read the SpeechKit Terms of Use.
- Confirm that you have a written consent of the person whose voice is used in the audio for the use of this audio to create and use speech synthesis.
- Click Create voice to start creating a voice.
-
In the management console, select the folder you are going to use to work with SpeechKit.
-
In the list of services, select SpeechKit.
-
Click Create voice.
-
Click Create a dataset and select Upload ZIP archive.
-
Drag a ZIP archive to the upload area.
A ZIP archive with a fine-tuning dataset must contain:
- Audio recordings in WAV format.
- UTF-8 encoded TSV table with the transcripts of recordings from the archive. The table should have two columns without headers:
- Name of the audio file with the speaker's text.
- Line with a verbatim transcript of the recording.
-
Under Use of voice:
- Read and confirm having read the SpeechKit Terms of Use.
- Confirm that you have a written consent of the person whose voice is used in the audio for the use of this audio to create and use speech synthesis.
-
Click Create voice to start creating a voice.
If using a template by the SpeechKit team, add the audio file name to the beginning of each line and delete the table header line.
Prepared data example
The table header is given as an example, it must be excluded from the uploaded file.
| recordings | text |
|---|---|
| 1.wav | Books are a uniquely portable magic. |
| 2.wav | We have an amazing book for you! |
| 3.wav | This book is suitable for children from the age of five. |
Voice statuses
As soon as you start voice creation, the voice will appear in the list of available voices under Brand Voice Lite. The creation process will take several days. During this period, the voice have the Creating status. Once the process is complete, the voice will become available for testing and its status will switch to Trial. You will have seven days to use the voice for free in SpeechKit Playground and synthesize speech via the API, only paying for the requests (see pricing). Once the trial period expires, the voice will be archived, its status will switch to Archived, and you will no longer be able to use it. Hosting archived voices is free of charge.
If you like the voice you created, you can activate it without waiting for the trial period to end. Also, you can activate an archived voice:
- In the management console, select the folder you are going to use to work with SpeechKit.
- In the list of services, select SpeechKit.
- In the left-hand panel, click Brand Voice Lite.
- Select a voice and navigate to its page.
- In the top-right corner, click Activate.
Once activated, the voice will switch its status toActiveand become available via the API and in SpeechKit Playground without limitations. The hosting will become chargeable.
If you no longer need the voice, you can archive it.
How to access a voice in a fine-tuned model
The voice you created will be available in SpeechKit Playground and via API v3. To use the voice via the API, specify the obtained model ID in synthesis settings:
{
...
"model": "tts://<folder_ID>/bvss-v1/latest@<voice_ID>/?<model_ID>"
...
}
Example
Use the IAM token to authenticate as a Yandex account or federated account. The account must have the ai.speechkit-tts.user role. For other authentication methods, see Authentication with the SpeechKit API.
To reproduce this example, you will need the jq utility to work with JSON files.
-
Create the
tts_rest.jsonfile with the following request parameters:{ "text": "Hi! I'm Yandex Speech+Kit. I can turn any text into speech. Now y+ou can, too!", "model": "tts://<folder_ID>/bvss-v1/latest@<voice_ID>/?<model_ID>" }Where:
text: Text to synthesize.model: Fine-tuned model you are accessing.
-
Run the request in the terminal by specifying the IAM token and the ID of the folder you will use to work with SpeechKit:
export FOLDER_ID=<folder_ID>
export IAM_TOKEN=<IAM_token>

  --header "Authorization: Bearer $IAM_TOKEN" \
  --header "x-folder-id: $FOLDER_ID" \
  --data @tts_rest.json https://tts.api.cloud.yandex.net:443/tts/v3/utteranceSynthesis | \
  jq -r  '.result.audioChunk.data' | \
  while read chunk; do base64 -d <<< "$chunk" >> audio_my.wav; done
Where:
FOLDER_ID: ID of the folder for which your account has theai.speechkit-tts.userrole or higher. If using a service account, you do not need to include the folder ID in the request.IAM_TOKEN: IAM token of your Yandex account or federated account.
The synthesized speech will be Base64 encoded and saved to a file named
audio_my.wav.