Integration with Yandex DataSphere
You can use the Apache Spark™ clusters deployed in Yandex Data Processing, in your Yandex DataSphere projects. To set up integration with Yandex Data Processing in DataSphere:
- Set up your infrastructure.
- Create a bucket.
- Create a Yandex Data Processing cluster.
- Set up the DataSphere project.
- Run your computations.
If you no longer need the resources you created, delete them.
Required paid resources
The support cost includes:
- Yandex Data Processing cluster fee (see Yandex Data Processing pricing).
- NAT gateway fee (see Virtual Private Cloud pricing).
- Object Storage bucket fee: storing data and performing operations with it (see Object Storage pricing).
Getting started
Before getting started, register in Yandex Cloud, set up a community, and link your billing account to it.
- On the DataSphere home page, click Try for free and select an account to log in with: Yandex ID or your working account with the identity federation (SSO).
- Select the Yandex Cloud Organization organization you are going to use in Yandex Cloud.
- Create a community.
- Link your billing account to the DataSphere community you are going to work in. Make sure you have a linked billing account and its status is
ACTIVEorTRIAL_ACTIVE. If you do not have a billing account yet, create one in the DataSphere interface.
Set up your infrastructure
Log in to the Yandex Cloud management console and select the organization you use to access DataSphere. On the Yandex Cloud Billing page, make sure you have a billing account linked.
If you have an active billing account, you can create or select a folder to deploy your infrastructure in, on the cloud page.
Note
If you use an identity federation to access Yandex Cloud, billing details might be unavailable to you. In this case, contact your Yandex Cloud organization administrator.
Create a folder and network
Create a folder where your Yandex Data Processing cluster will run.
- In the management console, select a cloud and click Create folder.
- Give your folder a name, e.g.,
data-folder. - Select Create a default network. This will create a network with subnets in each availability zone.
- Click Create.
Learn more about clouds and folders.
Create an egress NAT gateway
- In
data-folder, select Virtual Private Cloud. - In the left-hand panel, select Gateways.
- Click Create and set the gateway parameters:
- Name the gateway, e.g.,
nat-for-cluster. - Gateway Type: Egress NAT.
- Click Save.
- Name the gateway, e.g.,
- In the left-hand panel, select Routing tables.
- Click Create and specify the route table parameters:
- Enter a name, e.g.,
route-table. - Select
data-network. - Click Add.
- In the window that opens, select Gateway in the Next hop field.
- In the Gateway field, select the NAT gateway you created. The destination prefix will apply automatically.
- Click Add.
- Enter a name, e.g.,
- Click Create routing table.
Next, associate the route table with a subnet to route traffic from it through the NAT gateway:
- In the left-hand panel, select Subnets.
- In the row with the subnet you need, click .
- In the menu that opens, select Link routing table.
- In the window that opens, select your route table from the list.
- Click Link.
Create a service account for the cluster
-
Navigate to
data-folder. -
From the list of services, select Identity and Access Management.
-
Click Create service account.
-
Enter a name for the service account, e.g.,
sa-for-data-proc. -
Click Add role and assign the following roles to the service account:
dataproc.agentto create and use Yandex Data Processing clusters.dataproc.provisionerto enable subcluster autoscaling.vpc.userto use the Yandex Data Processing cluster network.iam.serviceAccounts.userto create resources in the folder on behalf of the service account.
-
Click Create.
Create an SSH key pair
To ensure a safe connection to the Yandex Data Processing cluster hosts, you will need SSH keys. You may skip this step if you have already generated your SSH keys.
How to generate an SSH key pair
-
Open the terminal.
-
Use the
ssh-keygencommand to create a new key:ssh-keygen -t ed25519 -C "<optional_comment>"You can specify an empty string in the
-Cparameter to avoid adding a comment, or you may not specify the-Cparameter at all: in this case, a default comment will be added.After running this command, you will be prompted to specify the name and path to the key files, as well as enter the password for the private key. If you only specify the name, the key pair will be created in the current directory. The public key will be saved in a file with the
.pubextension, while the private key, in a file without extension.By default, the command prompts you to save the key under the
id_ed25519name in the following directory:/home/<username>/.ssh. If there is already an SSH key namedid_ed25519in this directory, you may accidentally overwrite it and lose access to the resources it is used in. Therefore, you may want to use unique names for all SSH keys.
If you do not have OpenSSH installed yet, follow this guide to install it.
-
Run
cmd.exeorpowershell.exe(make sure to update PowerShell before doing so). -
Use the
ssh-keygencommand to create a new key:ssh-keygen -t ed25519 -C "<optional_comment>"You can specify an empty string in the
-Cparameter to avoid adding a comment, or you may not specify the-Cparameter at all: in this case, a default comment will be added.After running this command, you will be prompted to specify the name and path to the key files, as well as enter the password for the private key. If you only specify the name, the key pair will be created in the current directory. The public key will be saved in a file with the
.pubextension, while the private key, in a file without extension.By default, the command prompts you to save the key under the
id_ed25519name in the following folder:C:\Users\<username>/.ssh. If there is already an SSH key namedid_ed25519in this directory, you may accidentally overwrite it and lose access to the resources it is used in. Therefore, you may want to use unique names for all SSH keys.
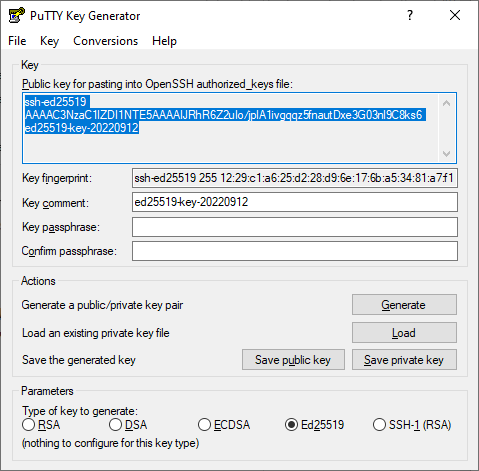
Create keys using the PuTTY app:
-
Download and install PuTTY.
-
Add the folder with PuTTY to the
PATHvariable:- Click Start and type Change system environment variables in the Windows search bar.
- Click Environment Variables... at the bottom right.
- In the window that opens, find the
PATHparameter and click Edit. - Add your folder path to the list.
- Click OK.
-
Launch the PuTTYgen app.
-
Select EdDSA as the pair type to generate. Click Generate and move the cursor in the field above it until key creation is complete.
-
In Key passphrase, enter a strong password. Enter it again in the field below.
-
Click Save private key and save the private key. Do not share its key phrase with anyone.
-
Click Save public key and save the public key to a file named
<key_name>.pub.
Warning
Store your private key securely, as you will not be able to connect to the VM without it.
Configure DataSphere
To work with Yandex Data Processing clusters in DataSphere, create and set up a project.
Create a project
- Open the DataSphere home page.
- In the left-hand panel, select Communities.
- Select the community to create a project in.
- On the community page, click Create project.
- In the window that opens, enter a name and description (optional) for the project.
- Click Create.
Edit the project settings
-
Navigate to the Settings tab.
-
Under Advanced settings, click Edit.
-
Specify the parameters:
-
Default folder:
data-folder. -
Service account:
sa-for-data-proc. -
Subnet: Subnet of the
ru-central1-aavailability zone indata-folder.Note
If you specified a subnet in the project settings, the time to allocate computing resources may be increased.
-
Security groups, if used in your organization.
-
-
Click Save.
Create a bucket
- In the management console, select the folder where you want to create a bucket.
- From the list of services, select Object Storage.
- Click Create bucket.
- In the ** Name** field, enter a name for the bucket.
- In the Object read access, Object listing access, and Read access to settings fields, select Restricted.
- Click Create bucket.
Create a Yandex Data Processing cluster
Before creating a cluster, make sure that your cloud has enough total SSD space (200 GB is allocated for a new cloud by default).
You can view your current resources under Quotas in the management console.
-
In the management console, select the folder where you want to create a cluster.
-
Click Create resource and select Yandex Data Processing cluster from the drop-down list.
-
Enter a name for the cluster in the Cluster name field. It must be unique within the folder.
-
In the Environment field, select
PRODUCTION. -
In the Version field, select
2.0. -
In the Services field, select
LIVY,SPARK,YARN, andHDFS. -
Enter the public part of your SSH key in the SSH key field.
-
In the Service account field, select
sa-for-data-proc. -
In the Availability zone field, select
ru-central1-a. -
If required, set the properties of Hadoop and its components in the Properties field, such as:
hdfs:dfs.replication : 2
hdfs:dfs.blocksize : 1073741824
spark:spark.driver.cores : 1
The available properties are listed in the official documentation for the components
-
Select the created bucket in the Bucket name field.
-
Select a network for the cluster.
-
Enable UI Proxy to access the web interfaces of Yandex Data Processing components.
-
Configure subclusters: no more than one main subcluster with a Master host and subclusters for data storage or computing.
Note
To run computations on clusters, make sure you have at least one
ComputeorDatasubcluster.ComputeandDatasubcluster roles are different: you can deploy data storage components onDatasubclusters and data processing components onComputesubclusters. TheComputesubcluster storage is only used to temporarily store processed files. -
For each subcluster, you can configure:
- Number of hosts.
- Host class, i.e., the platform and computing resources available to the host.
- Storage size and type.
- Subnet of the network where the cluster is located.
-
For
Computesubclusters, you can specify the autoscaling parameters. -
When you have set up all the subclusters, click Create cluster.
Yandex Data Processing will run the cluster create operation. After the cluster status changes to Running, you can connect to any active subcluster using the specified SSH key.
The Yandex Data Processing cluster you created will be added to your DataSphere project under Project resources ⟶ Yandex Data Processing ⟶ Available clusters.
Run your computations on the cluster
-
Open the DataSphere project:
-
Select the relevant project in your community or on the DataSphere homepage in the Recent projects tab.
- Click Open project in JupyterLab and wait for the loading to complete.
- Open the notebook tab.
-
-
In the cell, insert the code to compute. For example:
#!spark --cluster <cluster_name>
import random

def inside(p):
    x, y = random.random(), random.random()
    return x*x + y*y < 1

NUM_SAMPLES = 1_000_000

count = sc.parallelize(range(0, NUM_SAMPLES)) \
    .filter(inside).count()
print("Pi is roughly %f" % (4.0 * count / NUM_SAMPLES))
Where
#!spark --cluster <cluster_name>is a required system command to run computations on a cluster.Wait for the computation to start. While it is in progress, you will see logs under the cell.
-
Write data to S3 by specifying the bucket name:
#!spark data = [[1, "tiger"], [2, "lion"], [3, "snow leopard"]] df = spark.createDataFrame(df, schema="id LONG, name STRING") df.repartition(1).write.option("header", True).csv("s3://<bucket_name>/") -
Run the cells. To do this, select Run ⟶ Run Selected Cells or press Shift + Enter.
The file will appear in the bucket. To view bucket contents in the JupyterLab interface, create and activate an S3 connector in your project.
Note
To get more than 100 MB of the Yandex Data Processing cluster data, use an S3 connector.
To learn more about running computations on Yandex Data Processing clusters in DataSphere, see this concept.
Delete the resources you created
Warning
As a user of a cluster deployed in Yandex Data Processing, you manage its lifecycle yourself. The cluster will run, and fees will be charged, until you shut it down.
Some resources are not free of charge. To avoid paying for them, delete the resources you no longer need:
- Objects from the bucket
- Bucket
- Cluster
- Project
- Subnet
- Route table
- NAT gateway
- Network
- Service account