Installing a Cisco CSR 1000v virtual router
In Yandex Cloud, you can deploy a virtual router called Cisco Cloud Services Router (CSR) 1000v, based on a ready-to-use VM image.
To install the CSR 1000v and configure SSH access to it:
- Prepare your cloud.
- Create an SSH key pair.
- Create a VM with a Cisco Cloud Services Router.
- Set the host name for the router.
- Create a user with the administrative rights.
- Configure authentication using SSH keys.
- Check the SSH connection to the router.
If you no longer need the resources you created, delete them.
Before you begin
Sign up in Yandex Cloud and create a billing account:
- Navigate to the management console and log in to Yandex Cloud or register a new account.
- On the Yandex Cloud Billing page, make sure you have a billing account linked and it has the
ACTIVEorTRIAL_ACTIVEstatus. If you do not have a billing account, create one and link a cloud to it.
If you have an active billing account, you can navigate to the cloud page to create or select a folder for your infrastructure to operate in.
Learn more about clouds and folders.
Required paid resources
Alert
When you use a Cisco CSR 1000v image without a license, the router throughput is limited to 100 Kbps. To remove the limit, install a license.
The cost of using a virtual router includes:
- A charge for a disk and a continuously running VM (see Yandex Compute Cloud pricing).
- A fee for using a dynamic or static external IP address (see Yandex Virtual Private Cloud pricing).
Create an SSH key pair
To connect to a VM over SSH, you need a key pair: the public key resides on the VM, and the private one is kept by the user. This method is more secure than connecting with login and password.
Note
SSH connections using a login and password are disabled by default on public Linux images that are provided by Yandex Cloud.
Cisco Cloud Services Router (CSR) 1000v only supports keys generated using the RSA algorithm.
To create a key pair:
-
Open the terminal.
-
Use the
ssh-keygencommand to create a new key:ssh-keygen -t rsa -b 2048After you run the command, you will be asked to specify the names of files where the keys will be saved and enter the password for the private key. The default name is
id_rsa. Keys are created in the~/.sshdirectory.The public part of the key will be saved in the
<key_name>.pubfile.
-
Run
cmd.exeorpowershell.exe. -
Use the
ssh-keygencommand to create a new key:ssh-keygen -t rsa -b 2048After you run the command, you will be asked to specify the names of files where the keys will be saved and enter the password for the private key. The default name is
id_rsa. The keys are created inC:\Users\<username>\.ssh\orC:\Users\<username>\depending on the command-line interface.The public part of the key will be saved to a file named
<key name>.pub.
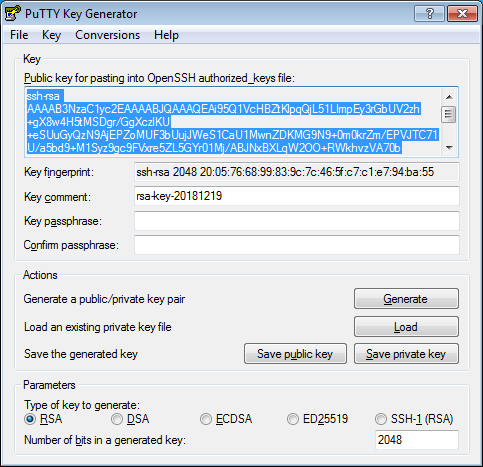
Create keys using the PuTTY app:
-
Download and install PuTTY.
-
Add the folder with PuTTY to the
PATHvariable:- Click Start and type Change system environment variables in the Windows search bar.
- Click Environment Variables... at the bottom right.
- In the window that opens, find the
PATHparameter and click Edit. - Add your folder path to the list.
- Click OK.
-
Launch the PuTTYgen app.
-
Select RSA for the type of pair to generate and set the length to 2048. Click Generate and move the cursor in the field above it until key creation is complete.
-
In Key passphrase, enter a strong password. Enter it again in the field below.
-
Click Save private key and save the private key. Do not share its key phrase with anyone.
-
Save the key to a text file. To do this, copy the public key from the text field to a text file named
id_rsa.pub. Please note that the key must be written as a single line (no returns or line breaks).
Warning
Save the private key in a secure location: you won't be able to connect to the VM without it.
Create a VM with a Cisco Cloud Services Router
- In the management console, select a folder where you want to create a VM with Cisco Cloud Services Router.
- Click Create resource and select Virtual machine.
- Enter a name for the VM, like
cisco-router. - Select an availability zone to place the VM in. If you don't know which availability zone you need, leave the default.
- Under Image/boot disk selection, go to the Cloud Marketplace tab and select the Cisco CSR image.
- Under Computing resources:
- Choose a VM platform.
- Specify the number of vCPUs and amount of RAM:
- Platform: Intel Ice Lake.
- Guaranteed vCPU share: 100%
- vCPU: 2.
- RAM: 4 GB.
- Under Network settings, select the network and subnet to connect the VM to. If there aren't any networks, create one:
-
Select Create network.
-
In the resulting window, enter a network name and folder to host the VM.
-
(optional) To automatically create subnets, select the Create subnets option.
-
Click Create.
Each network must have at least one subnet. If there is no subnet, create one by selecting Add subnet.
-
- Under Public address, keep Auto to assign your VM a random external IP address from the Yandex Cloud pool, or select a static address from the list if you reserved one in advance.
- Enter the VM access information:
- Enter the username in the Login field.
- In the SSH key field, paste the contents of the previously generated public key file.
- Select Grant access to serial console.
- Click Create VM.
The VM may take several minutes to create. When the VM status changes to RUNNING, you can use the serial console.
Set the host name for the router
-
In the management console, select the folder containing your VM.
-
Select Compute Cloud.
-
Select
cisco-routerfrom the VM list. -
Go to the Serial console tab and click Connect.
-
Wait for the operating system to start up completely.
-
Run the
enablecommand to switch to privileged mode:cisco-router.ru-central1.internal>enable -
Enter the configuration mode and set the host name for the router:
cisco-router.ru-central1.internal#configure terminal
Enter configuration commands, one per line. End with CNTL/Z.
cisco-router.ru-cent(config)#hostname cisco-router
Make sure that the router name in the command line prompt changes to
cisco-router.
Create a user with the administrative rights
Create a user with the administrative rights and password authentication disabled:
In the serial console, run the command:
cisco-router(config)#username test-user privilege 15
Configure authentication using SSH keys
-
If your public SSH key is longer than 72 characters, split the key into chunks, 72 characters each. For this, in your computer terminal, run this command:
fold -bw 72 <path_to_file_with_public key>This will output your public SSH key split into chunks, 72 characters in each.
-
In the serial console, enable access to the VM over SSH:
cisco-router(config)#aaa new-model cisco-router(config)#ip ssh server algorithm authentication publickey cisco-router(config)#ip ssh pubkey-chain -
Create a user named
test-userand transmit, in theconf-ssh-pubkey-datamode, your public SSH key in chunks no longer than 72 characters, beginning withssh-rsaand ending with the username:cisco-router(conf-ssh-pubkey)#username test-user cisco-router(conf-ssh-pubkey-user)#key-string cisco-router(conf-ssh-pubkey-data)#<public_key_string> ... cisco-router(conf-ssh-pubkey-data)#<public_key_string> cisco-router(conf-ssh-pubkey-data)#exit cisco-router(conf-ssh-pubkey-user)#exit cisco-router(conf-ssh-pubkey)#exit cisco-router(config)#exit -
Make sure that the key is added:
cisco-router#show run | beg ip ssh ip ssh pubkey-chain username test-user key-hash ssh-rsa <key_hash> <username_assigned_this_key> ! ! ... -
Compare the SSH key hash on the router with the key hash on your computer:
ssh-keygen -E md5 -lf <path_to_file_with_public_key> -
In the serial console, enter the password that enables the privileged mode:
cisco-router#configure terminal
cisco-router(config)#enable secret <password>
Check the SSH connection to the router
-
Log in to the router via SSH. For this, in your computer terminal, run this command:
ssh -i <path_to_file_with_private_key> test-user@<public_IP_of_router>If everything is configured correctly, you will log in to the router under
test-user. If the connection is not established, make sure that the router is configured correctly in the serial console: theaaa new-modelcommand was run, the key hashes are the same on your computer and the router, and password authorization for the test user is disabled. If you can't find the problem, repeat the previous steps. -
Enter the
enablecommand and password. If everything is configured correctly, you can configure the router.
How to delete created resources
To stop paying for the resources created: