Configuring multi-tiered support
Technical support services often have a multi-tiered structure.
-
Support line 1 accepts user requests, collect necessary information, and resolves relatively simple problems. More complex problems are handed over to Support line 2.
-
Support line 2 involves highly qualified experts capable to solve sophisticated technical problems.
-
Sometimes companies decide to enable Support line 3 to solve the most sophisticated problems.
To distribute requests between the support lines and determine which line is currently dealing with a given request, you can use issue statuses in Tracker or a dedicated line field.
Using statuses
You can assign an issue status for each support line. For example, the queue template called Multi-tiered support includes such issue statuses as Support line 1 and Support line 2. If you need to set up a third support line, configure an additional status.
Using issue fields
Sometimes, it may be more convenient to create a new issue field. Let's say you receive user requests via forms and you want them to be automatically distributed between your two support lines based on the subject of the request. When you create an issue from a form, you cannot set its status to any of the support lines, because all new issues automatically have the Open status. However, you can assign values to issue fields provided the request has a specific subject. You can then automatically change issue statuses based on the value in that issue field.
To do this in Tracker:
Step 1. Create a new field for the issue
Go to the Tracker settings and create a new field with the following parameters:
-
Field type: Drop-down list.
-
Category: System.
-
Name: Line. Use any English name and key you like, for example, Line.
-
Item selection: Single item.
-
Values in the list: 1, 2 (for two-tiered support).
![]()
Step 2. Set up a request form
-
Go to Yandex Forms
-
Add questions that allow users to provide relevant information that is required to register their request.
To distribute requests between support lines, add a drop-down list called Subject to the form and specify some common problems.
-
Configure issue creation in Tracker for the first support line in the integration settings:
-
Configure notification conditions. The Subject list displays subjects to be tackled by the first support line.

-
Add the Line issue field and set its value to 1.

-
If you want to assign the issue to the employee responsible for the specified support line, specify their username in the Assignee field.
-
Save your integration settings.
-
-
Similarly to Support line 1, add a new notification group and set up a condition for creating an issue for Support line 2 with its parameters.
-
Save the integration settings.
Step 3. Set up a condition that triggers a status change
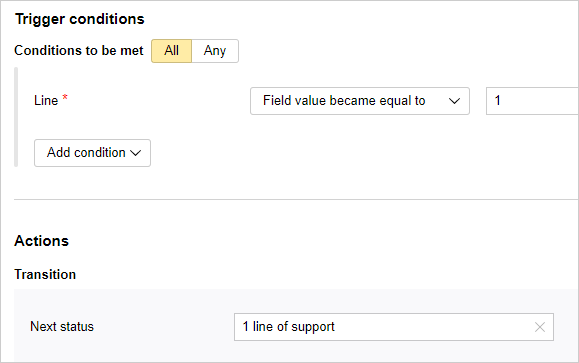
In the support team queue, create two triggers that will be fired if the Line field value changes and will update issue statuses:
-
Go to the queue settings, open the Triggers section, and click Create trigger.
-
Add the condition System → Line → became equal to → 1.
-
Add the action Change issue status → Support line 1.
-
Save your trigger.

-
Create a similar trigger for Support line 2.
Issues created via the form will now automatically be distributed between the two support lines based on their subject.