Getting started with Managed Service for YDB


In this tutorial, you will create a YDB database in Yandex Cloud and run a simple query against it using the Yandex Cloud management console or command line tools.
You can also work with a Yandex Managed Service for YDB database through:
Getting started
-
Navigate to the management console and log in to Yandex Cloud or sign up if not signed up yet.
-
If you do not have a folder yet, create one:
-
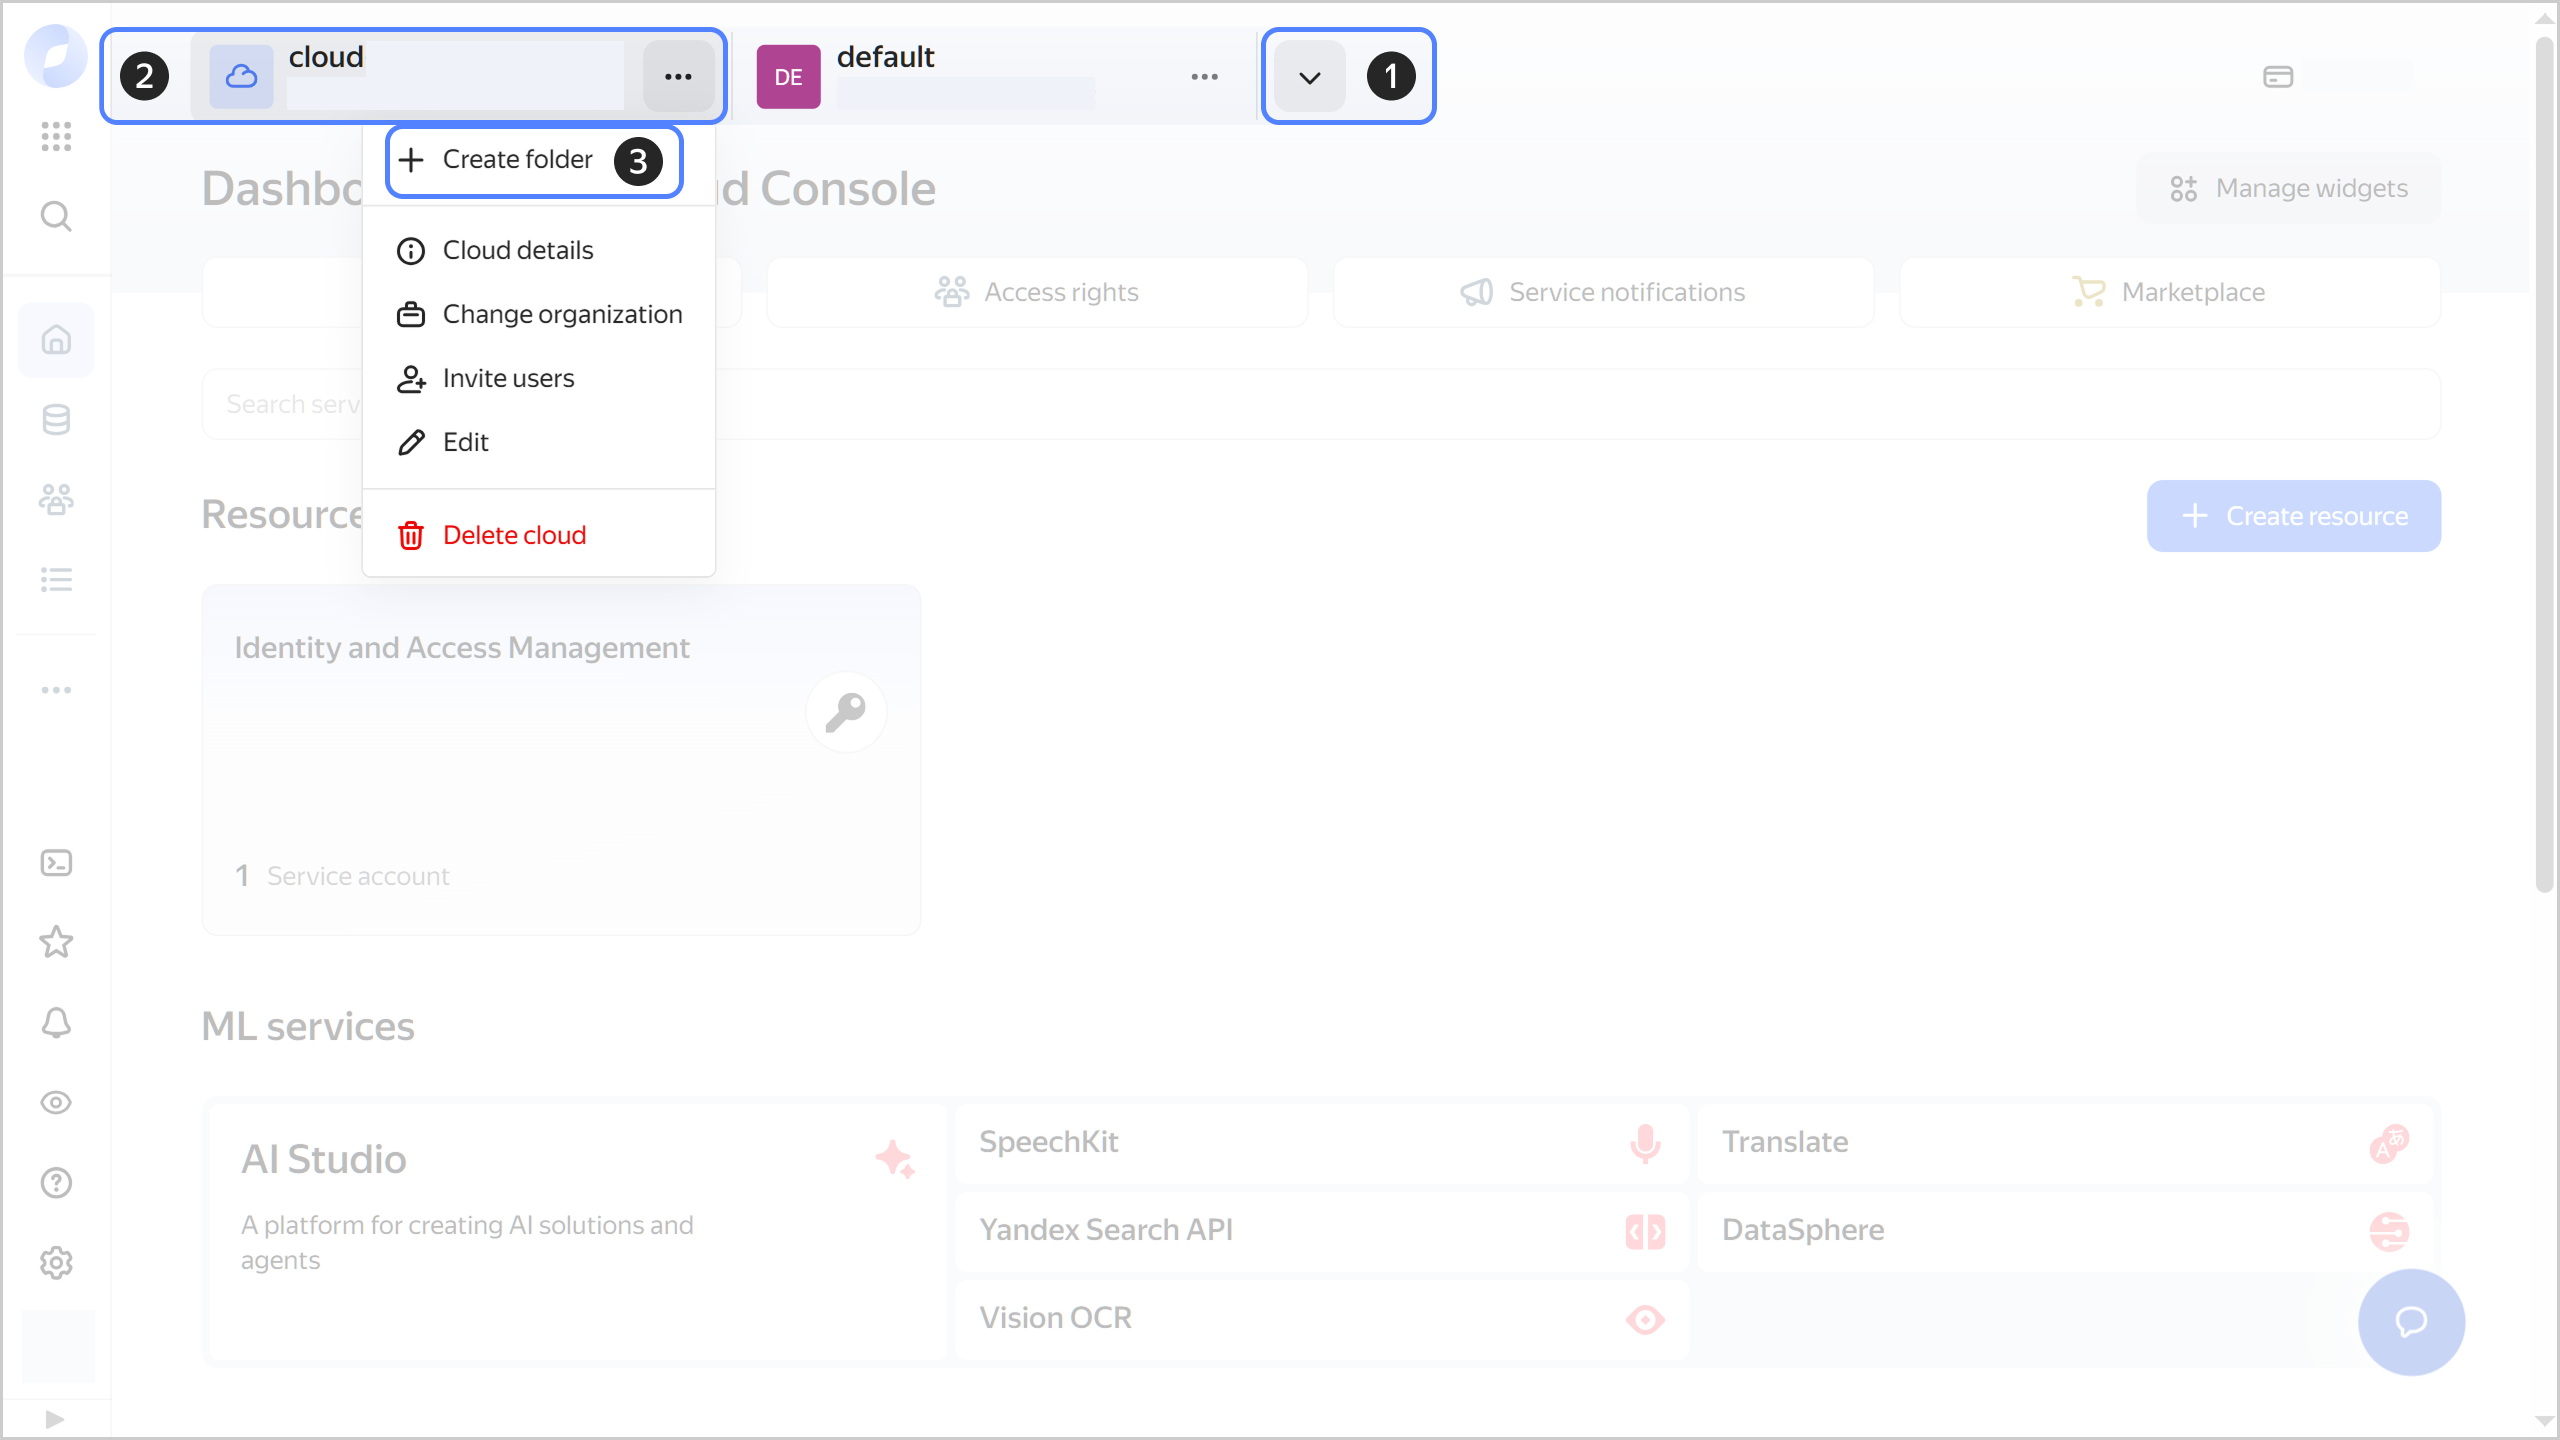
In the management console, in the top panel, click or and select the cloud.
-
To the right of the cloud name, click .
-
Select Create folder.
-
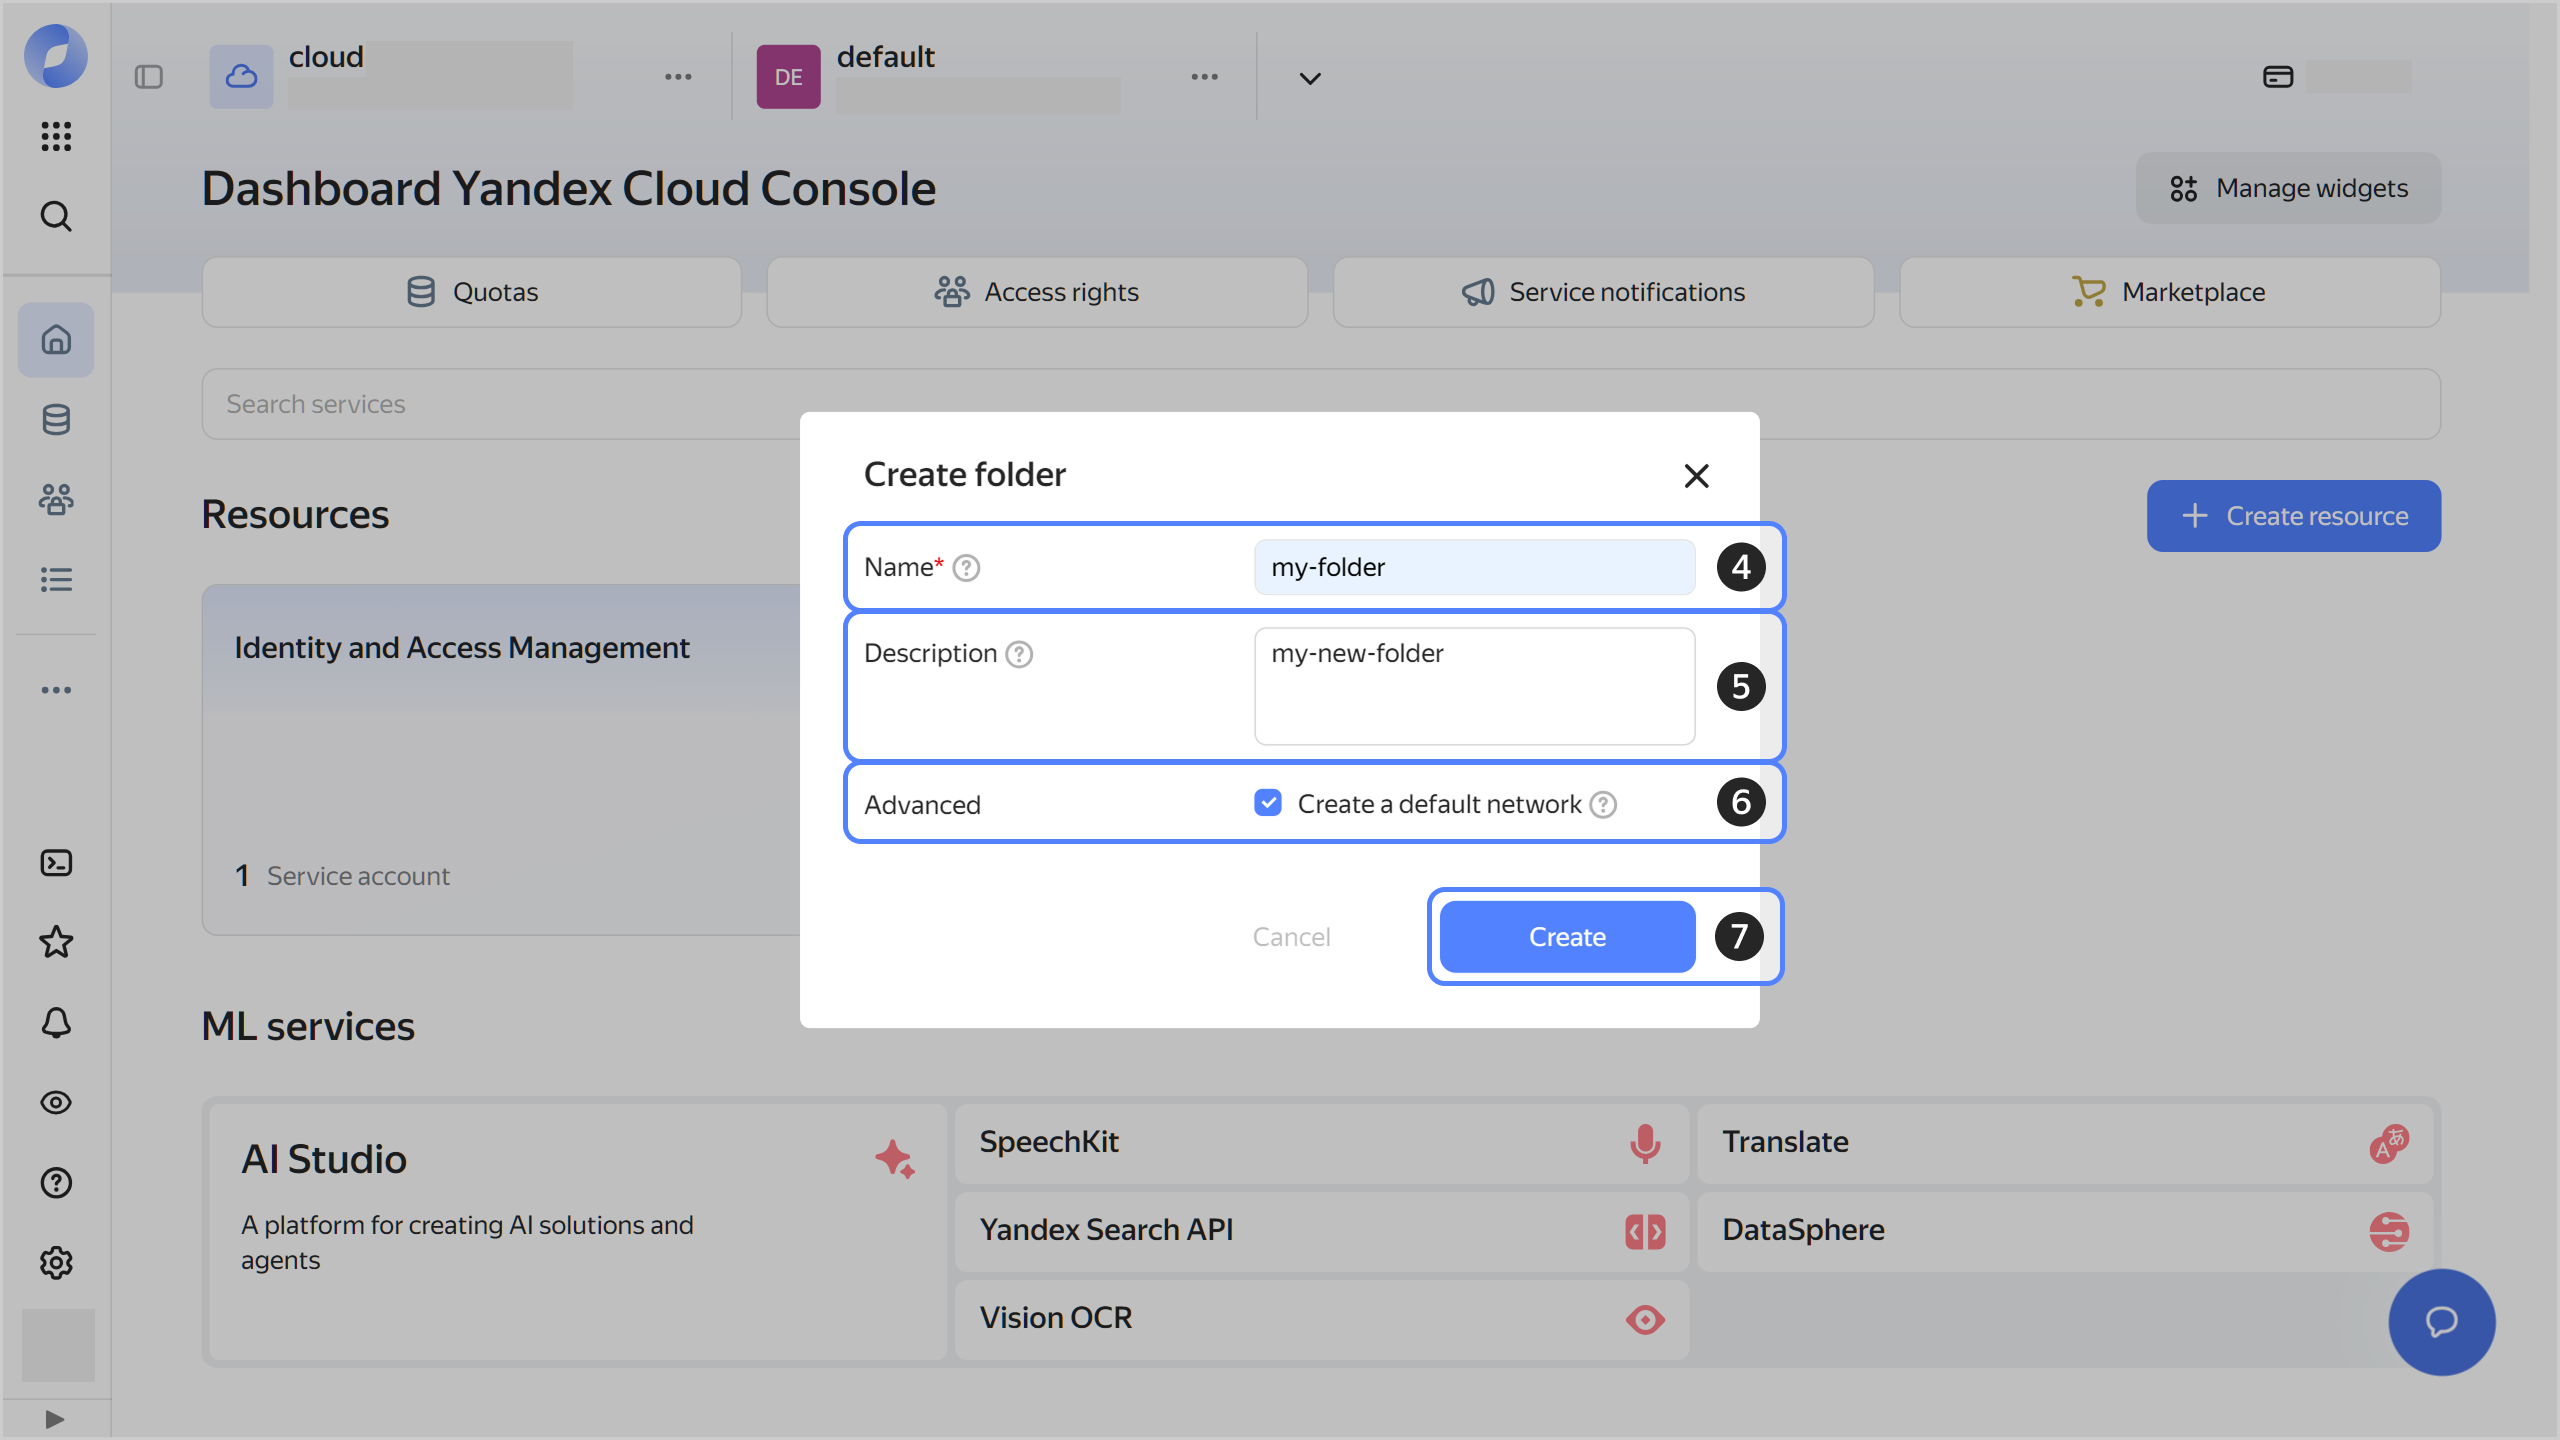
Give your folder a name. The naming requirements are as follows:
- Length: between 3 and 63 characters.
- It can only contain lowercase Latin letters, numbers, and hyphens.
- It must start with a letter and cannot end with a hyphen.
-
Optionally, specify the description for your folder.
-
Select Create a default network. This will create a network with subnets in each availability zone. Within this network, you will also have a default security group, within which all network traffic will be allowed.
-
Click Create.
-
Create a database
You can create a database in a serverless configuration or with dedicated servers. For more information about differences between configurations, see Serverless and dedicated modes. You cannot change the database type once you create it.
Note
For the Amazon DynamoDB compatibility mode, use a serverless database configuration.
Create a serverless database
-
In the management console, select the folder for your database.
-
Navigate to Managed Service for YDB.
-
Click Create a database.
-
Enter a Name for your database. The naming requirements are as follows:
- Length: between 3 and 63 characters.
- It can only contain lowercase Latin letters, numbers, and hyphens.
- It must start with a letter and cannot end with a hyphen.
-
Under Database type, select
Serverless.You can leave the default parameters for your database and update them later. For more information about database parameters, see Creating a serverless database.
-
Click Create a database.
Wait for the database to start. While being created, your database will have the Provisioning status. Once it is ready for use, its status will change to Running.
-
If you do not have the Yandex Cloud CLI yet, install and initialize it.
-
Create a database:
yc ydb database create <DB_name> --serverlessWhere
<DB_name>is the name of your database.Result:
done (6s)
id: etn95g8jk8g0********
folder_id: b1g7gvsi89m3********
created_at: "2022-05-30T07:26:44Z"
name: test
status: PROVISIONING
endpoint: grpcs://ydb.serverless.yandexcloud.net:2135/?database=/ru-central1/b1gia87mbaom********/etn95g8jk8g0********
serverless_database:
  storage_size_limit: "53687091200"
location_id: ru-central1
backup_config:
  backup_settings:
  - name: daily
    backup_schedule:
      daily_backup_schedule:
        execute_time:
          hours: 17
    backup_time_to_live: 172800s
    type: SYSTEM
document_api_endpoint: https://docapi.serverless.yandexcloud.net/ru-central1/b1gia87mbaom********/etn95g8jk8g0********
monitoring_config: {}
This will create a database with the default parameters. You can update its parameters later on. For more information about database parameters, see Creating a serverless database.
-
Check the status of the new database:
yc ydb database get <DB_name>Where
<DB_name>is the name of your new database.While being created, your database will have the
PROVISIONINGstatus. Once it is ready for use, its status will change toRUNNING.
Create a database on dedicated servers
-
In the management console, select the folder for your database.
-
Navigate to Managed Service for YDB.
-
Click Create a database.
-
Enter a Name for your database. The naming requirements are as follows:
- Length: between 3 and 63 characters.
- It can only contain lowercase Latin letters, numbers, and hyphens.
- It must start with a letter and cannot end with a hyphen.
-
Under Database type, select
Dedicated. -
Under Computing resources, select the type and amount of computing resources.
-
Under Storage groups, select the disk type and number of storage groups that determines the total amount of storage.
-
Under Network, configure the network:
-
Optionally, in the Public IP addresses field, select Assign if you plan to query the database both from the Yandex Cloud network and the internet.
Warning
For Managed Service for YDB databases with external IP addresses, the outgoing internet traffic consumption is calculated based on the current pricing policy.
Use grants to offset the charges for outgoing internet traffic generated by Managed Service for YDB usage.
-
Select an existing network from the Cloud network list or create a new one:
- Click Create.
- In the window that opens, enter a Name for the new network.
- Optionally, select Create subnets. Subnets in each availability zone will be created automatically.
- Click Create network.
-
Under Subnets, select a subnet or create a new one for each availability zone:
- Click Create.
- In the window that opens, enter a Name for the new subnet.
- Optionally, enter a Description for the subnet.
- Select the availability zone from the Availability zone list.
- Set the subnet address in CIDR format.
- Click Create subnet.
You cannot change the settings of the Network section after the database is created.
-
-
Click Create a database.
Wait for the database to start. While being created, your database will have the
Provisioningstatus. Once it is ready for use, its status will change toRunning.
-
If you do not have the Yandex Cloud CLI yet, install and initialize it.
-
Create a cloud network and subnets for each availability zone, if needed.
-
Create a database:
yc ydb database create <DB_name> \
  --dedicated \
  --resource-preset <configuration> \
  --storage type=<storage_type>,groups=<number_of_storage_groups> \
  --public-ip \
  --network-name default\
  --async
Where:
--resource-preset STR: Configuration of the node computing resources. You can find the valid values in the Configuration name column of the table in Database on dedicated resources.--storage STR: Storage type and number of storage groups intype=<storage_type>,groups=<number_of_storage_groups>format. For thessdtype, a single storage group can store up to 100 GB of data.--public-ip: Public IP address assignment flag. Without it, you will not be able to connect to your database from the internet.--network-name STR: Name of the cloud network to create the database in. You can specify thedefaultnetwork.--async: Asynchronous database creation flag.
For more information about database parameters, see Creating a serverless database.
Result:
done (7m18s) id: etnk1u65e4sh******** folder_id: b1g7gvsi89m3******** created_at: "2022-05-31T10:10:12Z" name: test-ded status: PROVISIONING endpoint: grpcs://lb.etnk1u65e4shtgj338va.ydb.mdb.yandexcloud.net:2135/?database=/ru-central1/b1gia87mbaom********/etnk1u65e4sh******** resource_preset_id: medium storage_config: storage_options: - storage_type_id: ssd group_count: "1" storage_size_limit: "107374182400" scale_policy: fixed_scale: size: "1" network_id: enpqkm0od2bu******** subnet_ids: - b0cmespgm8o3******** - e2lif378n1pg******** - e9b72lv142k4******** dedicated_database: resource_preset_id: medium storage_config: storage_options: - storage_type_id: ssd group_count: "1" storage_size_limit: "107374182400" scale_policy: fixed_scale: size: "1" network_id: enpqkm0od2bu******** subnet_ids: - b0cmespgm8o3******** - e2lif378n1pg******** - e9b72lv142k4******** assign_public_ips: true assign_public_ips: true location_id: ru-central1 backup_config: backup_settings: - name: daily backup_schedule: daily_backup_schedule: execute_time: hours: 17 backup_time_to_live: 172800s type: SYSTEM monitoring_config: {} -
Check the status of the new database:
yc ydb database get <DB_name>Where
<DB_name>is the name of your new database.While being created, your database will have the
PROVISIONINGstatus. Once it is ready for use, its status will change toRUNNING.
Query your database
-
In the management console, select the folder with your database.
-
Navigate to Managed Service for YDB.
-
Select the database you created.
-
Navigate to the Navigation tab.
-
Click New SQL query and enter the query text:
SELECT 1; -
Click Run.
Check the query result below:
# column0
0 1
-
If you do not have the Yandex Cloud CLI yet, install and initialize it.
-
To manage your databases from the command line, install the YDB CLI.
-
To authenticate the YDB CLI in Yandex Cloud, get an IAM token and export it to the environment variable:
export IAM_TOKEN=`yc iam create-token` -
Get the database endpoint and path:
yc ydb database get ydb-prodResult:
...
endpoint: grpcs://ydb.serverless.yandexcloud.net:2135/?database=/ru-central1/b1gia87mbaom********/etnudu2n9ri3********
...
Here, a part of the
grpcs://ydb.serverless.yandexcloud.net:2135string contains the endpoint, while/ru-central1/b1gia87mbaom********/etnudu2n9ri3********specifies the database path. -
Query your database using the database endpoint and path:
ydb \
  --endpoint grpcs://ydb.serverless.yandexcloud.net:2135 \
  --database /ru-central1/b1gia87mbaom********/etnudu2n9ri3******** \
  yql -s "SELECT 1;"
Result:
┌─────────┐
| column0 |
├─────────┤
| 1       |
└─────────┘
What's next
- Learn more about working with databases.
- Read about the service concepts.
- Learn more about the YQL.