Creating a WordPress website using the management console
To create and set up a WordPress website using the Yandex Cloud management console:
- Get your cloud ready.
- Create a security group.
- Create a VM for WordPress.
- Configure DNS (if you have a domain name).
- Get credentials for authentication in the web interface.
- Connect to the WordPress web interface.
If you no longer need the resources you created, delete them.
Get your cloud ready
Sign up for Yandex Cloud and create a billing account:
- Navigate to the management console and log in to Yandex Cloud or create a new account.
- On the Yandex Cloud Billing page, make sure you have a billing account linked and it has the
ACTIVEorTRIAL_ACTIVEstatus. If you do not have a billing account, create one and link a cloud to it.
If you have an active billing account, you can create or select a folder for your infrastructure on the cloud page.
Learn more about clouds and folders here.
Make sure the selected folder has a cloud network with a subnet in at least one availability zone. To do this, select VPC on the folder page. If the list contains a network, click its name to see the list of subnets. If the subnets or network you need are not listed, create them.
Required paid resources
The cost of maintaining a WordPress website includes:
- Fee for a continuously running VM (see Yandex Compute Cloud pricing).
- Fee for using a dynamic or static public IP address (see Yandex Virtual Private Cloud pricing).
- Fee for public DNS queries and DNS zones if using Yandex Cloud DNS (see Cloud DNS pricing).
Create a security group
To create a security group:
-
In the management console, select a folder.
-
Navigate to Virtual Private Cloud.
-
Open the Security groups tab.
-
Click Create security group.
-
Specify the group Name:
wordpress. -
Select Network.
-
Under Rules, create the following rules using the instructions below the table:
Traffic
directionDescription Port range Protocol Source /
Destination nameCIDR blocks Outbound anyAllAnyCIDR0.0.0.0/0Inbound ext-http80TCPCIDR0.0.0.0/0Inbound ext-https443TCPCIDR0.0.0.0/0Inbound ext-ssh22TCPCIDR0.0.0.0/0- Select the Egress or Ingress tab.
- Click Add.
- In the Port range window that opens, specify the port to receive traffic. Do not indicate anything for outgoing traffic.
- In the Protocol field, specify the required protocol. For outgoing traffic, leave
Anyto allow traffic over all protocols. - In the Destination name or Source field, select
CIDRfor the rule to apply to a range of IP addresses. In the CIDR blocks field, enter0.0.0.0; in the list after /, select0. - Click Save. Repeat these steps to create all rules from the table.
-
Click Save.
Create a VM for WordPress
To create a VM:
-
On the folder dashboard in the management console, click Create resource and select
Virtual machine instance. -
Under Boot disk image, in the Product search field, enter
WordPressand select a public WordPress image. -
Under Location, select an availability zone where your VM will reside. If you are not sure which availability zone you need, leave the default selection.
-
Under Computing resources, navigate to the
Customtab and specify the platform, number of vCPUs, and amount of RAM:- Platform:
Intel Ice Lake. - vCPU:
2. - Guaranteed vCPU performance:
20%. - RAM:
1 GB.
- Platform:
-
Under Network settings:
- In the Subnet field, select the network where you created the
wordpresssecurity group and the subnet to connect your VM to. If you do not have a subnet, create one. - In the Public IP address field, select a static IP address from the list, or leave
Autoto assign your VM a random external IP address from the Yandex Cloud pool. - In the Security groups field, select the
wordpresssecurity group.
- In the Subnet field, select the network where you created the
-
Under Access, select SSH key and specify the VM access data:
- In the Login field, enter a username. Do not use
rootor other reserved usernames. For operations requiring root privileges, use thesudocommand. -
In the SSH key field, select the SSH key saved in your organization user profile.
If there are no SSH keys in your profile or you want to add a new key:
-
Click Add key.
-
Enter a name for the SSH key.
-
Select one of the following:
-
Enter manually: Paste the contents of the public SSH key. You need to create an SSH key pair on your own. -
Load from file: Upload the public part of the SSH key. You need to create an SSH key pair on your own. -
Generate key: Automatically create an SSH key pair.When adding a new SSH key, an archive containing the key pair will be created and downloaded. In Linux or macOS-based operating systems, unpack the archive to the
/home/<user_name>/.sshdirectory. In Windows, unpack the archive to theC:\Users\<user_name>/.sshdirectory. You do not need additionally enter the public key in the management console.
-
-
Click Add.
The system will add the SSH key to your organization user profile. If the organization has disabled the ability for users to add SSH keys to their profiles, the added public SSH key will only be saved in the user profile inside the newly created resource.
-
- In the Login field, enter a username. Do not use
-
Under General information, specify the VM name:
wordpress. -
Click Create VM.
It may take a few minutes to create your VM. When the VM status changes to RUNNING, you can start configuring your website.
Once created, the VM is assigned an IP address and a host name (FQDN). This data can be used when configuring the DNS and SSH access.
Configure the DNS (if you have a domain name)
If you have a registered domain name, use the Yandex Cloud DNS service to manage the domain.
The tutorial below describes configuring DNS for the example.com domain name.
Add a DNS zone
To add a public DNS zone:
Add resource records
Create DNS records in the public zone:
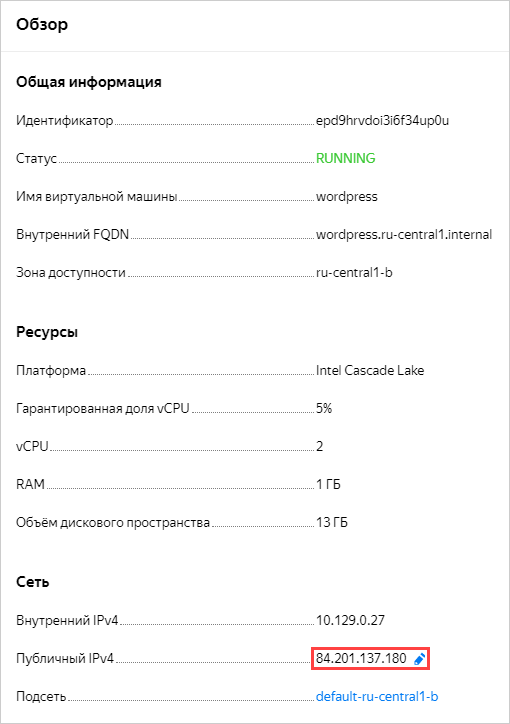
- Under Network on the VM page in the management console, find the VM's public IP address.
- Create an A record:
- Open the Cloud DNS section of the folder containing the
example.comDNS zone. - Select the
example.comDNS zone from the list. - Click Create record.
- Specify the record settings:
- Name: Leave empty.
- Type: Leave set to
A. - Data: Enter your VM's public address.
- TTL (in seconds) (record time to live): Keep the default value.
- Click Create.
- Open the Cloud DNS section of the folder containing the
- Create a CNAME record:
- Select the
example.comDNS zone from the list. - Click Create record.
- Specify the record settings:
- Name:
www. - Type: Select
CNAME. - Data: Enter
example.com. - TTL (in seconds) (record time to live): Keep the default value.
- Name:
- Click Create.
- Select the
Delegate the domain name
Delegation is the transfer of authority from the registrar's servers to yours. For a domain, NS resource records (ns1.yandexcloud.net and ns2.yandexcloud.net) are created.
To delegate a domain, specify its DNS servers in the registrar's account.
Delegation does not take effect immediately. Internet provider servers normally update records within 24 hours (86,400 seconds). This depends on the TTL value which specifies how long domain records are cached.
You can check domain delegation using Whois or the dig utility:
dig +short NS example.com
Result:
ns2.yandexcloud.net.
ns1.yandexcloud.net.
Get credentials for authentication in the web interface
When creating a VM, an administrator account for the web interface is created automatically. To get the authentication credentials:
-
Use SSH to connect to the VM you created:
ssh <username>@<VM_public_IP_address> -
Switch to the
rootaccount:sudo su -
Open the file for reading:
cat root/default_passwords.txt -
Copy the username and user password from the
WP_ADMIN_USERandWP_ADMIN_PASSWORDlines.
Connect to the WordPress web interface
To connect to the WordPress web interface, do the following:
-
In the management console, go to the VM page, find the VM public IP address under Network, and add it to the type A resource record you created earlier.
-
In your browser, open the WordPress admin panel using the domain name you configured or the VM's address:
http://<domain_name_or_VM_public_address>/wp-admin. -
Enter the username and password you saved earlier.
How to delete the resources you created
To stop paying for the resources you created:
- Delete the
wordpressVM. - Delete the static public IP address if you reserved one for your VM.
- Delete the DNS records and delete the DNS zone if you used Cloud DNS.