Setting up network connectivity with IPsec gateways on your own using Yandex Cloud

You can set up a secure connection between the cloud infrastructure and a corporate data center yourself using IPsec gateways according to the following chart:
- Get your cloud ready.
- Set up a cloud site.
- Set up a remote site.
- Test an IPsec connection and connectivity between remote and cloud resources.
If you no longer need the resources you created, delete them.
Get your cloud ready
Sign up for Yandex Cloud and create a billing account:
- Navigate to the management console and log in to Yandex Cloud or create a new account.
- On the Yandex Cloud Billing page, make sure you have a billing account linked and it has the
ACTIVEorTRIAL_ACTIVEstatus. If you do not have a billing account, create one and link a cloud to it.
If you have an active billing account, you can create or select a folder for your infrastructure on the cloud page.
Learn more about clouds and folders here.
Required paid resources
The infrastructure deployment cost for this IPsec gateways-based solution includes:
- Fee for continuously running VMs (see Yandex Compute Cloud pricing).
- Fee for a static external IP address (see Yandex Virtual Private Cloud pricing).
Create an SSH keypair
To connect to a VM over SSH, you will need a key pair: the public key resides on the VM, and the private one is kept by the user. This method is more secure than login and password authentication.
Note
SSH connections using a login and password are disabled by default on public Linux images that are provided by Yandex Cloud.
To create a key pair:
-
Open the terminal.
-
Use the
ssh-keygencommand to create a new key:ssh-keygen -t ed25519 -C "<optional_comment>"You can specify an empty string in the
-Cparameter to avoid adding a comment, or you may not specify the-Cparameter at all: in this case, a default comment will be added.After running this command, you will be prompted to specify the name and path to the key files, as well as enter the password for the private key. If you only specify the name, the key pair will be created in the current directory. The public key will be saved in a file with the
.pubextension, while the private key, in a file without extension.By default, the command prompts you to save the key under the
id_ed25519name in the following directory:/home/<username>/.ssh. If there is already an SSH key namedid_ed25519in this directory, you may accidentally overwrite it and lose access to the resources it is used in. Therefore, you may want to use unique names for all SSH keys.
If you do not have OpenSSH installed yet, follow this guide to install it.
-
Run
cmd.exeorpowershell.exe(make sure to update PowerShell before doing so). -
Use the
ssh-keygencommand to create a new key:ssh-keygen -t ed25519 -C "<optional_comment>"You can specify an empty string in the
-Cparameter to avoid adding a comment, or you may not specify the-Cparameter at all: in this case, a default comment will be added.After running this command, you will be prompted to specify the name and path to the key files, as well as enter the password for the private key. If you only specify the name, the key pair will be created in the current directory. The public key will be saved in a file with the
.pubextension, while the private key, in a file without extension.By default, the command prompts you to save the key under the
id_ed25519name in the following folder:C:\Users\<username>/.ssh. If there is already an SSH key namedid_ed25519in this directory, you may accidentally overwrite it and lose access to the resources it is used in. Therefore, you may want to use unique names for all SSH keys.
Create keys using the PuTTY app:
-
Download and install PuTTY.
-
Add the folder with PuTTY to the
PATHvariable:- Click Start and type Change system environment variables in the Windows search bar.
- Click Environment Variables... at the bottom right.
- In the window that opens, find the
PATHparameter and click Edit. - Add your folder path to the list.
- Click OK.
-
Launch the PuTTYgen app.
-
Select EdDSA as the pair type to generate. Click Generate and move the cursor in the field above it until key creation is complete.
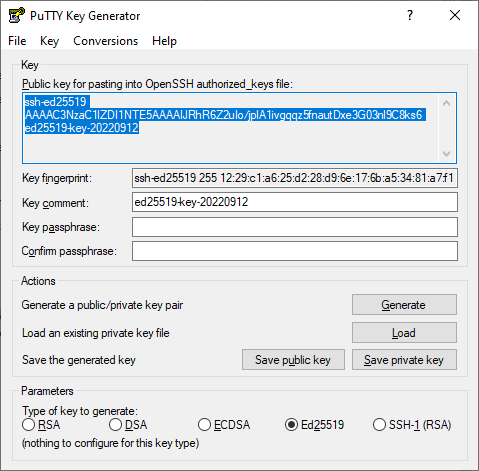
-
In Key passphrase, enter a strong password. Enter it again in the field below.
-
Click Save private key and save the private key. Do not share its key phrase with anyone.
-
Click Save public key and save the public key to a file named
<key_name>.pub.
Set up your cloud site
At this stage, you will reserve two static IP addresses for IPsec gateways and create and set up an infrastructure for your site in Yandex Cloud: an IPsec gateway, two VMs, and a network with two subnets.
Set up a cloud network
Reserve public IP addresses for gateways
Reserve two static public IP addresses in the ru-central1-b availability zone:
cloud-gw: Main IPsec gateway address, further referred to as<x1.x1.x1.x1>.remote-gw: Remote IPsec gateway address, further referred to as<x2.x2.x2.x2>.
Create your cloud network with subnets
-
Create a network named
cloud-netwith the Create subnets option disabled. -
In the
cloud-netnetwork, manually create subnets with the following parameters:-
The
cloud-gwmain IPsec gateway subnet:- Name:
ipsec-subnet - Availability zone:
ru-central1-b - CIDR:
172.16.0.0/24
- Name:
-
The
vm-dVM subnet:- Name:
subnet-d - Availability zone:
ru-central1-d - CIDR:
172.16.1.0/24
- Name:
-
The
vm-bVM subnet:- Name:
subnet-b - Availability zone:
ru-central1-b - CIDR:
172.16.2.0/24
- Name:
-
Set up the main IPsec gateway security group
-
In
cloud-net, create thecloud-net-sgsecurity group. -
In the
cloud-net-sgsecurity group, create rules based on the table below:Traffic
directionDescription Port range Protocol Source /
Destination nameCIDR blocks Outbound anyAllAnyCIDR0.0.0.0/0Inbound icmpAllICMPCIDR0.0.0.0/0Inbound ssh22TCPCIDR0.0.0.0/0Inbound ipsec-udp-500500UDPCIDR<x2.x2.x2.x2>/32Inbound ipsec-udp-45004500UDPCIDR<x2.x2.x2.x2>/32Inbound subnet-dAllAnyCIDR172.16.1.0/24Inbound subnet-bAllAnyCIDR172.16.2.0/24
Set up static routing for the main IPsec gateway
-
In the management console, navigate to the
cloud-netnetwork folder. -
Navigate to Virtual Private Cloud.
-
Select
cloud-net. -
Navigate to the Routing tables tab and click Create.
-
In the Name field, specify
cloud-net-rt. -
Under Static routes, click Add.
- In the window that opens, specify
10.10.0.0/16in the Destination prefix field. - In the IP address field, specify the gateway private IP address:
172.16.0.10. - Click Add.
- In the window that opens, specify
-
Click Create routing table.
-
Link the
cloud-net-rtroute table tosubnet-dandsubnet-b:- Navigate to the Overview tab.
- In the
subnet-drow, click and select Link routing table. - In the window that opens, select the
cloud-net-rtroute table and click Link. - Repeat the previous two steps for
subnet-b.
Create and configure your cloud VMs
Create the main IPsec gateway VM
-
In the management console, navigate to the folder dashboard, click Create resource, and select
Virtual machine instance. -
Under Boot disk image, in the Product search field, type
IPsec instanceand select a public IPsec instance image. -
Under Location, select the
ru-central1-bavailability zone where the main IPsec gateway will reside. -
Under Network settings:
-
In the Subnet field, select
ipsec-subnet. -
In the Public IP address field, select
List. -
In the IP address field that appears, select the previously reserved
<x1.x1.x1.x1>public IP address. -
In the Security groups field, select the previously created
cloud-net-sgsecurity group. -
Expand the Additional section:
- In the Internal IPv4 address field, select
Manual. - In the input field that appears, specify
172.16.0.10.
- In the Internal IPv4 address field, select
-
-
Under Access, select SSH key and specify the VM access data:
-
In the Login field, specify
ipsec. -
In the SSH key field:
- Click Add key.
- Specify the SSH key name.
- Upload the previously created public SSH key or paste its contents into the appropriate field.
- Click Add.
The system will add the SSH key to your organization user profile. If the organization has disabled the ability for users to add SSH keys to their profiles, the added public SSH key will only be saved in the user profile inside the newly created resource.
-
-
Under General information, specify the VM name:
cloud-gw. -
Click Create VM.
Wait until the VM status changes to Running.
Set up the main IPsec gateway
To set up the gateway, use the IP addresses, username, and SSH key of the cloud-gw VM.
-
Connect to the VM over SSH:
ssh ipsec@<x1.x1.x1.x1> -
Change the VM date and time settings:
sudo timedatectl set-timezone Europe/Moscow sudo timedatectl set-ntp True timedatectl -
To optimize ICMP performance, disable
ICMP Redirects:sudo su -c "echo 'net.ipv4.conf.eth0.send_redirects=0' >> /etc/sysctl.conf" sudo su -c "echo 'net.ipv4.conf.default.send_redirects=0' >> /etc/sysctl.conf"For more information, see the strongSwan how-tos.
-
Create a backup copy of the
swanctl.conffile:sudo mv /etc/swanctl/swanctl.conf /etc/swanctl/swanctl.orig -
Create the main IPsec gateway configuration in the
/etc/swanctl/swanctl.conffile:sudo nano /etc/swanctl/swanctl.confIn the file that opens, add the following code:
connections {
  cloud-ipsec {
    local_addrs = 172.16.0.10
    remote_addrs = <x2.x2.x2.x2>
    local {
      auth = psk
    }
    remote {
      auth = psk
    }
    version = 2 # IKEv2
    mobike = no
    proposals = aes128gcm16-prfsha256-ecp256, default
    dpd_delay = 10s
    children {
      cloud-ipsec {
        # List of local IPv4 subnets
        local_ts = 172.16.1.0/24, 172.16.2.0/24

        # List of remote IPv4 subnets
        remote_ts = 10.10.0.0/16

        start_action = trap
        esp_proposals = aes128gcm16
        dpd_action = clear
      }
    }
  }
}

# Pre-shared key (PSK) for IPsec connection
secrets {
  ike-cloud-ipsec {
    secret = <ipsec_password>
  }
}
Where:
cloud-ipsec: IPsec connection name.remote_addrs: Remote IPsec gateway public IP address (<x2.x2.x2.x2>).proposals: Internet Key Exchange Version 2 (IKEv2). A list of ciphers the system can use to encrypt the IPsec connection control channel.esp_proposals: Encapsulating Security Payload. A list of ciphers the system can use to encrypt the transmitted data.secret: Pre-shared key. The<ipsec_password>the system will use for IPsec handshake.
Note
You can add more options in
swanctl.confbased on these strongSwan guides.For example, for faster data transfers, you can use optimized encryption algorithms in IKEv2 mode. However, if you use a different software from strongSwan on the remote IPsec gateway, first make sure it supports these algorithms.
-
Upload the configuration to strongSwan:
sudo swanctl --load-all -
Restart strongSwan:
sudo systemctl restart strongswan -
Check the strongSwan status:
sudo swanctl -L -
Optionally, check the strongSwan logs:
sudo journalctl -u strongswan --no-pager sudo journalctl -u strongswan -n 20 sudo journalctl -u strongswan -f -
Terminate the
cloud-gwconnection:exit
Create your test cloud VMs
-
Create the
vm-dVM with the following settings:- Operating system: Ubuntu 22.04 LTS
- Availability zone:
ru-central1-d - Subnet:
subnet-d - Public IP address:
No address - Internal IPv4 address:
172.16.1.5 - Login:
ipsec - SSH key: Public SSH key
- Name:
vm-d
-
Create the
vm-bVM with the following settings:- Operating system:
Ubuntu 22.04 LTS - Availability zone:
ru-central1-b - Subnet:
subnet-b - Public IP address:
No address - Internal IPv4 address:
172.16.2.5 - Login:
ipsec - SSH key: Public SSH key
- Name:
vm-b
- Operating system:
Set up your remote site
At this stage, you will create and set up an infrastructure for a remote site of a typical corporate data center. It will include an IPsec gateway, a VM, a network, and a subnet.
Set up a remote network
Create a network with a subnet
-
Create a network named
remote-net. with the Create subnets option disabled. -
In the
remote-netnetwork, manually create a subnet to connect theremote-gwremote IPsec gateway and a VM namedvm-1with the following parameters:- Name:
subnet-1 - Availability zone:
ru-central1-b - CIDR:
10.10.0.0/16
- Name:
Create the remote IPsec gateway security group
-
In the
remote-netnetwork, create theremote-net-sgsecurity group. -
In the
remote-net-sgsecurity group, create rules based on the table below:Traffic
directionDescription Port range Protocol Source /
Destination nameCIDR blocks Outbound anyAllAnyCIDR0.0.0.0/0Inbound icmpAllICMPCIDR0.0.0.0/0Inbound ssh22TCPCIDR0.0.0.0/0Inbound ipsec-udp-500500UDPCIDR<x1.x1.x1.x1>/32Inbound ipsec-udp-45004500UDPCIDR<x1.x1.x1.x1>/32Inbound subnet-1AllAnyCIDR10.10.0.0/16
Set up remote IPsec gateway static routing
-
In the management console, navigate to the
remote-netnetwork folder. -
Navigate to Virtual Private Cloud.
-
Select
remote-net. -
Navigate to the Routing tables tab and click Create.
-
In the Name field, specify
remote-net-rt. -
Under Static routes, click Add.
- In the window that opens, specify
172.16.1.0/24in the Destination prefix field. - In the IP address field, specify the main IPSec gateway private IP address:
10.10.20.20. - Click Add.
- In the window that opens, specify
-
Repeat the previous step to add the second rule with the following parameters:
- Destination prefix:
172.16.2.0/24 - IP address:
10.10.20.20
- Destination prefix:
-
Click Create routing table.
-
Link the
remote-net-rtroute table tosubnet-1:- Navigate to the Overview tab.
- In the
subnet-1row, click and select Link routing table. - In the window that opens, select the
remote-net-rttable and click Link.
Create and configure VMs on the remote site
Create a remote IPsec gateway VM
Create a VM you will use as a remote IPsec gateway.
-
In the management console, navigate to the folder dashboard, click Create resource, and select
Virtual machine instance. -
Under Boot disk image, in the Product search field, type
IPsec instanceand select a public IPsec instance image. -
Under Location, select the
ru-central1-bavailability zone where the remote IPsec gateway will reside. -
Under Network settings:
-
In the Subnet field, select
subnet-1. -
In the Public IP address field, select
List. -
In the IP address field that appears, select the previously reserved
<x2.x2.x2.x2>public IP address. -
In the Security groups field, select the previously created
remote-net-sgsecurity group. -
Expand the Additional section:
- In the Internal IPv4 address field, select
Manual. - In the input field that appears, specify
10.10.20.20.
- In the Internal IPv4 address field, select
-
-
Under Access, select SSH key and specify the VM access data:
-
In the Login field, specify
ipsec. -
In the SSH key field, select the SSH key that you saved in your organization user profile when creating the main IPsec gateway VM.
If there are no saved SSH keys in your profile, or you want to add a new key:
- Click Add key.
- Specify the SSH key name.
- Upload the previously created public SSH key or paste its contents into the appropriate field.
- Click Add.
The system will add the SSH key to your organization user profile. If the organization has disabled the ability for users to add SSH keys to their profiles, the added public SSH key will only be saved in the user profile inside the newly created resource.
-
-
Under General information, specify the VM name:
remote-gw. Follow these naming requirements:- Length: between 3 and 63 characters.
- It can only contain lowercase Latin letters, numbers, and hyphens.
- It must start with a letter and cannot end with a hyphen.
-
Click Create VM.
Wait until the VM status changes to Running.
Set up the remote IPsec gateway
To set up the gateway, use the IP addresses, username, and SSH key of the remote-gw VM.
-
Connect to the VM over SSH:
ssh ipsec@<x2.x2.x2.x2> -
Change the VM date and time settings:
sudo timedatectl set-timezone Europe/Moscow sudo timedatectl set-ntp True timedatectl -
To optimize ICMP performance, disable
ICMP Redirects:sudo su -c "echo 'net.ipv4.conf.eth0.send_redirects=0' >> /etc/sysctl.conf" sudo su -c "echo 'net.ipv4.conf.default.send_redirects=0' >> /etc/sysctl.conf"For more information, see the strongSwan how-tos.
-
Create a backup copy of the
swanctl.conffile:sudo mv /etc/swanctl/swanctl.conf /etc/swanctl/swanctl.orig -
Create the remote IPsec gateway configuration in the
/etc/swanctl/swanctl.conffile:sudo nano /etc/swanctl/swanctl.confIn the file that opens, add the following code:
connections {
  cloud-ipsec {
    local_addrs = 10.10.20.20
    remote_addrs = <x1.x1.x1.x1>
    local {
      auth = psk
    }
    remote {
      auth = psk
    }
    version = 2 # IKEv2
    mobike = no
    proposals = aes128gcm16-prfsha256-ecp256, default
    dpd_delay = 10s
    children {
      cloud-ipsec {
        # List of local IPv4 subnets
        local_ts = 10.10.0.0/16

        # List of remote IPv4 subnets
        remote_ts = 172.16.1.0/24, 172.16.2.0/24

        start_action = trap
        esp_proposals = aes128gcm16
        dpd_action = clear
      }
    }
  }
}

# Pre-shared key (PSK) for IPsec connection
secrets {
  ike-cloud-ipsec {
    secret = <ipsec_password>
  }
}
Where:
cloud-ipsec: IPsec connection name.remote_addrs: Main IPsec gateway public IP address (<x1.x1.x1.x1>).proposals: Internet Key Exchange Version 2 (IKEv2). A list of ciphers the system can use to encrypt the IPsec connection control channel.esp_proposals: Encapsulating Security Payload. A list of ciphers the system can use to encrypt the transmitted data.secret: Pre-shared key. The<ipsec_password>the system will use for IPsec handshake.
Note
You can add more options in
swanctl.confbased on these strongSwan guides.For example, for faster data transfers, you can use optimized encryption algorithms in IKEv2 mode. However, if you use a different software from strongSwan on the remote IPsec gateway, first make sure it supports these algorithms.
-
Upload the configuration to strongSwan:
sudo swanctl --load-all -
Restart strongSwan:
sudo systemctl restart strongswan -
Check the strongSwan status:
sudo swanctl -L -
Optionally, check the strongSwan logs:
sudo journalctl -u strongswan --no-pager sudo journalctl -u strongswan -n 20 sudo journalctl -u strongswan -f -
Terminate the
remote-gwconnection:exit
Set up a test VM on the remote site
Create a test VM with the following settings:
- Operating system:
Ubuntu 22.04 LTS - Availability zone:
ru-central1-b - Subnet:
subnet-1 - Public IP address:
No address - Internal IPv4 address:
10.10.10.10 - Login:
ipsec - SSH key: Public SSH key
- Name:
vm-1
Test an IPsec connection and connectivity between remote and cloud resources
Establish an IPsec connection between the gateways and make sure it works correctly
The main and remote gateways will establish an IPsec connection when one of them receives traffic directed to the other’s subnet.
Note
After you activated an IPsec connection, it may take a while for the gateways to establish a tunnel. If you test the connection with ping and it fails, try again in a few minutes.
To activate an IPsec connection between the gateways:
-
Send
pingICMP packets fromvm-1on the remote site tovm-d:ssh -J ipsec@<x2.x2.x2.x2> ipsec@10.10.10.10 ping -c4 172.16.1.5Result:
PING 172.16.1.5 (172.16.1.5) 56(84) bytes of data. 64 bytes from 172.16.1.5: icmp_seq=1 ttl=58 time=4.92 ms 64 bytes from 172.16.1.5: icmp_seq=2 ttl=58 time=4.33 ms 64 bytes from 172.16.1.5: icmp_seq=3 ttl=58 time=4.31 ms 64 bytes from 172.16.1.5: icmp_seq=4 ttl=58 time=4.38 ms --- 172.16.1.5 ping statistics --- 4 packets transmitted, 4 received, 0% packet loss, time 3005ms rtt min/avg/max/mdev = 4.306/4.483/4.916/0.251 ms -
Activate an IPsec connection on the cloud side by sending ICMP packets from
vm-btovm-1:ssh -J ipsec@<x1.x1.x1.x1> ipsec@172.16.2.5 ping -c4 10.10.10.10Result:
PING 10.10.10.10 (10.10.10.10) 56(84) bytes of data.
64 bytes from 10.10.10.10: icmp_seq=1 ttl=58 time=4.92 ms
64 bytes from 10.10.10.10: icmp_seq=2 ttl=58 time=4.33 ms
64 bytes from 10.10.10.10: icmp_seq=3 ttl=58 time=4.31 ms
64 bytes from 10.10.10.10: icmp_seq=4 ttl=58 time=4.38 ms

--- 10.10.10.10 ping statistics ---
4 packets transmitted, 4 received, 0% packet loss, time 3005ms
rtt min/avg/max/mdev = 4.306/4.483/4.916/0.251 ms
Test connectivity between the VMs
-
Connect to the
cloud-gwmain IPsec gateway:ssh ipsec@<x1.x1.x1.x1>-
Check the strongSwan status:
sudo swanctl -LResult:
cloud-to-remote-site: IKEv1/2, reauthentication every 3060s, no rekeying, dpd delay 30s local: %any remote: <x2.x2.x2.x2> local pre-shared key authentication: id: <x1.x1.x1.x1> remote pre-shared key authentication: id: <x2.x2.x2.x2> cloud-to-remote-site: TUNNEL, rekeying every 28260s, dpd action is restart local: 172.16.1.0/24 remote: 10.10.0.0/16 cloud-ipsec: IKEv2, no reauthentication, rekeying every 14400s, dpd delay 10s local: 172.16.0.10 remote: <x2.x2.x2.x2> local pre-shared key authentication: remote pre-shared key authentication: cloud-ipsec: TUNNEL, rekeying every 3600s, dpd action is clear local: 172.16.1.0/24 172.16.2.0/24 remote: 10.10.0.0/16 -
Check active IPsec connections:
sudo swanctl -lResult:
cloud-ipsec: #6, ESTABLISHED, IKEv2, 80e6fa659b4f6307_i* 9f63a85191df1e48_r
  local  '172.16.0.10' @ 172.16.0.10[4500]
  remote '10.10.20.20' @ <x2.x2.x2.x2>[4500]
  AES_GCM_16-128/PRF_HMAC_SHA2_256/ECP_256
  established 9716s ago, rekeying in 4107s
  cloud-ipsec: #19, reqid 1, INSTALLED, TUNNEL-in-UDP, ESP:AES_GCM_16-128
    installed 682s ago, rekeying in 2735s, expires in 3278s
    in  cf9668bb,      0 bytes,     0 packets
    out c3a00b2c,      0 bytes,     0 packets
    local  172.16.1.0/24 172.16.2.0/24
    remote 10.10.0.0/16
If the connection status is
ESTABLISHED, the IPsec connection is active. -
Terminate the
cloud-gwconnection:exit
-
-
Connect to the
remote-gwremote IPsec gateway:ssh ipsec@<x2.x2.x2.x2>-
Check the strongSwan status:
sudo swanctl -LResult:
remote-site-to-cloud: IKEv1/2, reauthentication every 3060s, no rekeying, dpd delay 30s local: %any remote: <x1.x1.x1.x1> local pre-shared key authentication: id: <x2.x2.x2.x2> remote pre-shared key authentication: id: <x1.x1.x1.x1> remote-site-to-cloud: TUNNEL, rekeying every 28260s, dpd action is restart local: 10.10.0.0/16 remote: 172.16.1.0/24 cloud-ipsec: IKEv2, no reauthentication, rekeying every 14400s, dpd delay 10s local: 10.10.20.20 remote: <x1.x1.x1.x1> local pre-shared key authentication: remote pre-shared key authentication: cloud-ipsec: TUNNEL, rekeying every 3600s, dpd action is clear local: 10.10.0.0/16 remote: 172.16.1.0/24 172.16.2.0/24 -
Check active IPsec connections:
sudo swanctl -lResult:
cloud-ipsec: #6, ESTABLISHED, IKEv2, 80e6fa659b4f6307_i 9f63a85191df1e48_r*
  local  '10.10.20.20' @ 10.10.20.20[4500]
  remote '172.16.0.10' @ <x1.x1.x1.x1>[4500]
  AES_GCM_16-128/PRF_HMAC_SHA2_256/ECP_256
  established 9833s ago, rekeying in 3346s
  cloud-ipsec: #19, reqid 1, INSTALLED, TUNNEL-in-UDP, ESP:AES_GCM_16-128
    installed 799s ago, rekeying in 2620s, expires in 3161s
    in  c3a00b2c,      0 bytes,     0 packets
    out cf9668bb,      0 bytes,     0 packets
    local  10.10.0.0/16
    remote 172.16.1.0/24 172.16.2.0/24
If the connection status is
ESTABLISHED, the IPsec connection is active. -
Terminate the
remote-gwconnection:exit
-
-
Connect to
vm-d:ssh -J ipsec@<x1.x1.x1.x1> ipsec@172.16.1.5-
Change the VM date and time settings:
sudo timedatectl set-timezone Europe/Moscow sudo timedatectl set-ntp True timedatectl -
Test IP connectivity between
vm-dandvm-1:ping -c4 10.10.10.10Result:
PING 10.10.10.10 (10.10.10.10) 56(84) bytes of data. 64 bytes from 10.10.10.10: icmp_seq=1 ttl=58 time=4.92 ms 64 bytes from 10.10.10.10: icmp_seq=2 ttl=58 time=4.33 ms 64 bytes from 10.10.10.10: icmp_seq=3 ttl=58 time=4.31 ms 64 bytes from 10.10.10.10: icmp_seq=4 ttl=58 time=4.38 ms --- 10.10.10.10 ping statistics --- 4 packets transmitted, 4 received, 0% packet loss, time 3005ms rtt min/avg/max/mdev = 4.306/4.483/4.916/0.251 ms -
Terminate the
vm-dconnection:exit
-
-
Connect to
vm-b:ssh -J ipsec@<x1.x1.x1.x1> ipsec@172.16.2.5-
Change the VM date and time settings:
sudo timedatectl set-timezone Europe/Moscow sudo timedatectl set-ntp True timedatectl -
Test IP connectivity between
vm-bandvm-1:ping -c4 10.10.10.10Result:
PING 10.10.10.10 (10.10.10.10) 56(84) bytes of data. 64 bytes from 10.10.10.10: icmp_seq=1 ttl=58 time=4.92 ms 64 bytes from 10.10.10.10: icmp_seq=2 ttl=58 time=4.33 ms 64 bytes from 10.10.10.10: icmp_seq=3 ttl=58 time=4.31 ms 64 bytes from 10.10.10.10: icmp_seq=4 ttl=58 time=4.38 ms --- 10.10.10.10 ping statistics --- 4 packets transmitted, 4 received, 0% packet loss, time 3005ms rtt min/avg/max/mdev = 4.306/4.483/4.916/0.251 ms -
Terminate the
vm-bconnection:exit
-
-
Connect to
vm-1:ssh -J ipsec@<x2.x2.x2.x2> ipsec@10.10.10.10-
Change the VM date and time settings:
sudo timedatectl set-timezone Europe/Moscow sudo timedatectl set-ntp True timedatectl -
Test IP connectivity between
vm-1andvm-d:ping -c4 172.16.1.5Result:
PING 172.16.1.5 (172.16.1.5) 56(84) bytes of data. 64 bytes from 172.16.1.5: icmp_seq=1 ttl=58 time=4.92 ms 64 bytes from 172.16.1.5: icmp_seq=2 ttl=58 time=4.33 ms 64 bytes from 172.16.1.5: icmp_seq=3 ttl=58 time=4.31 ms 64 bytes from 172.16.1.5: icmp_seq=4 ttl=58 time=4.38 ms --- 172.16.1.5 ping statistics --- 4 packets transmitted, 4 received, 0% packet loss, time 3005ms rtt min/avg/max/mdev = 4.306/4.483/4.916/0.251 ms -
Test IP connectivity between
vm-1andvm-b:ping -c4 172.16.2.5Result:
PING 172.16.2.5 (172.16.2.5) 56(84) bytes of data. 64 bytes from 172.16.2.5: icmp_seq=1 ttl=58 time=4.92 ms 64 bytes from 172.16.2.5: icmp_seq=2 ttl=58 time=4.33 ms 64 bytes from 172.16.2.5: icmp_seq=3 ttl=58 time=4.31 ms 64 bytes from 172.16.2.5: icmp_seq=4 ttl=58 time=4.38 ms --- 172.16.2.5 ping statistics --- 4 packets transmitted, 4 received, 0% packet loss, time 3005ms rtt min/avg/max/mdev = 4.306/4.483/4.916/0.251 ms -
Terminate the
vm-1connection:exit
-
How to delete the resources you created
To stop paying for the resources you created: