Deploying a Minecraft server in Yandex Cloud
Follow this tutorial to deploy the current version of a Minecraft (Java Edition) server in Yandex Cloud on an Ubuntu 24.04 VM.
To deploy a Minecraft server in Yandex Cloud:
- Get your cloud ready.
- Create a security group.
- Create a VM for the Minecraft server.
- Install the required tools.
- Download and run the Minecraft server.
- Test the server.
If you no longer need the resources you created, delete them.
Get your cloud ready
Sign up for Yandex Cloud and create a billing account:
- Navigate to the management console and log in to Yandex Cloud or create a new account.
- On the Yandex Cloud Billing page, make sure you have a billing account linked and it has the
ACTIVEorTRIAL_ACTIVEstatus. If you do not have a billing account, create one and link a cloud to it.
If you have an active billing account, you can create or select a folder for your infrastructure on the cloud page.
Learn more about clouds and folders here.
Required paid resources
The infrastructure support cost includes:
- Fee for a continuously running VM (see Yandex Compute Cloud pricing).
- Fee for using public IP address and outgoing traffic (see Yandex Virtual Private Cloud pricing).
Create a security group
Create a security group with a rule allowing incoming traffic to port 25565. This is the defalut port for client access in the Minecraft server configuration file. Also, rules allowing SSH access to the VM to configure the server and VM access to the internet to download software will be added to the security group.
-
In the management console, select your folder.
-
Navigate to Virtual Private Cloud.
-
In the left-hand panel, select Security groups.
-
Click Create security group.
-
In the Name field, specify the name:
minecraft-sg. -
In the Network field, select
default. -
Under Rules, create the following traffic management rules:
Traffic
directionDescription
Port range
Protocol
Source /
Destination nameCIDR blocks
Inbound
Client access to
Minecraft server25565AnyCIDR0.0.0.0/0Inbound
Access to VM over
SSH22AnyCIDR0.0.0.0/0Outbound
VM access to
the internet0-65535AnyCIDR0.0.0.0/0 -
Click Save.
Create a VM for the Minecraft server
-
Create an SSH key pair:
ssh-keygen -t ed25519We recommend sticking with the default key file name.
-
Create a VM with a public IP address:
Management console-
In the management console, select the folder where you want to create your VM.
-
Navigate to Compute Cloud.
-
In the left-hand panel, select Virtual machines.
-
Click Create virtual machine.
-
Under Boot disk image, select Ubuntu 24.04 LTS.
-
Under Location, select an availability zone where your VM will reside.
-
Under Disks and file storages, configure the boot disk:
- Type:
HDD. - Size:
18 GB.
- Type:
-
Under Computing resources, navigate to the Custom tab and specify the Minecraft server recommended parameters:
- Platform:
Intel Ice Lake - vCPU:
2 - Guaranteed vCPU performance:
100% - RAM:
2 GB
- Platform:
-
Under Network settings:
-
In the Subnet field, enter the ID of a subnet in the new VM’s availability zone. Alternatively, select a cloud network from the list.
-
Each network must have at least one subnet. If there is no subnet, create one by selecting Create subnet.
-
If there are no networks in the list, click Create network to create one:
- In the window that opens, specify the network name and select the folder where it will be created.
- Optionally, enable the Create subnets setting to automatically create subnets in all availability zones.
- Click Create network.
-
-
In the Public IP address field, select
Autoto assign the VM a random external IP address from the Yandex Cloud pool. Alternatively, select a static address from the list if you reserved one. -
In the Security groups field, select the
minecraft-sgsecurity group you created earlier.
-
-
Under Access, select SSH key and specify the VM access credentials:
-
In the Login field, enter a name for the user you want to create on the VM, e.g.,
ubuntu.Alert
Do not use
rootor other OS-reserved usernames. For operations requiring root privileges, use thesudocommand. -
In the SSH key field, select the SSH key saved in your organization user profile.
If there are no SSH keys in your profile or you want to add a new key:
-
Click Add key.
-
Enter a name for the SSH key.
-
Select one of the following:
-
Enter manually: Paste the contents of the public SSH key. You need to create an SSH key pair on your own. -
Load from file: Upload the public part of the SSH key. You need to create an SSH key pair on your own. -
Generate key: Automatically create an SSH key pair.When adding a new SSH key, an archive containing the key pair will be created and downloaded. In Linux or macOS-based operating systems, unpack the archive to the
/home/<user_name>/.sshdirectory. In Windows, unpack the archive to theC:\Users\<user_name>/.sshdirectory. You do not need additionally enter the public key in the management console.
-
-
Click Add.
The system will add the SSH key to your organization user profile. If the organization has disabled the ability for users to add SSH keys to their profiles, the added public SSH key will only be saved in the user profile inside the newly created resource.
-
-
-
Under General information, specify the VM name:
minecraft-server. -
Click Create VM.
Recommended virtual machine configuration:
Configuration Number of players vCPU RAM Disk size Minimum 1-4 2 1GB 150MB HDD or more Recommended 5-10 2 2GB 200MB HDD or more Ideal 10+ 4 4GB 200MB SSD or more Warning
Note that this configuration table is in line with the default settings defined in
server.properties. The bigger the game world grows, the higher the requirements, especially for RAM. In addition, larger rendered areas, villages, and other dynamic objects will result in higher virtual server requirements. -
Install the required tools
-
Use SSH to connect to the VM you created.
-
Install the required Java packages from the repository and the
screenutility to run the terminal session in background mode:Note
The command below installs OpenJDK version
23. To start the current Minecraft server version, you may need a newer OpenJDK version. Therefore, check the current OpenJDK version on the project website before you install this package.sudo add-apt-repository -y ppa:openjdk-r/ppa \ && sudo apt update -y \ && sudo apt install -y openjdk-23-jre-headless screen
Download and run the Minecraft server
-
Create a separate directory and navigate to it:
mkdir minecraft-server && cd minecraft-server -
Follow this link and copy the URL to download the distribution of the current server version.
-
Download the current distribution to the current directory using
wget:wget -O minecraft_server.jar <download_link>Where
<download_link>is the distribution download link you got in the previous step. For example:https://piston-data.mojang.com/v1/objects/4707d00eb834b446575d89a61a11b5d548d8c001/server.jar -
Create the
eula.txtfile to automatically accept the EULA terms:cat << EOF > eula.txt eula=true EOF -
Run the background
screensession:screen -
In the background session, run the server:
java -Xms1024M -Xmx1024M -jar minecraft_server.jar noguiWait for the game world to be created.
[09:18:58] [Worker-Main-2/INFO]: Preparing spawn area: 81% [09:18:59] [Worker-Main-2/INFO]: Preparing spawn area: 82% [09:19:00] [Worker-Main-2/INFO]: Preparing spawn area: 83% ... [09:19:08] [Worker-Main-2/INFO]: Preparing spawn area: 97% [09:19:09] [Server thread/INFO]: Time elapsed: 75917 ms [09:19:09] [Server thread/INFO]: Done (92.666s)! For help, type "help" -
Optionally, you can leave the
screensession running in the background by pressing Ctrl + A + D and return to the main VM terminal.If there is only one such background session with the server running and you want to return to it, run the following command:
screen -rIf there are multiple background sessions, get their list by running the following command:
screen -listResult:
There is a screen on:
   24257.pts-0.mcft-test	(02/28/2024 09:17:15 AM)	(Detached)
1 Socket in /run/screen/S-username.
Then, enter the session using its ID from the list:
screen -r 24257 -
After running the server, in the directory, you will see new directories and the files required for server operation and configuration, including the logs:
    4096 Mar 16 09:50 .
    4096 Mar 16 09:52 ..
       2 Mar 16 09:16 banned-ips.json
       2 Mar 16 09:16 banned-players.json
      10 Mar 16 09:48 eula.txt
    4096 Mar 16 09:50 libraries
    4096 Mar 16 09:16 logs
49150256 Dec  7 09:04 minecraft_server_1.20.4.jar
       2 Mar 16 09:16 ops.json
    1303 Mar 16 09:16 server.properties
       2 Mar 16 09:16 usercache.json
    4096 Mar 16 09:50 versions
       2 Mar 16 09:50 whitelist.json
    4096 Mar 16 09:13 world
Test the server
-
Add the server to the server list in the Minecraft client. Give the server a name of your choice. In the Server address field, specify the public IP address of your
minecraft-serverVM.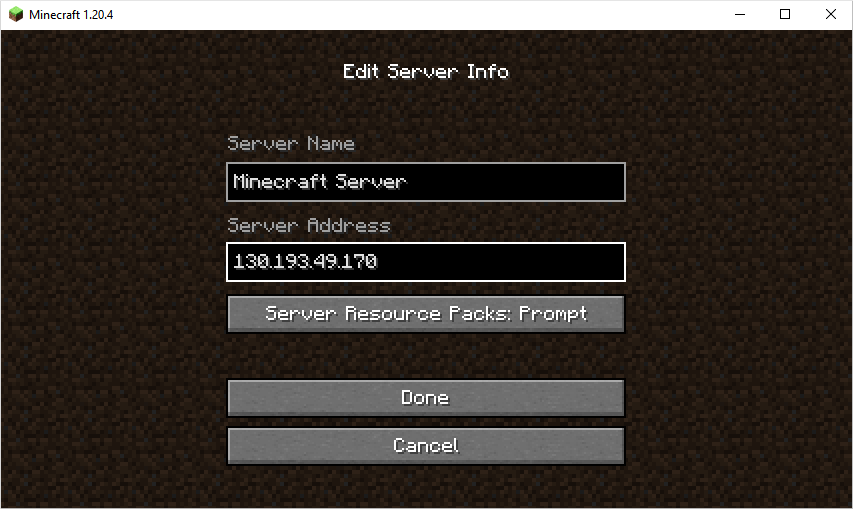
-
From the server list, select the server you added and click
Connect.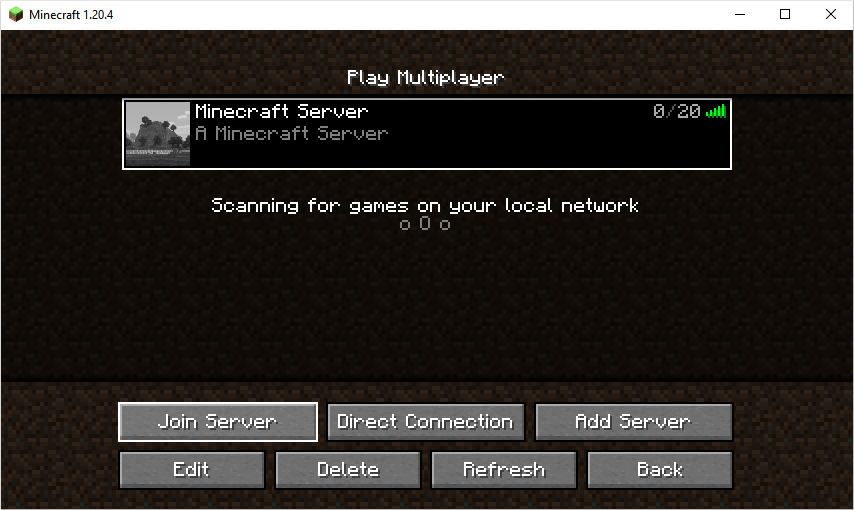
How to delete the resources you created
To stop paying for the resources you created: