Creating a new cloud


After you sign up with Yandex Cloud and create an organization, you can create your first cloud. If you need an additional cloud, follow the same guide to create it.
Note
When creating a cloud, you automatically get the owner role in this cloud.
To create a cloud:
-
On the Yandex Cloud Billing page, make sure that the billing account is in the
ACTIVEorTRIAL_ACTIVEstatus. If you do not have a billing account, create one or ask your administrator to assign you thebilling.accounts.memberrole for a billing account. -
In the management console, in the top panel, click or and select the organization.
-
Click to the right of the organization name.
-
Select Create cloud.
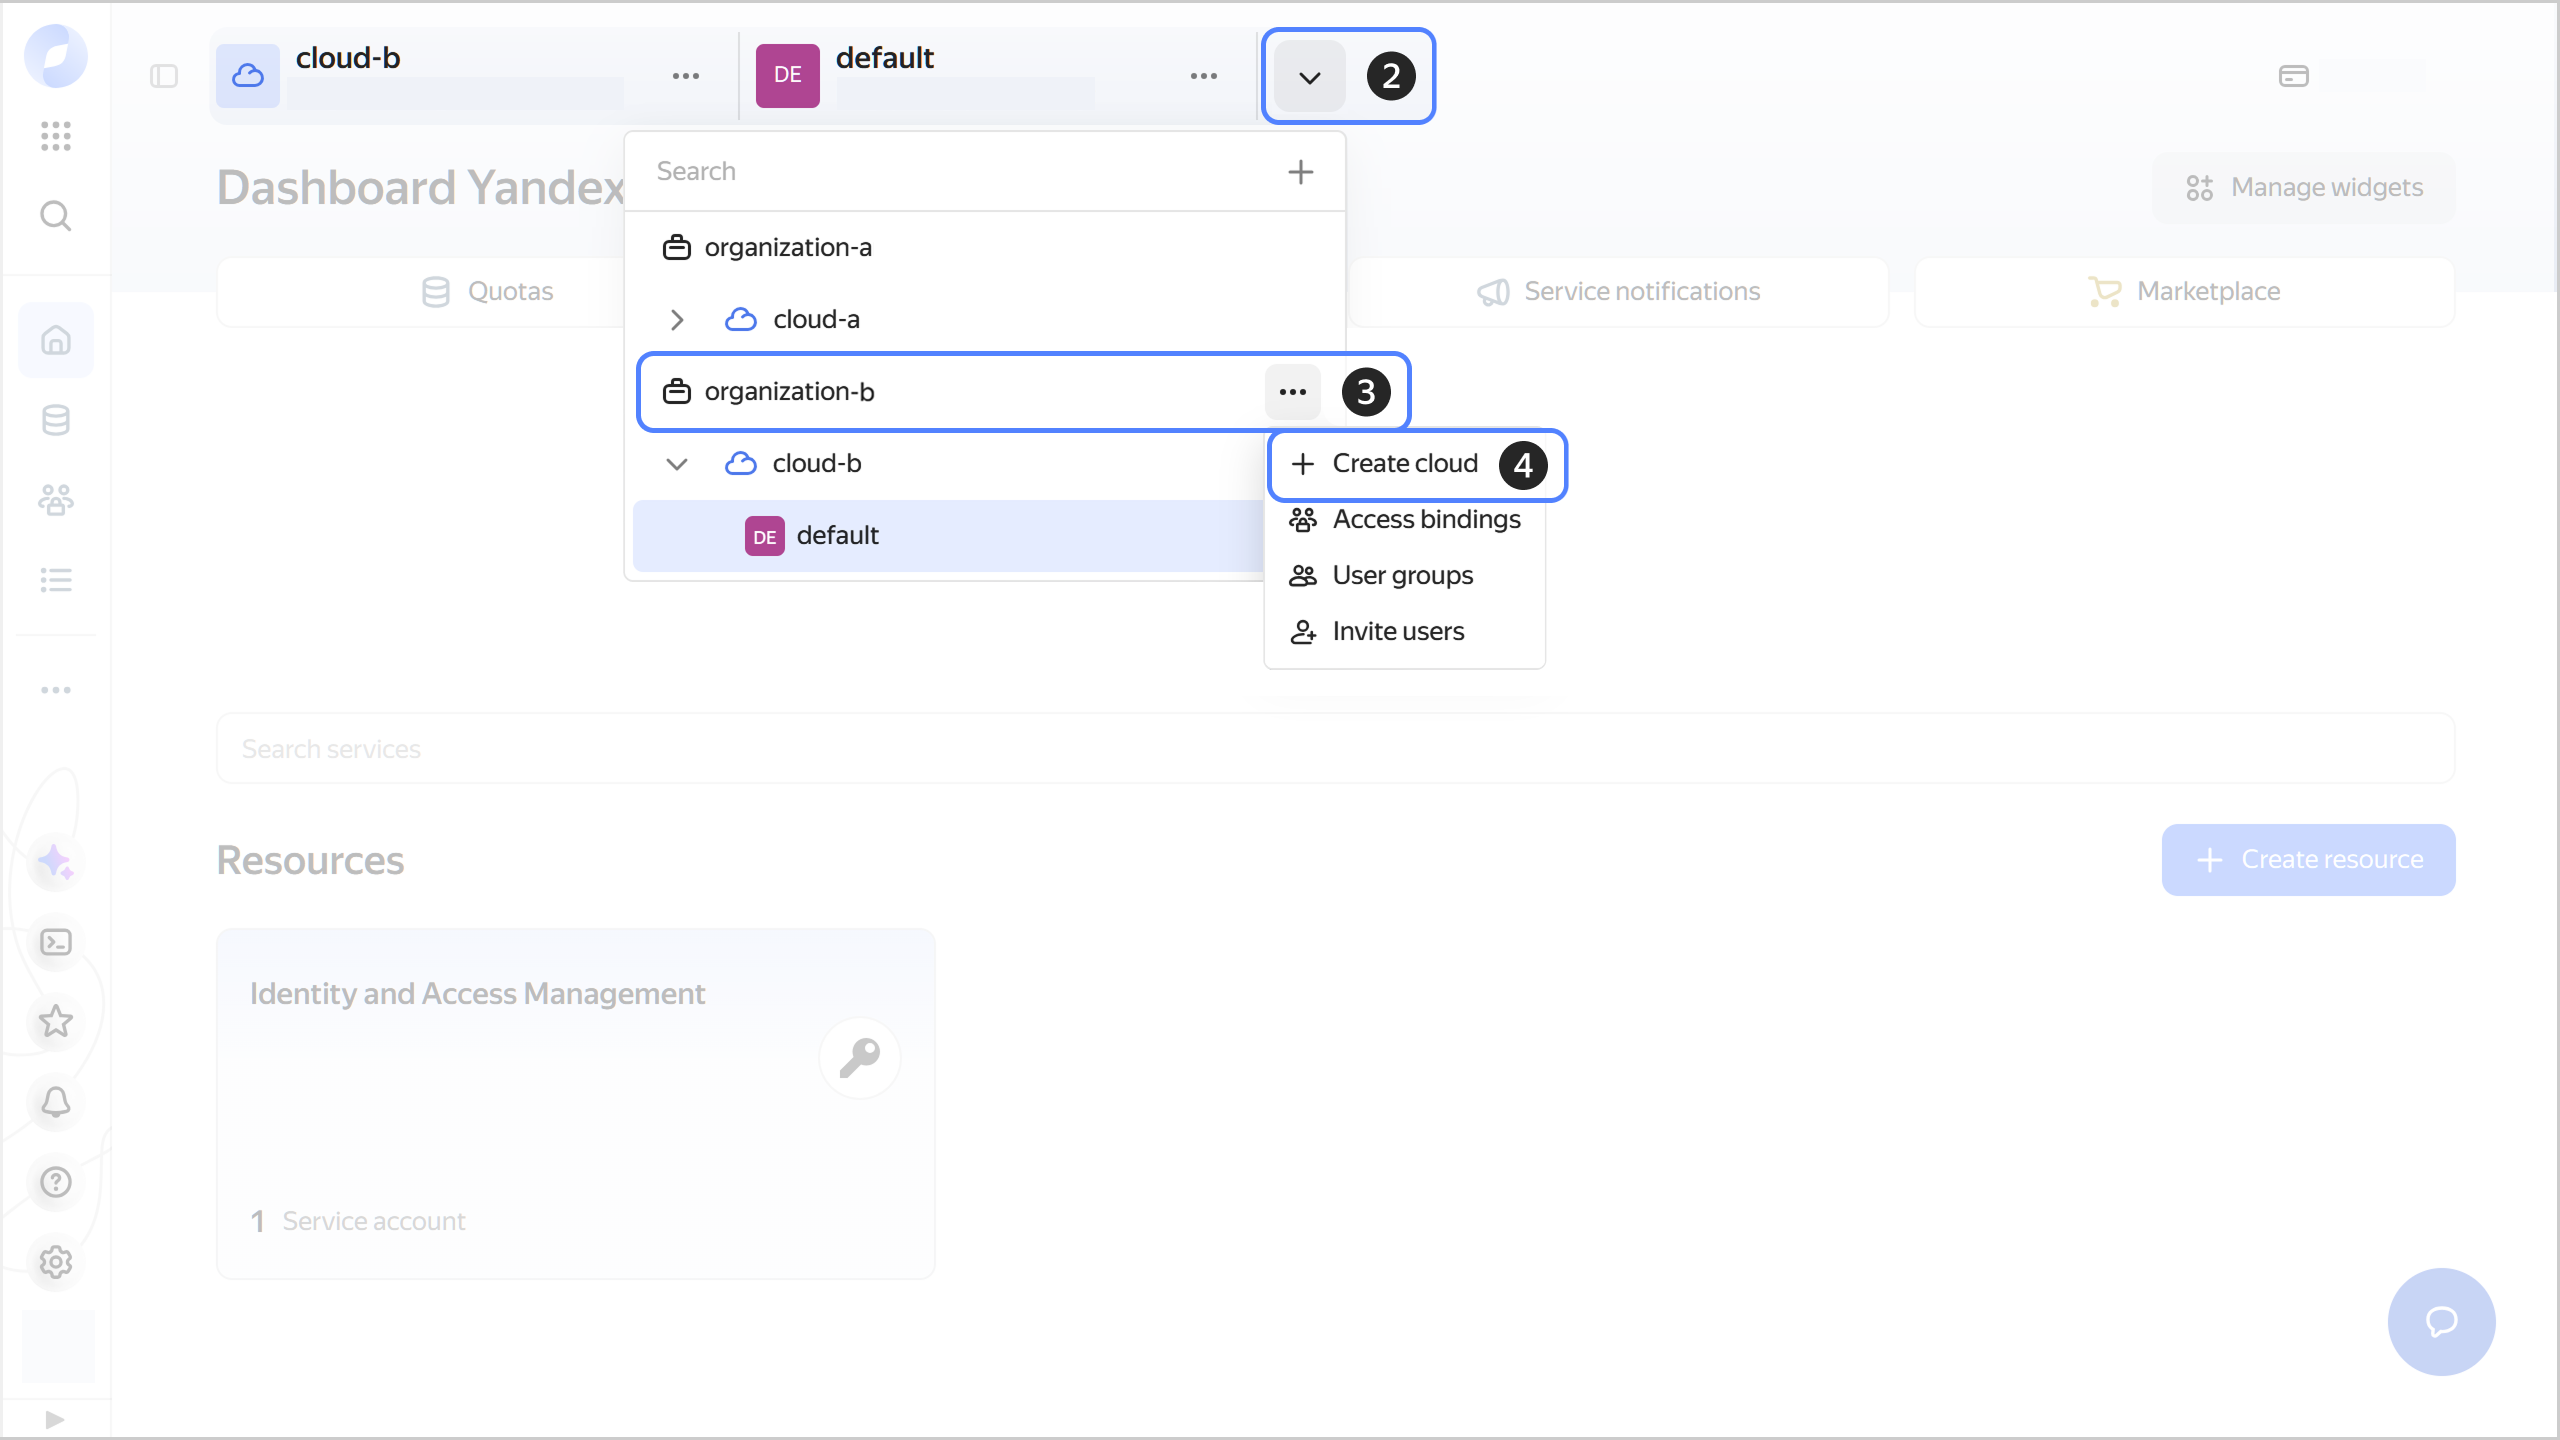
-
Enter a name for your cloud. The naming requirements are as follows:
- Length: between 3 and 63 characters.
- It can only contain lowercase Latin letters, numbers, and hyphens.
- It must start with a letter and cannot end with a hyphen.
-
Optionally, add a cloud label.
-
Click Create.
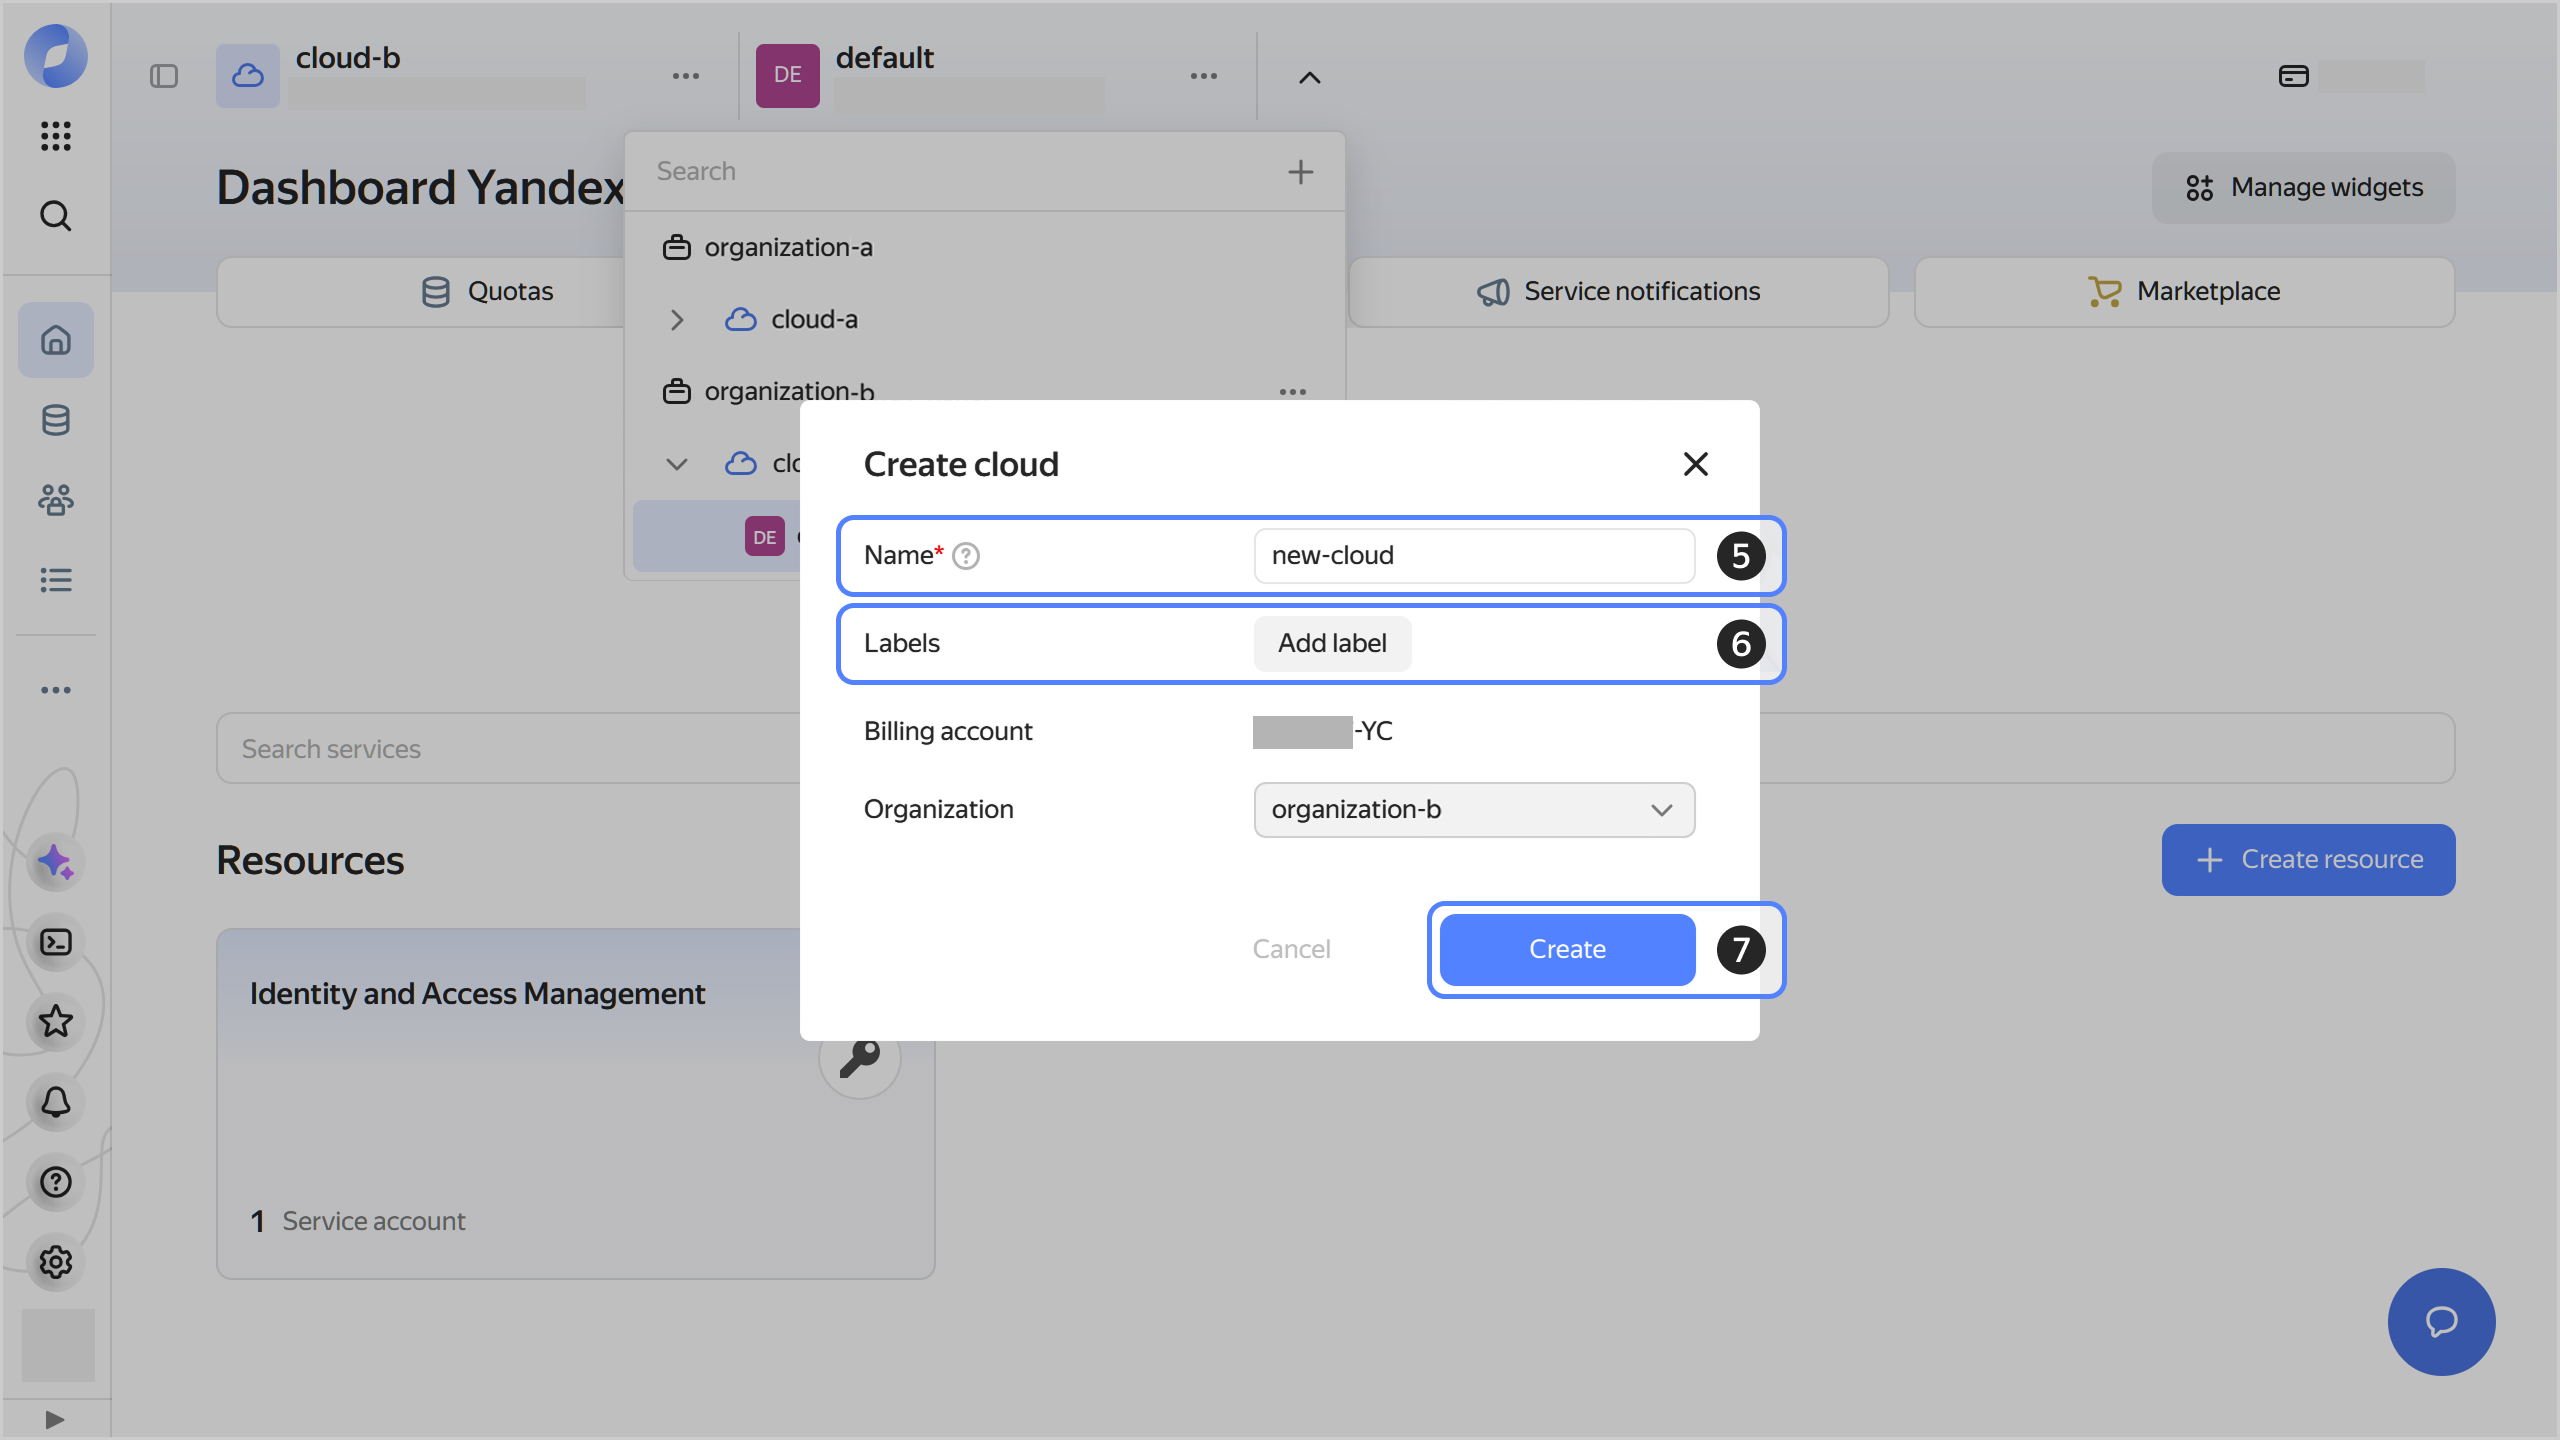
Note
To create a new cloud using the Yandex Cloud CLI, link the organization to a CLI profile.
If you do not have the Yandex Cloud CLI yet, install and initialize it.
-
View the description of the create cloud command:
yc resource-manager cloud create --help -
If you do not have a linked organization yet, link the one you want to create the cloud in to the CLI profile.
yc config set organization-id <organization_ID>Where
<organization_ID>is the ID of the organization to create the cloud in. -
To create the cloud, run this command:
yc resource-manager cloud create \
  --name <cloud_name> \
  --billing-account-id <billing_account_ID>
Where:
-
--name: Name of the new cloud. The naming requirements are as follows:- Length: between 3 and 63 characters.
- It can only contain lowercase Latin letters, numbers, and hyphens.
- It must start with a letter and cannot end with a hyphen.
-
--billing-account-id: ID of the billing account to link the new cloud to.You can get the billing account ID in the Yandex Cloud Billing interface under Account information on the billing account page.
Result:
done (4s) id: b1gbi30tq0m9******** created_at: "2024-12-10T09:25:22Z" name: my-new-cloud organization_id: bpfaidqca8vd******** -
If you do not have Terraform yet, install it and configure the Yandex Cloud provider.
To manage infrastructure using Terraform under a service account or user accounts (a Yandex account, a federated account, or a local user), authenticate using the appropriate method.
Warning
To activate the cloud, make sure to link it to your billing account. Until then, the new cloud will remain in the Creating status. To link the cloud to your billing account, use the yandex_billing_cloud_binding resource and specify the cloud ID in the cloud_id field.
-
In the Terraform configuration file, describe the resources you want to create:
# Creating a cloud

resource "yandex_resourcemanager_cloud" "cloud1" {
  name            = "<cloud_name>"
  organization_id = "<organization_ID>"
}

# Linking the cloud to the billing account

resource "yandex_billing_cloud_binding" "mycloud" {
  billing_account_id = "<billing_account_ID>"
  cloud_id           = yandex_resourcemanager_cloud.cloud1.id
}
Where:
-
name: Cloud name. The naming requirements are as follows:- Length: between 3 and 63 characters.
- It can only contain lowercase Latin letters, numbers, and hyphens.
- It must start with a letter and cannot end with a hyphen.
-
organization_id: Organization ID. Terraform allows you to create a cloud only for an existing organization. -
billing_account_id: ID of the billing account to link the new cloud to.You can get the billing account ID in the Yandex Cloud Billing interface under Account information on the billing account page.
-
cloud_id: ID of the cloud to link to the billing account.
For more on the properties of the
yandex_resourcemanager_cloudandyandex_billing_cloud_bindingresources in Terraform, see this provider guide. -
-
Create the resources:
-
In the terminal, navigate to the configuration file directory.
-
Make sure the configuration is correct using this command:
terraform validateIf the configuration is valid, you will get this message:
Success! The configuration is valid. -
Run this command:
terraform planYou will see a list of resources and their properties. No changes will be made at this step. Terraform will show any errors in the configuration.
-
Apply the configuration changes:
terraform apply -
Type
yesand press Enter to confirm the changes.
-
This will create a cloud linked to your billing account in the organization. You can check the new cloud and its parameters in the management console or using this CLI command:
yc resource-manager cloud list
To create a cloud, use the create REST API method for the Cloud resource or the CloudService/Create gRPC API call.