Getting started with Yandex MPP Analytics for PostgreSQL

To get started:
To connect to the cluster and work with databases, you will need the following tools:
- DBeaver graphical IDE.
psqlconsole client.
For more tools you can use to work with Yandex MPP Analytics for PostgreSQL, see Pre-configuring a Yandex MPP Analytics for PostgreSQL cluster connection.
Getting started
-
Navigate to the management console and log in to Yandex Cloud or sign up if not signed up yet.
-
If you do not have a folder yet, create one:
-
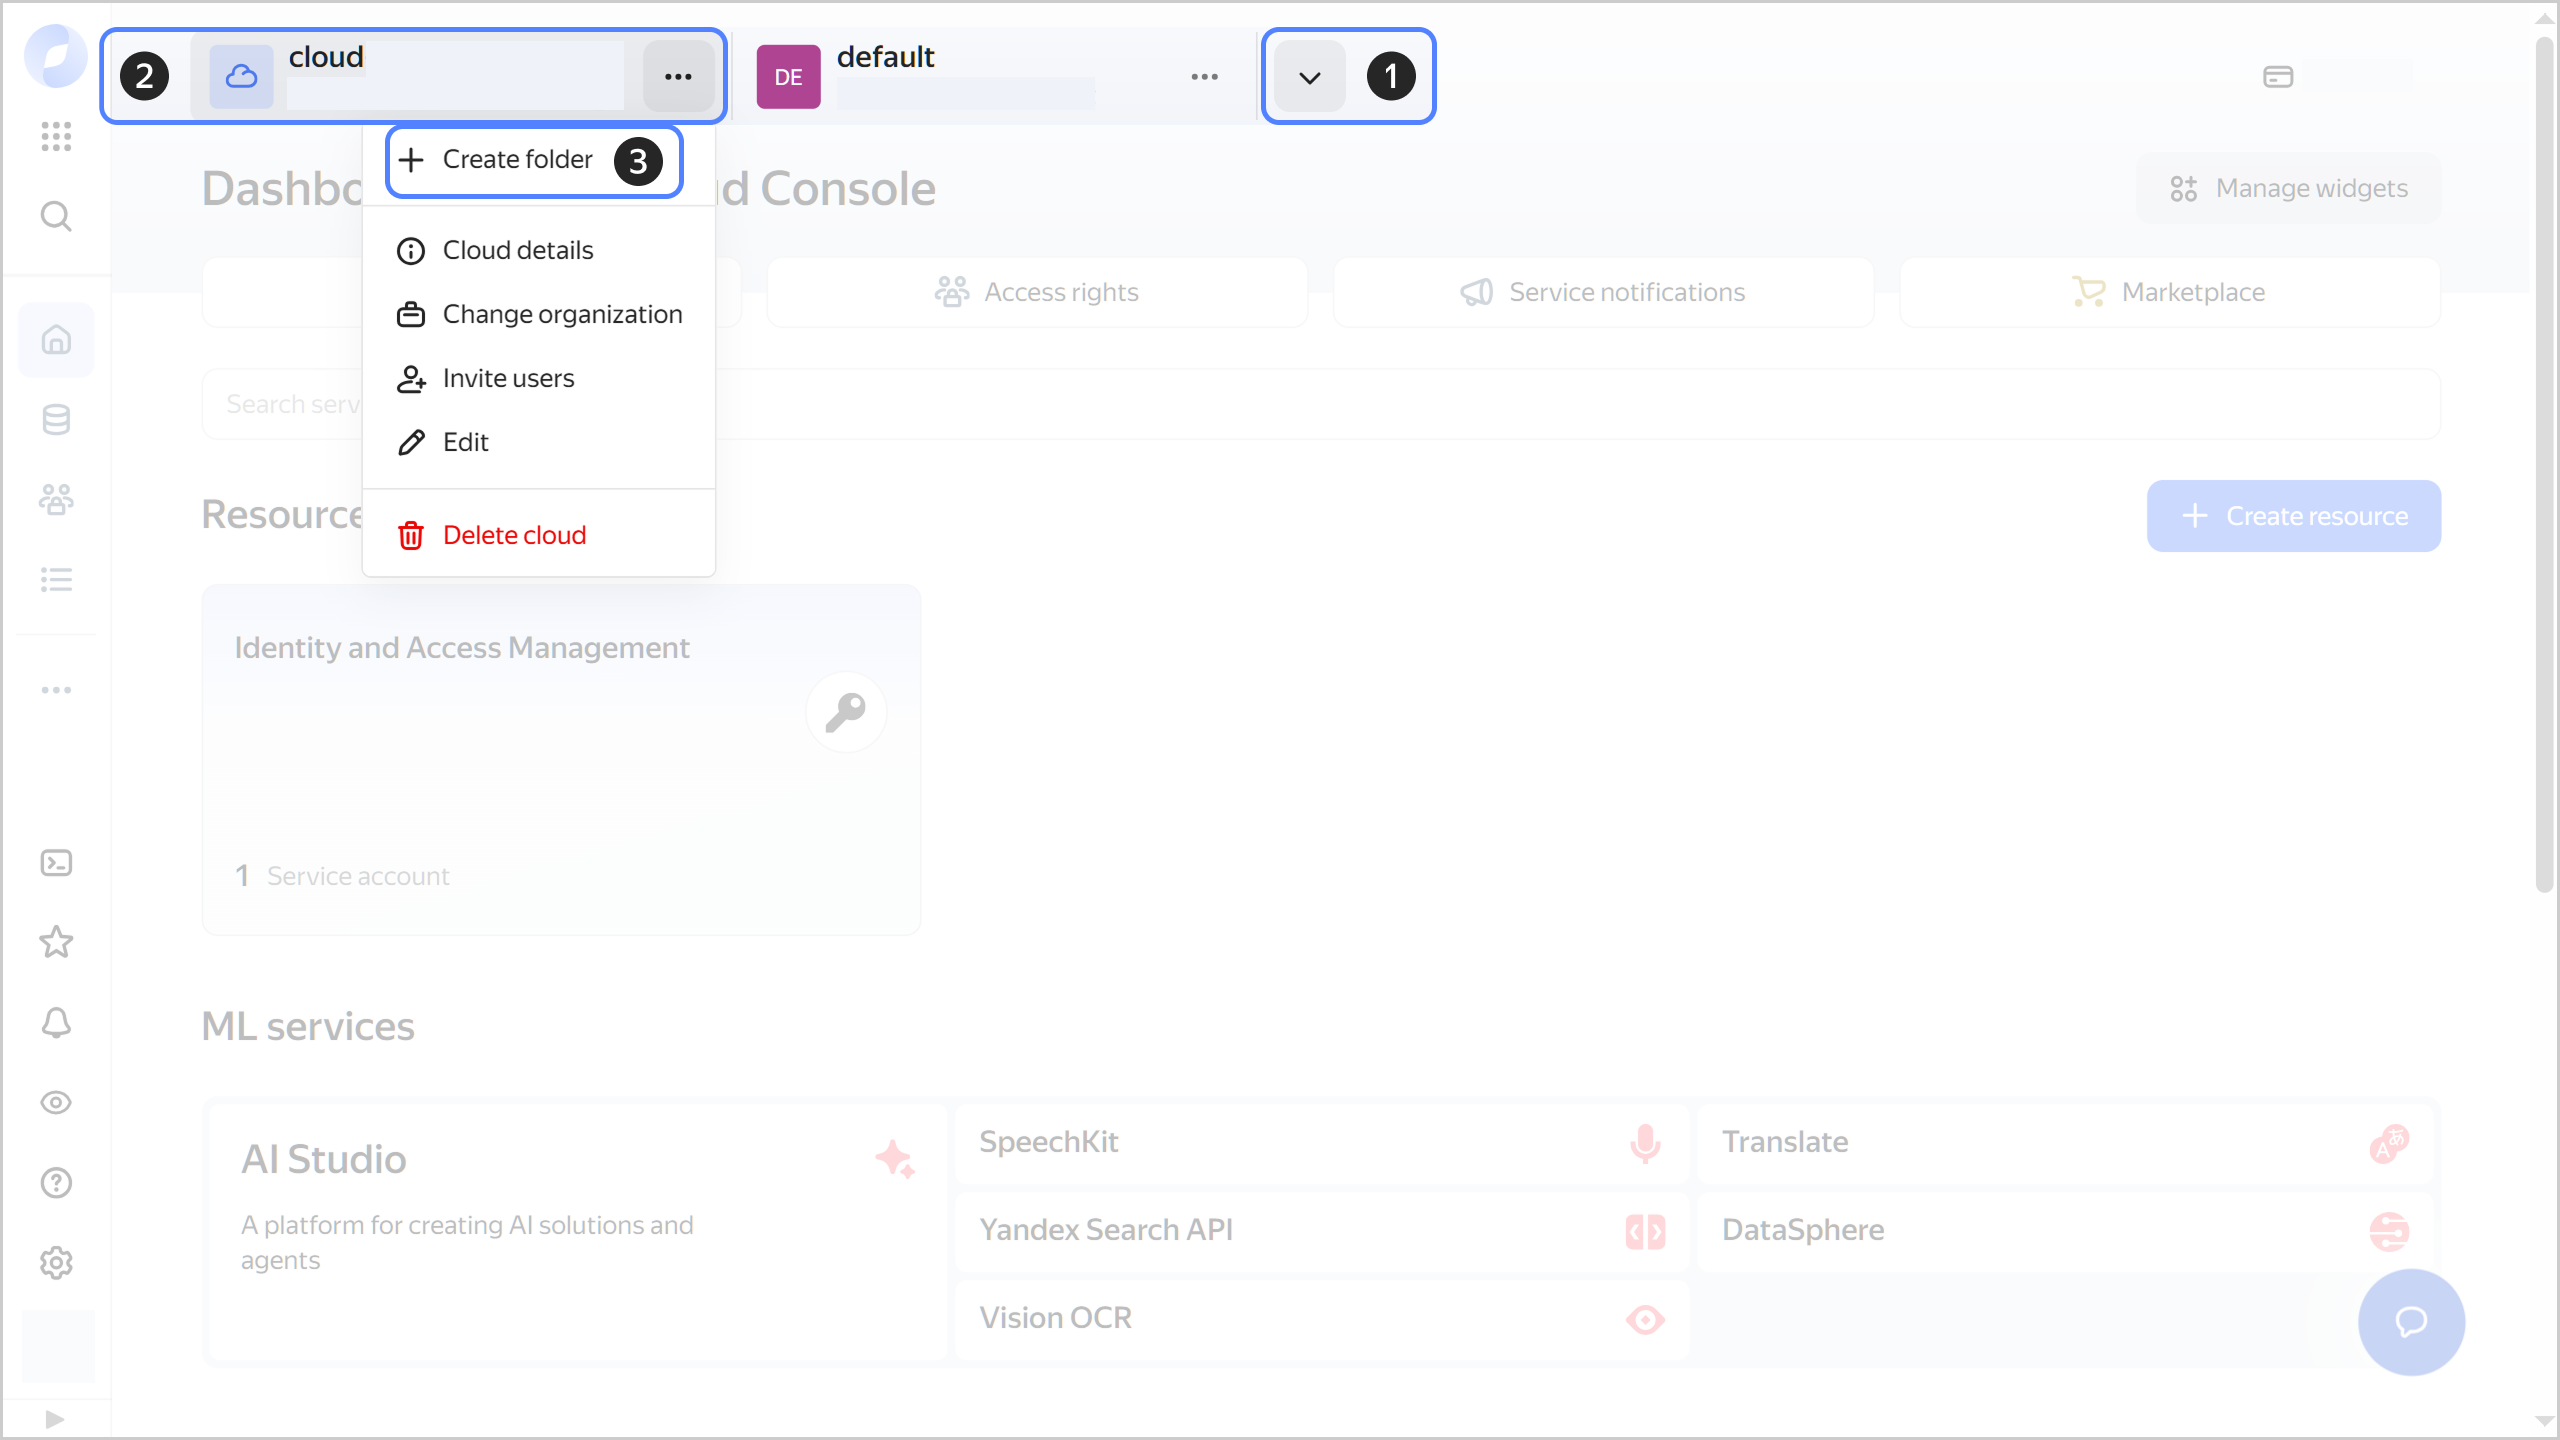
In the management console, in the top panel, click or and select the cloud.
-
To the right of the cloud name, click .
-
Select Create folder.
-
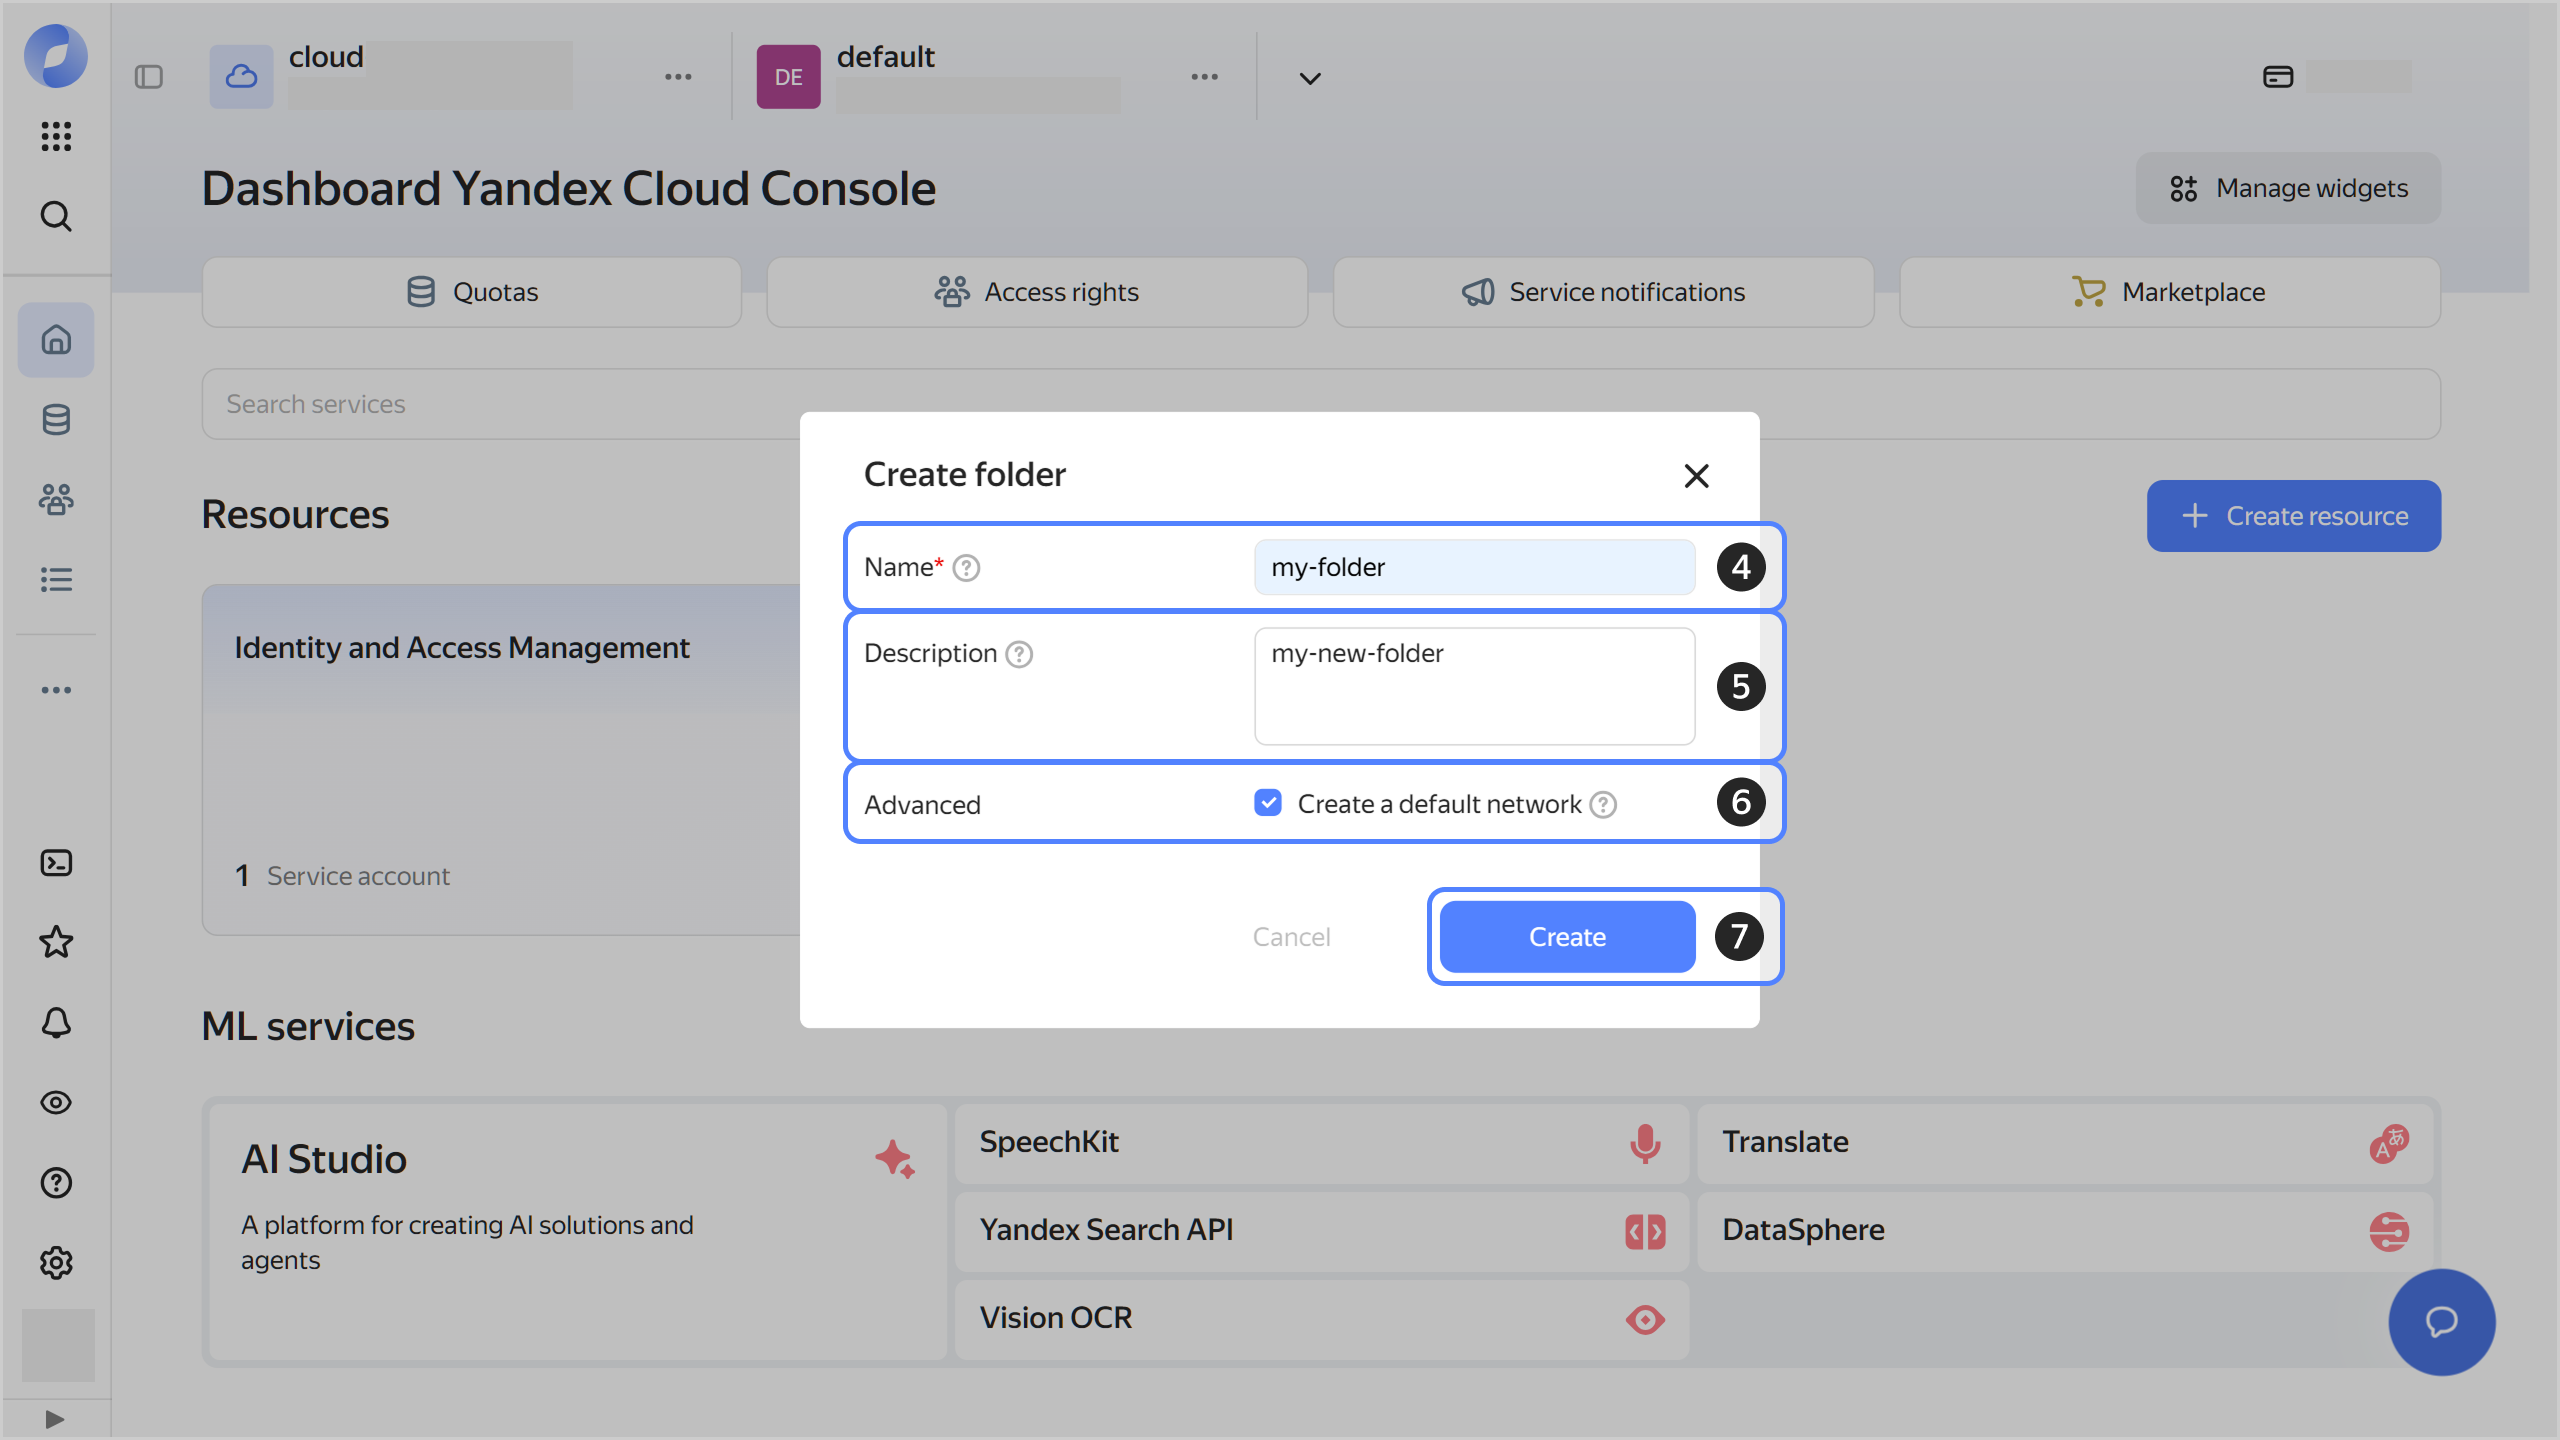
Give your folder a name. The naming requirements are as follows:
- Length: between 3 and 63 characters.
- It can only contain lowercase Latin letters, numbers, and hyphens.
- It must start with a letter and cannot end with a hyphen.
-
Optionally, specify the description for your folder.
-
Select Create a default network. This will create a network with subnets in each availability zone. Within this network, you will also have a default security group, within which all network traffic will be allowed.
-
Click Create.
-
-
Assign the following roles to your Yandex Cloud account:
-
managed-greenplum.editor or higher: To create a cluster.
-
mdb.viewer: To view managed database (MDB) clusters on the dashboard in the management console.
Note
If you cannot manage roles, contact your cloud or organization administrator.
-
Create a cluster
Create a Yandex MPP Analytics for PostgreSQL cluster with public access. You can connect to such a cluster with a Yandex Compute Cloud VM or over the internet.
To create a cluster:
-
In the management console, select the folder where you want to create your database cluster.
-
Navigate to Yandex MPP Analytics for PostgreSQL.
-
Click Create cluster.
-
Specify the following cluster properties:
-
Basic parameters → Cluster name: Cluster name. It must be unique within the folder.
-
Network settings:
-
Network: Specify the network you want the cluster hosts to reside in.
-
Security groups: Specify security groups for the cluster network traffic.
Set up the security groups to be able to connect to the cluster over the internet.
-
Availability zone: Specify an availability zone for the cluster hosts.
-
Subnet: Specify a subnet for the cluster hosts.
-
Enable Public access.
-
-
User:
-
Username: Admin username. It may contain Latin letters, numbers, hyphens, and underscores, but cannot start with a hyphen. It must be from 1 to 32 characters long.
Note
Such names as
admin,gpadmin, mdb_admin,mdb_replication,monitor,none,postgres,public, andreplare reserved for Yandex MPP Analytics for PostgreSQL. You cannot create users with these names. -
Password: Admin user password. It must be from 8 to 128 characters long.
The admin is a special user required for managing the cluster. This user cannot be deleted. For more information, see Users and roles in Yandex MPP Analytics for PostgreSQL.
-
-
Master and Segment: Master and segment host configuration in the Yandex MPP Analytics for PostgreSQL cluster.
You can edit the settings on these tabs if the default configuration does not suit your needs. For more information, see Calculating the cluster configuration.
-
-
Click Create cluster.
-
Wait until the cluster is ready: its status on the Yandex MPP Analytics for PostgreSQL dashboard will change to Running and its state, to Alive. This may take a while.
For more information on creating a cluster, see Creating a cluster Yandex MPP Analytics for PostgreSQL.
Get the cluster ID
Get the cluster ID required to connect to the cluster:
- In the management console, navigate to the folder page.
- Navigate to Yandex MPP Analytics for PostgreSQL.
- Click the name of your cluster and select the Overview tab.
- Copy the cluster ID specified under General information.
Connect to the cluster
Connect to the cluster you created:
-
Install DBeaver to the host that will be used for the connection.
Note
Access to the cluster was tested in DBeaver Community 24.2.3
-
Launch DBeaver.
-
In the Database menu, select New connection.
-
Select Greenplum® from the database list.
-
Click Next.
-
Specify the main connection properties on the Main tab:
-
Under Server:
-
Connect by:
Host. -
Host: Special FQDN of the primary master,
c-<cluster_ID>.rw.mdb.yandexcloud.net.Cluster ID you got earlier.
-
Database:
postgres. -
Port:
6432. -
Show all databases: Enabled.
-
-
Under Authentication:
-
Authentication:
Database Native. -
User: Admin username specified when creating the cluster.
-
Password: Admin user password.
You can disable the Save password option, which is enabled by default.
-
-
-
Click Test connection.
Click Download if DBeaver prompts you to download the driver files. You may not have these files if this is your first time using DBeaver to connect to the Yandex MPP Analytics for PostgreSQL.
Enter the user password if DBeaver prompts you for one and click OK.
DBeaver will connect to the
postgresdatabase in the Yandex MPP Analytics for PostgreSQL cluster.If the connection is successful, you will get general information about the Yandex MPP Analytics for PostgreSQL server and the driver used for the connection. Click OK.
Warning
When connecting, you will use an encrypted connection (with SSL) but without authenticating the cluster hosts. This is the default behavior for all clients that use the
libpqlibrary.In the production environment, we recommend connecting to the cluster over SSL with host authentication.
-
Optionally, on the Main tab, click Connection description (name, type, ...) and add a name and description for the connection.
By default, the connection name matches the specified database name, i.e.,
postgres. You may want to select a different name to avoid confusion: you can use this connection to work with any databases, not justpostgres. -
Click Finish.
You will see the new connection in the left-hand panel on the Databases tab.
-
Expand the connection you created in the left-hand panel on the Databases tab.
Enter the user password if DBeaver prompts you for one and click OK.
DBeaver will connect to the
postgresdatabase in the Yandex MPP Analytics for PostgreSQL cluster. -
Run this test query:
-
Open the Databases folder, expand the
postgresdatabase context menu, and select SQL editor → Open SQL console.This will open a console you can use to run SQL queries to the
postgresdatabase. -
Enter your query in the console:
SELECT version(); -
Run the query by clicking Run SQL script on the far left side of the console.
Alternatively, select Run SQL script in the SQL editor menu.
-
-
Install the
psqlclient to the host you will use to connect to the cluster.For example, to install
psqlon a Linux VM in Yandex Cloud with Ubuntu 24.04: -
Connect to the
postgresdatabase in the Yandex MPP Analytics for PostgreSQL cluster. Use the special primary master FQDN:psql "host=c-<cluster_ID>.rw.mdb.yandexcloud.net \ port=6432 \ dbname=postgres \ user=<username>"Cluster ID you got earlier.
After you run this command, enter the user password to complete the connection procedure.
Warning
When connecting, you will use an encrypted connection (with SSL) but without authenticating the cluster hosts. This is the default behavior for all clients that use the
libpqlibrary.In the production environment, we recommend connecting to the cluster over SSL with host authentication.
-
Run this test query:
SELECT version();
If your cluster connection and test query are successful, you will see the DBMS version.
Create a database
The previously created Yandex MPP Analytics for PostgreSQL cluster has only one database, a service database named postgres. This database is not meant to store user data. For example, you cannot create data schemas in it.
After you connect to the Yandex MPP Analytics for PostgreSQL cluster, create a database named sample_db for storing user data:
-
Expand the previously created connection in the left-hand panel on the Databases tab.
Enter the user password if DBeaver prompts you for one and click OK.
DBeaver will connect to the
postgresdatabase in the Yandex MPP Analytics for PostgreSQL cluster. -
Create a database:
-
Open the Databases folder, expand the
postgresdatabase context menu, and select SQL editor → Open SQL console.This will open a console you can use to run SQL queries to the
postgresdatabase. -
Enter your query in the console:
CREATE DATABASE sample_db; -
Run the query by clicking Run SQL script on the far left side of the console.
Alternatively, select Run SQL script in the SQL editor menu.
-
-
Update the list of databases for it to display the new database.
To do this, open the context menu of the Databases folder and select Refresh.
Tip
If you do not see
sample_dbin the list, make sure you enabled the Show all databases option for the connection.
-
Run this query:
CREATE DATABASE sample_db; -
Display the list of databases in the Yandex MPP Analytics for PostgreSQL cluster and make sure it includes
sample_db:\list
Run a few queries to the database
To make sure the database was created correctly, run a few queries to it:
-
Expand the previously created connection in the left-hand panel on the Databases tab.
Enter the user password if DBeaver prompts you for one and click OK.
DBeaver will connect to the
postgresdatabase in the Yandex MPP Analytics for PostgreSQL cluster. -
Open the Databases folder, expand the
sample_dbdatabase context menu, and select SQL editor → Open SQL console.This will open a console you can use to run SQL queries to
sample_db. -
Create a table and populate it with data:
-
Enter your queries in the console:
CREATE TABLE sample_table (a int) DISTRIBUTED BY (a); INSERT INTO sample_table SELECT * FROM GENERATE_SERIES(1, 10000); -
Run the query by clicking Run SQL script on the far left side of the console.
Alternatively, select Run SQL script in the SQL editor menu.
The table will be created and populated with numbers from 1 to 10,000.
The
CREATE TABLEandINSERT INTOqueries do not return any results. DBeaver will display statistics for the completed queries as follows:Queries 2 Updated Rows 10000 Execute time ... Fetch time ... Total time ... Start time ... Finish time ... -
-
Get the sum of all numbers in the table. To do this, clear the console, then enter and run the following query:
SELECT sum(a) FROM sample_table;Expected result:
sum | --------+ 50005000| -
Get information on how the 10,000 table rows are distributed across Yandex MPP Analytics for PostgreSQL segments. To do this, clear the console, then enter and run the following query:
SELECT gp_segment_id, count(*)
    FROM sample_table
    GROUP BY gp_segment_id;
The result will depend on the number of segments in the cluster. Distribution of strings by segments may vary as well.
Here is a possible result for a cluster with two segments:
gp_segment_id|count| -------------+-----+ 0| 5013| 1| 4987| -
End the connection session. To do this, open the connection context menu and select Disconnect.
-
Make sure you are connected to
sample_db:SELECT current_database();If the query returns a different database name, e.g.,
postgres, connect to the database you need:\connect sample_db; -
Create a table and populate it with data:
CREATE TABLE sample_table (a int)
    DISTRIBUTED BY (a);

INSERT INTO sample_table
    SELECT * FROM GENERATE_SERIES(1, 10000);
The table will be created and populated with numbers from 1 to 10,000.
The
CREATE TABLEandINSERT INTOqueries do not return any results. -
Get the sum of all numbers in the table:
SELECT sum(a) FROM sample_table;Expected result:
sum | --------+ 50005000| -
Get information on how the 10,000 table rows are distributed across Yandex MPP Analytics for PostgreSQL segments:
SELECT gp_segment_id, count(*)
    FROM sample_table
    GROUP BY gp_segment_id;
The result will depend on the number of segments in the cluster. Distribution of strings by segments may vary as well.
Here is a possible result for a cluster with two segments:
gp_segment_id|count| -------------+-----+ 0| 5013| 1| 4987| -
End the
psqlsession:\quit
What's next
- Read about the service concepts.
- Learn more about creating a cluster and connecting to a cluster.
Greenplum® and Greenplum Database® are registered trademarks or trademarks of Broadcom Inc. in the United States and/or other countries.