App testing with GitLab
GitLab is a web-based Git repository management platform. GitLab also allows developers to run a continuous process for writing, testing, and deploying code.
In this scenario, you will set up GitLab on a virtual machine, create a simple C++ project, set up a test scenario, and test its execution.
To create and test a project in the GitLab environment:
- Get your cloud ready.
- Required paid resources.
- Create a GitLab VM.
- Configure GitLab.
- Set the privacy settings.
- Create a project.
- Set up and run testing for the project.
- Configure and register a runner.
- Create a test pipeline.
- Create an error in the project.
- How to delete the resources you created.
Get your cloud ready
Sign up for Yandex Cloud and create a billing account:
- Navigate to the management console and log in to Yandex Cloud or create a new account.
- On the Yandex Cloud Billing page, make sure you have a billing account linked and it has the
ACTIVEorTRIAL_ACTIVEstatus. If you do not have a billing account, create one and link a cloud to it.
If you have an active billing account, you can create or select a folder for your infrastructure on the cloud page.
Learn more about clouds and folders here.
Required paid resources
The cost for maintaining a GitLab server includes:
- Fee for a disk and continuously running VM (see Yandex Compute Cloud pricing).
- Fee for a static or dynamic public IP address (see Yandex Virtual Private Cloud pricing).
Create a GitLab VM
-
On the folder dashboard in the management console, click Create resource and select
Virtual machine instance. -
Under Boot disk image, in the Product search field, enter
Gitlaband select a public GitLab image. -
Under Location, select an availability zone for your VM. If you are not sure which one to choose, leave the default.
-
Under Disks and file storages, select the
SSDdisk type and specify its size:20 GB. -
Under Computing resources, navigate to the
Customtab and specify the platform, number of vCPUs, and amount of RAM:- Platform:
Intel Ice Lake - vCPU:
4 - Guaranteed vCPU performance:
100% - RAM:
8 GB
- Platform:
-
Under Network settings:
- In the Subnet field, select the network and subnet to which you want to connect your VM. If the network or subnet you need does not exist yet, create it.
- In the Public IP address field, select a static IP address from the list, or leave
Autoto assign your VM a random external IP address from the Yandex Cloud pool.
-
Under Access, select SSH key and specify the VM access credentials:
- In the Login field, enter a username. Do not use
rootor other reserved usernames. For operations requiring root privileges, use thesudocommand. -
In the SSH key field, select the SSH key saved in your organization user profile.
If there are no SSH keys in your profile or you want to add a new key:
-
Click Add key.
-
Enter a name for the SSH key.
-
Select one of the following:
-
Enter manually: Paste the contents of the public SSH key. You need to create an SSH key pair on your own. -
Load from file: Upload the public part of the SSH key. You need to create an SSH key pair on your own. -
Generate key: Automatically create an SSH key pair.When adding a new SSH key, an archive containing the key pair will be created and downloaded. In Linux or macOS-based operating systems, unpack the archive to the
/home/<user_name>/.sshdirectory. In Windows, unpack the archive to theC:\Users\<user_name>/.sshdirectory. You do not need additionally enter the public key in the management console.
-
-
Click Add.
The system will add the SSH key to your organization user profile. If the organization has disabled the ability for users to add SSH keys to their profiles, the added public SSH key will only be saved in the user profile inside the newly created resource.
-
- In the Login field, enter a username. Do not use
-
Under General information, specify the VM name:
gitlab. -
Click Create VM.
Wait about five minutes until the VM is created and all its services are up and running. After all of the services are up and running, GitLab becomes accessible via the web interface in a browser.
Configure GitLab
-
Navigate to Compute Cloud.
-
Select the VM instance you created,
gitlab, and copy its public IP address. -
Connect to the VM over SSH.
-
Get the GitLab administrator password with the following VM command:
sudo cat /etc/gitlab/initial_root_password -
Copy the password without spaces from the
Passwordline to the clipboard or a separate file. -
In your browser, open
http://<VM_public_IP_address>. This will take you to the GitLab web UI. -
Log in as the administrator:
- Username or email:
root. - Password: Password you copied in the previous step.
If you are unable to log in, reset the administrator password.
- Username or email:
-
Log in as the administrator with the new password.
Set the privacy settings
Disable sign-up for other users on the login page:
- Go to Admin area.
- In the left-hand panel, go to Settings and select the General tab.
- Under Sign-up restrictions, click Expand.
- Uncheck Sign-up enabled.
- Click Save changes.
Now, only the administrator can create new users in the Users tab under Overview.
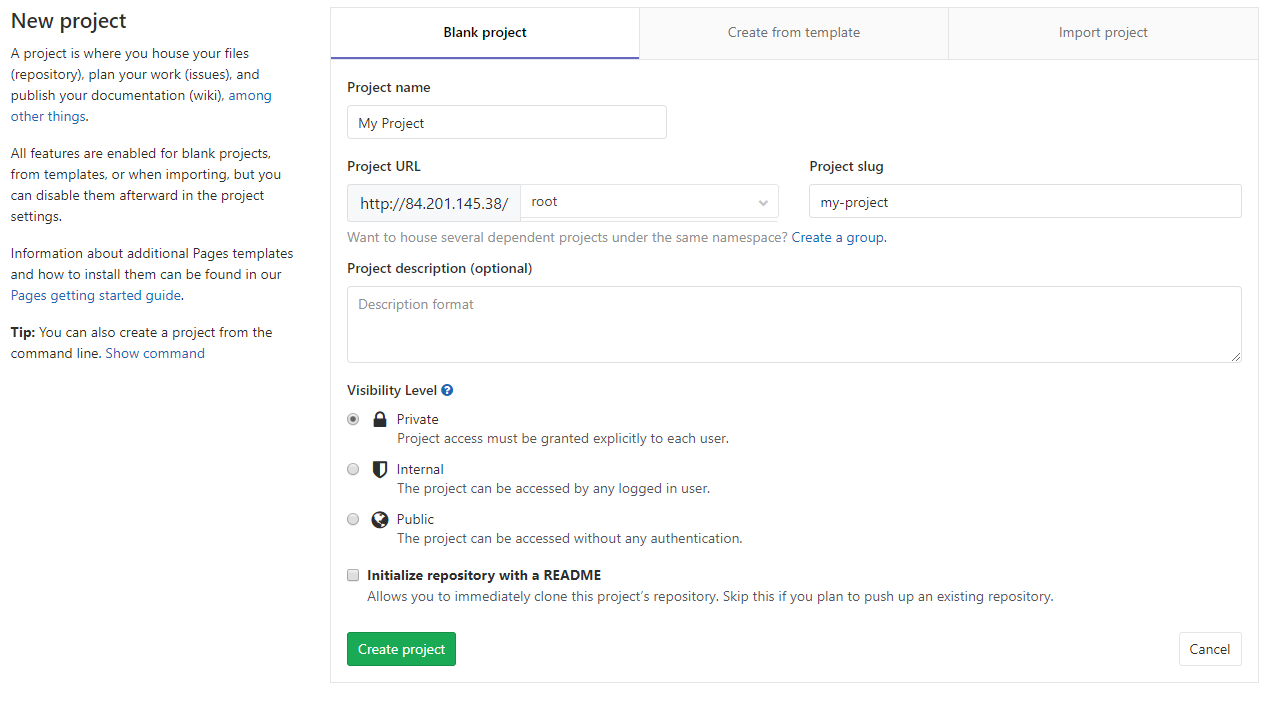
Create a project
To create a project:
-
On the GitLab home page, select Create a project.
-
On the page that opens, specify:
- Project name:
My Project. - Project group and project ID:
rootandmy-project, respectively. - Description and scope of the project, if required.
- Project name:
-
Click Create project.
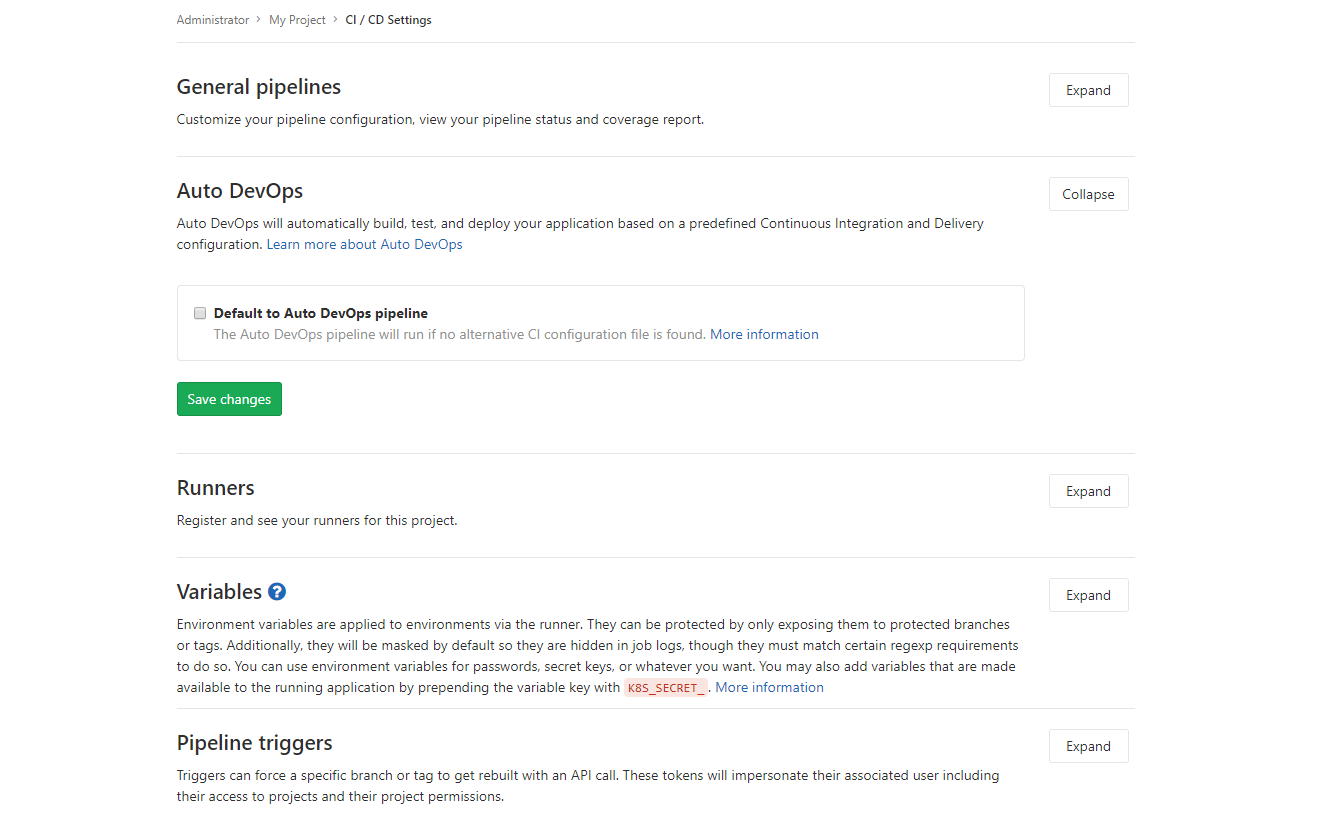
-
Once you create the project, go to Settings in the left-hand panel and select the CI/CD tab.
-
Under Auto DevOps, click Expand, disable Default to Auto DevOps pipeline, and click Save changes.
-
Add a project file.
-
In the left-hand panel, go to the GitLab project.
-
Click in the repository navigation bar and select New file from the drop-down menu.
-
Name your file
test.cpp. Add program code that checks that 2 multiplied by 2 equals 4 and printsHello Worldif the result is 4:#include <iostream> #include <cassert> int main() { assert(2 * 2 == 4); std::cout << "Hello world!" << std::endl; return 0; }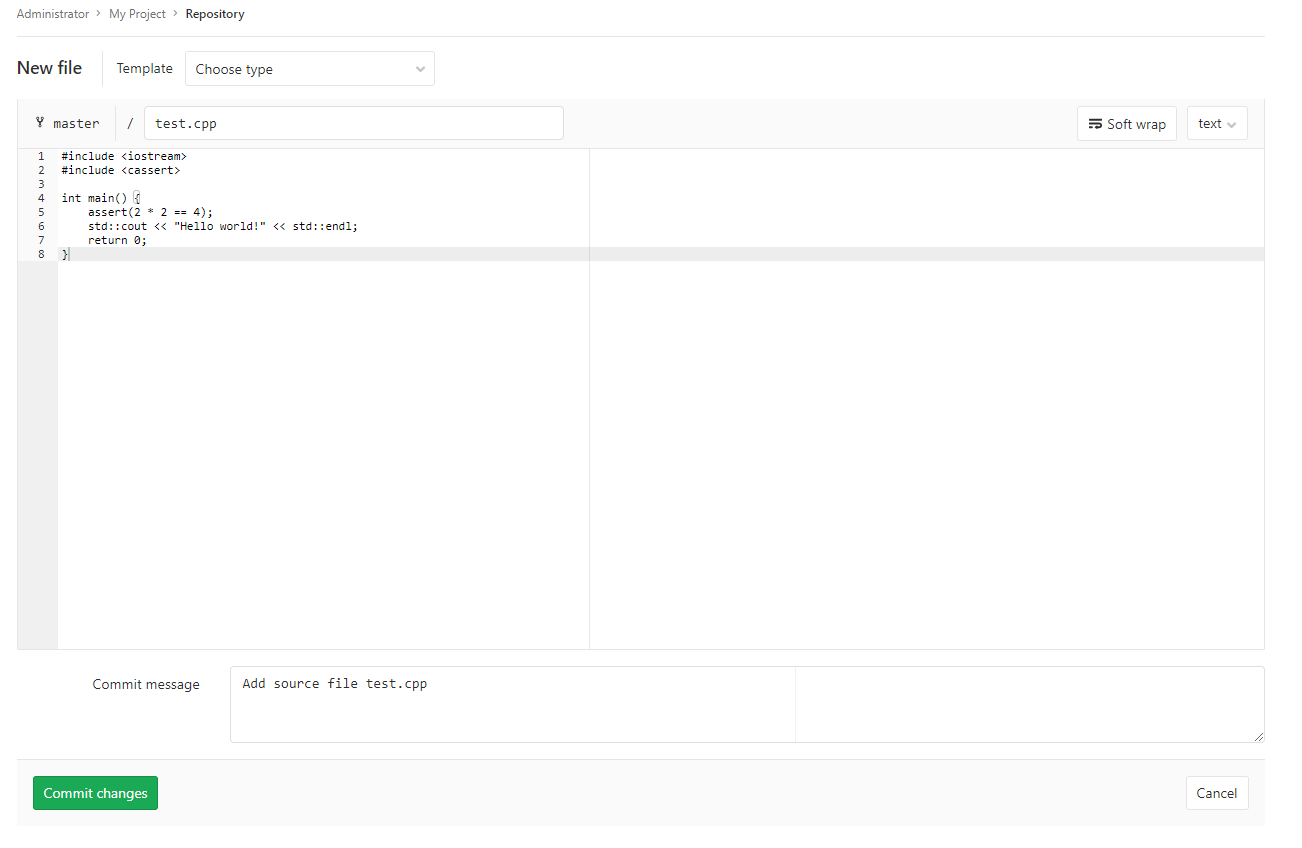
-
Enter a commit name in the Commit message field.
-
Click Commit changes.
-
Set up and run testing for the project
A runner is a program that tests and builds projects in the GitLab environment by following provided instructions.
Configure and register a runner
-
Use SSH to connect to the VM and switch to administrator mode in the console:
sudo -i -
Download a runner:
curl --location --output /usr/local/bin/gitlab-runner https://gitlab-runner-downloads.s3.amazonaws.com/latest/binaries/gitlab-runner-linux-amd64 -
Make the runner executable:
chmod +x /usr/local/bin/gitlab-runner -
Create a separate user to start the runner:
useradd --comment 'GitLab Runner' --create-home gitlab-runner --shell /bin/bash -
Install and start the runner:
gitlab-runner install --user=gitlab-runner --working-directory=/home/gitlab-runner gitlab-runner start -
Register your runner in GitLab:
-
Run the
gitlab-runner registercommand for interactive registration. -
Enter your GitLab server address. When you see this prompt:
Please enter the gitlab-ci coordinator URL (e.g. https://gitlab.com)enter
http://<public_IP_address_of_your_VM>. -
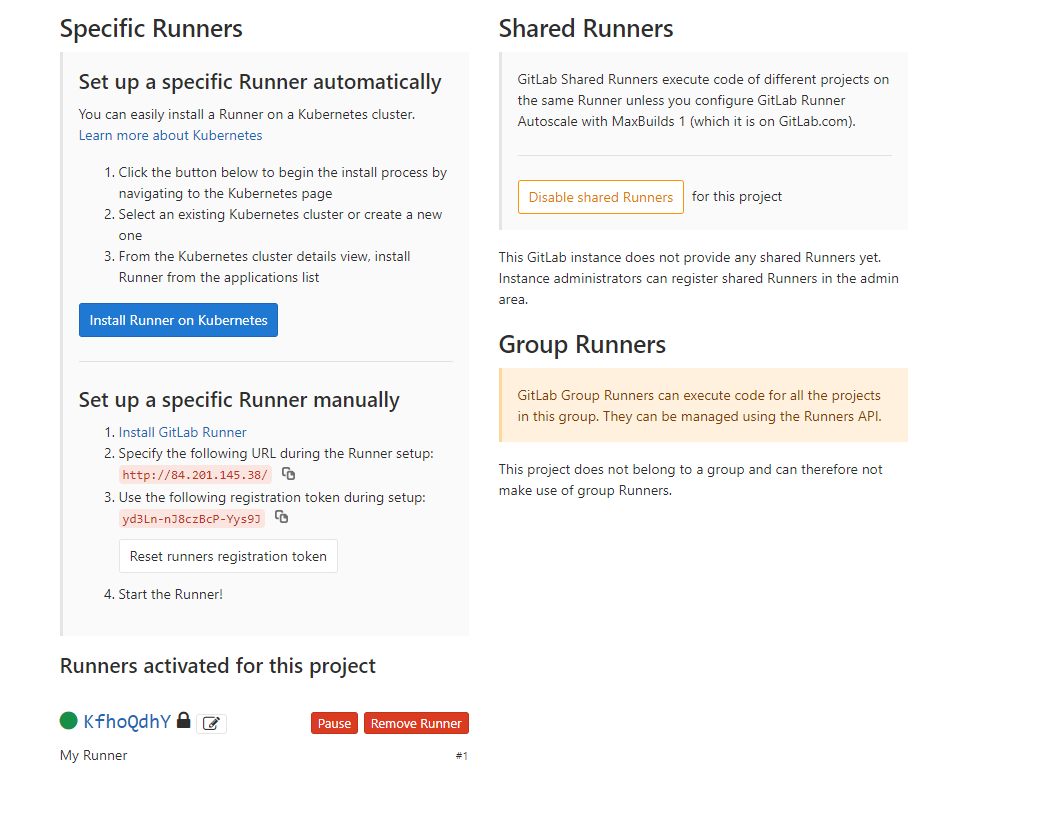
Enter the registration token for the runner. To get it, go to the project page in GitLab, select Settings in the left-hand panel, and open the CI/CD tab. Then click Expand under Runners. Under Set up a specific Runner manually, copy the token from Step 3 and enter it when prompted as follows:
Please enter the gitlab-ci token for this runner
<token>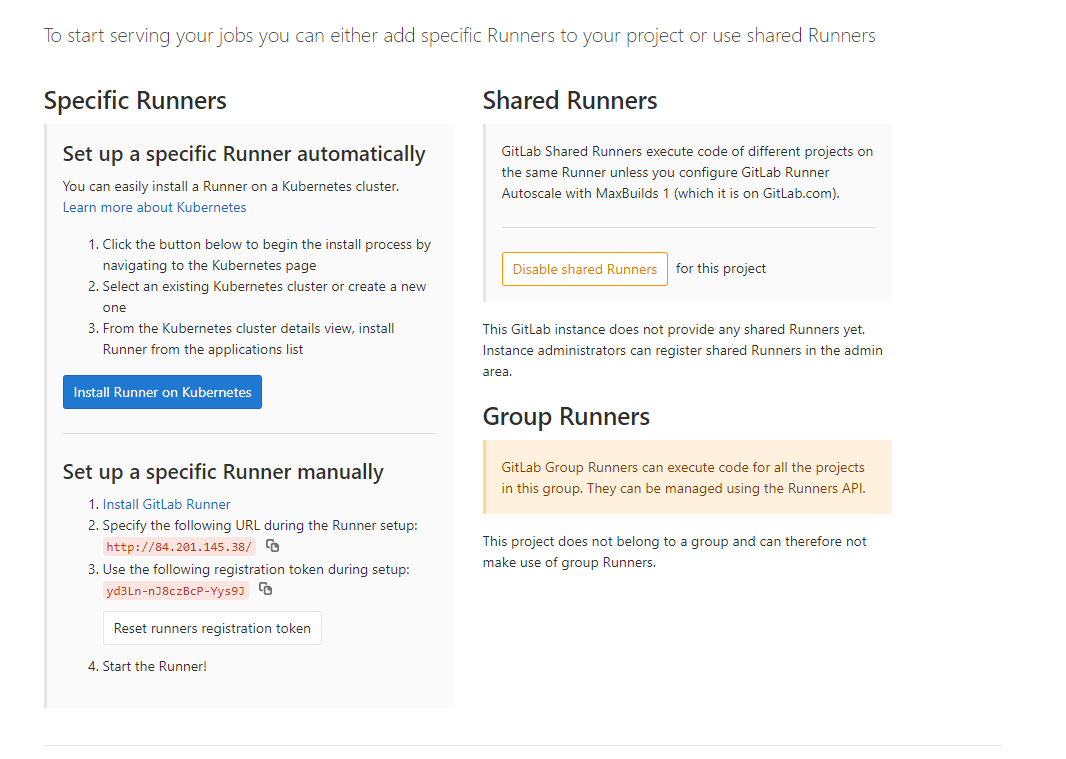
-
When you see this prompt:
Please enter the gitlab-ci description for this runnerenter a description for the runner:
My runner. -
Leave the tag field empty and pressEnter. Otherwise, by default, the runner will not run jobs unless the project has matching tags.
-
Specify the runtime. In our scenario, when prompted:
Please enter the executor: ssh, docker+machine, docker-ssh+machine, kubernetes, docker, parallels, virtualbox, docker-ssh, shell:enter:
shell.
-
The runner is now installed and configured. If everything is set up correctly, you should see the Runners activated for this project section on the page where you copied the registration token, displaying the registered runner.
Create a test pipeline
Create a test pipeline for the runner to complete. Describe the pipeline in a dedicated file named .gitlab-ci.yml located in the project root directory. According to the pipeline, the runner will compile the project source file, convert it to an executable file, and then run it.
As testing will take place in the VM operating system, you need to install the apps required for testing: git to clone the project from the repository and g++ to compile the project.
To create a test pipeline:
-
Connect to the VM over SSH and install the required apps:
sudo apt update sudo apt install -y git g++ -
Add a test pipeline:
-
Open the GitLab web UI.
-
Open the GitLab project.
-
On the page that opens, click Set up CI/CD.
-
You will see a page prompting you to add a new file named
.gitlab-ci.yml, where you need to describe the pipeline in YAML format. Add the pipeline configuration:stages: - build - test - pack cache: paths: - hello build: stage: build script: g++ test.cpp -o hello test: stage: test script: ./hello pack: stage: pack script: gzip -c hello > hello.gz artifacts: paths: - hello.gzThe pipeline includes three stages that run one after another:
build: First stage that compiles the project into thehelloexecutable.test: Second stage that runs the executable.pack: Third stage that creates an archive with the executable, which you can download via the GitLab web UI after the pipeline completes successfully. Theartifactssection lists the files available for download.
Under
cache, specify the files and directories to transfer between stages. If you skip it, thehellofile will not be available at theteststage, resulting in an error.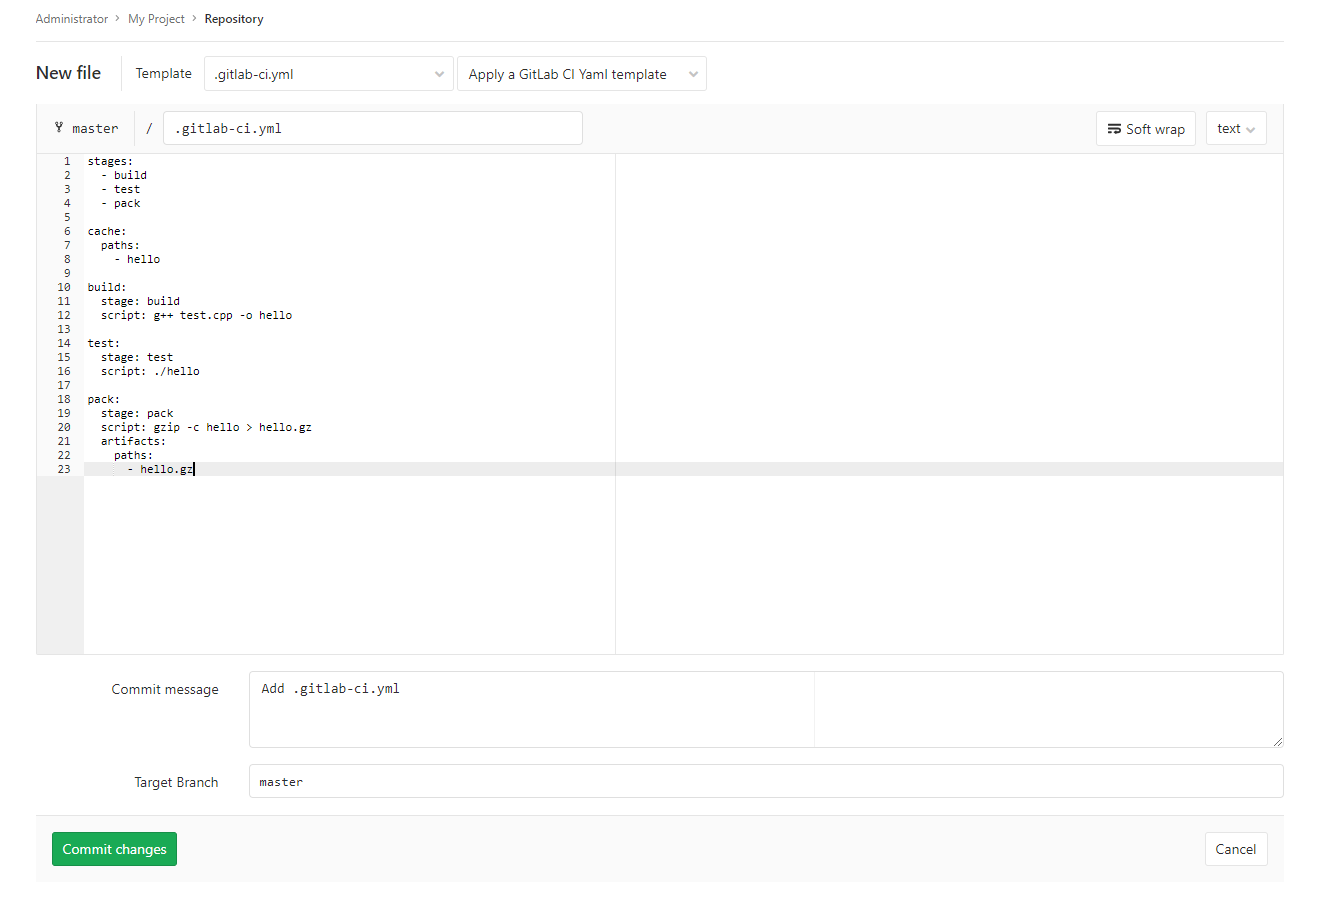
-
Click Commit changes.
-
After committing, the system will automatically start testing the latest commit. To check its results, select Build on the left-hand panel in the GitLab project, and then Pipelines from the drop-down menu. You should see a line with the first test showing passed. By clicking the cloud icon, you can download the build artifacts.
Create an error in the project
Now modify the project so it produces an error that the runner can detect during testing. Proceed as follows:
-
Go to the project repository and open the
test.cppfile. -
Click Edit.
-
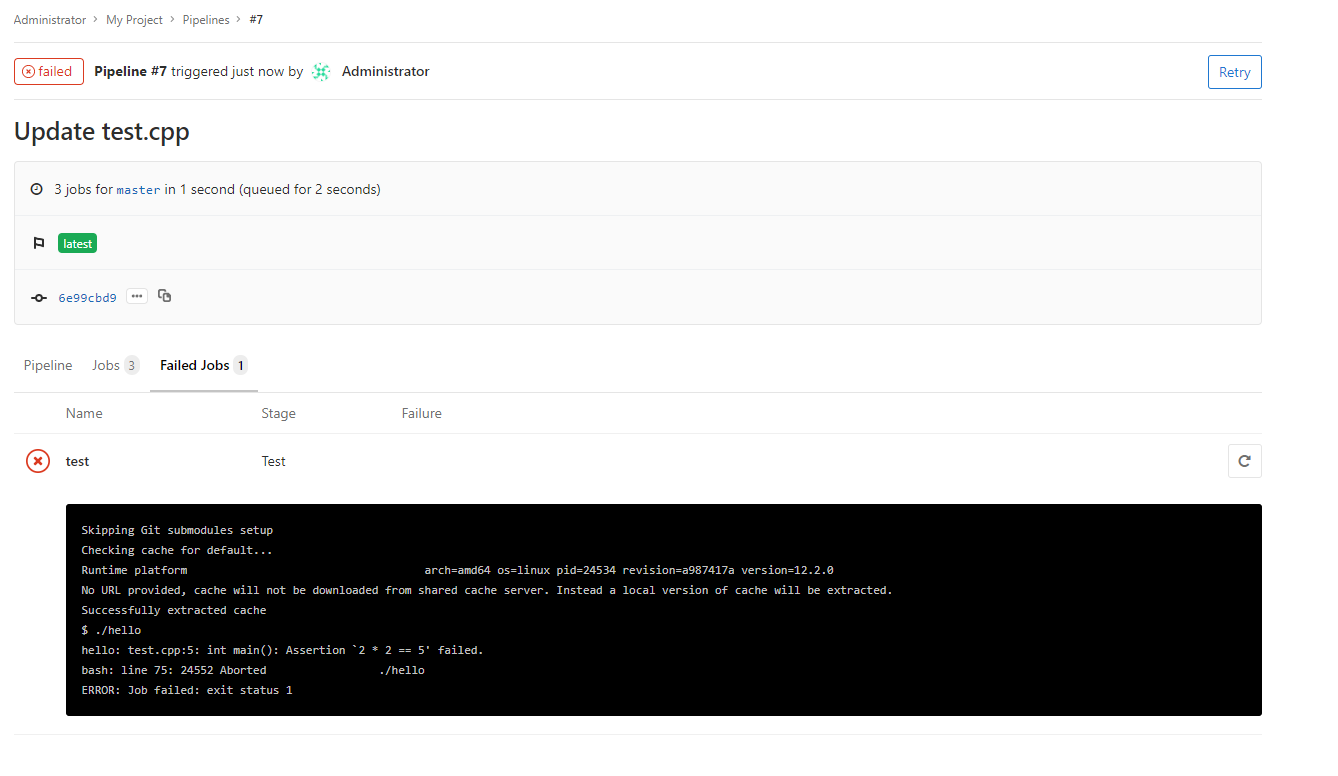
Update the assert so that 2 multiplied by 2 equals 5. This will cause the program to fail.
... assert(2 * 2 == 5); ... -
Name your commit:
Wrong assert in test.cpp. -
Click Commit changes.
Open Build → Pipelines. In the Stages column, you can see that the first stage, build, completed successfully, while the second stage, test, returned an error. The third stage, pack, was skipped and the build artifacts were not generated.
If you click the failed progress status and go to Failed Jobs, you can see the error text saying that assert failed:
How to delete the resources you created
To stop paying for your deployed server, delete the gitlab VM you created.
If you reserved a static public IP address for this VM:
- From your folder, navigate to Virtual Private Cloud.
- Open the Public IP addresses tab.
- Find the IP address, click , and select Delete.