Getting started with Managed Service for GitLab

To get started:
- Create an instance.
- Set up the runtime environment.
- Add SSH keys to GitLab.
- Start using the repository.
Warning
Before you begin, check this guide on how to migrate your projects from a custom GitLab installation to Managed Service for GitLab.
For more information about the differences between Managed Service for GitLab and the custom GitLab Community Edition installation, see Advantages over a custom GitLab installation.
Getting started
-
Navigate to the management console and log in to Yandex Cloud or sign up if you do not have an account yet.
-
If you do not have a folder yet, create one:
-
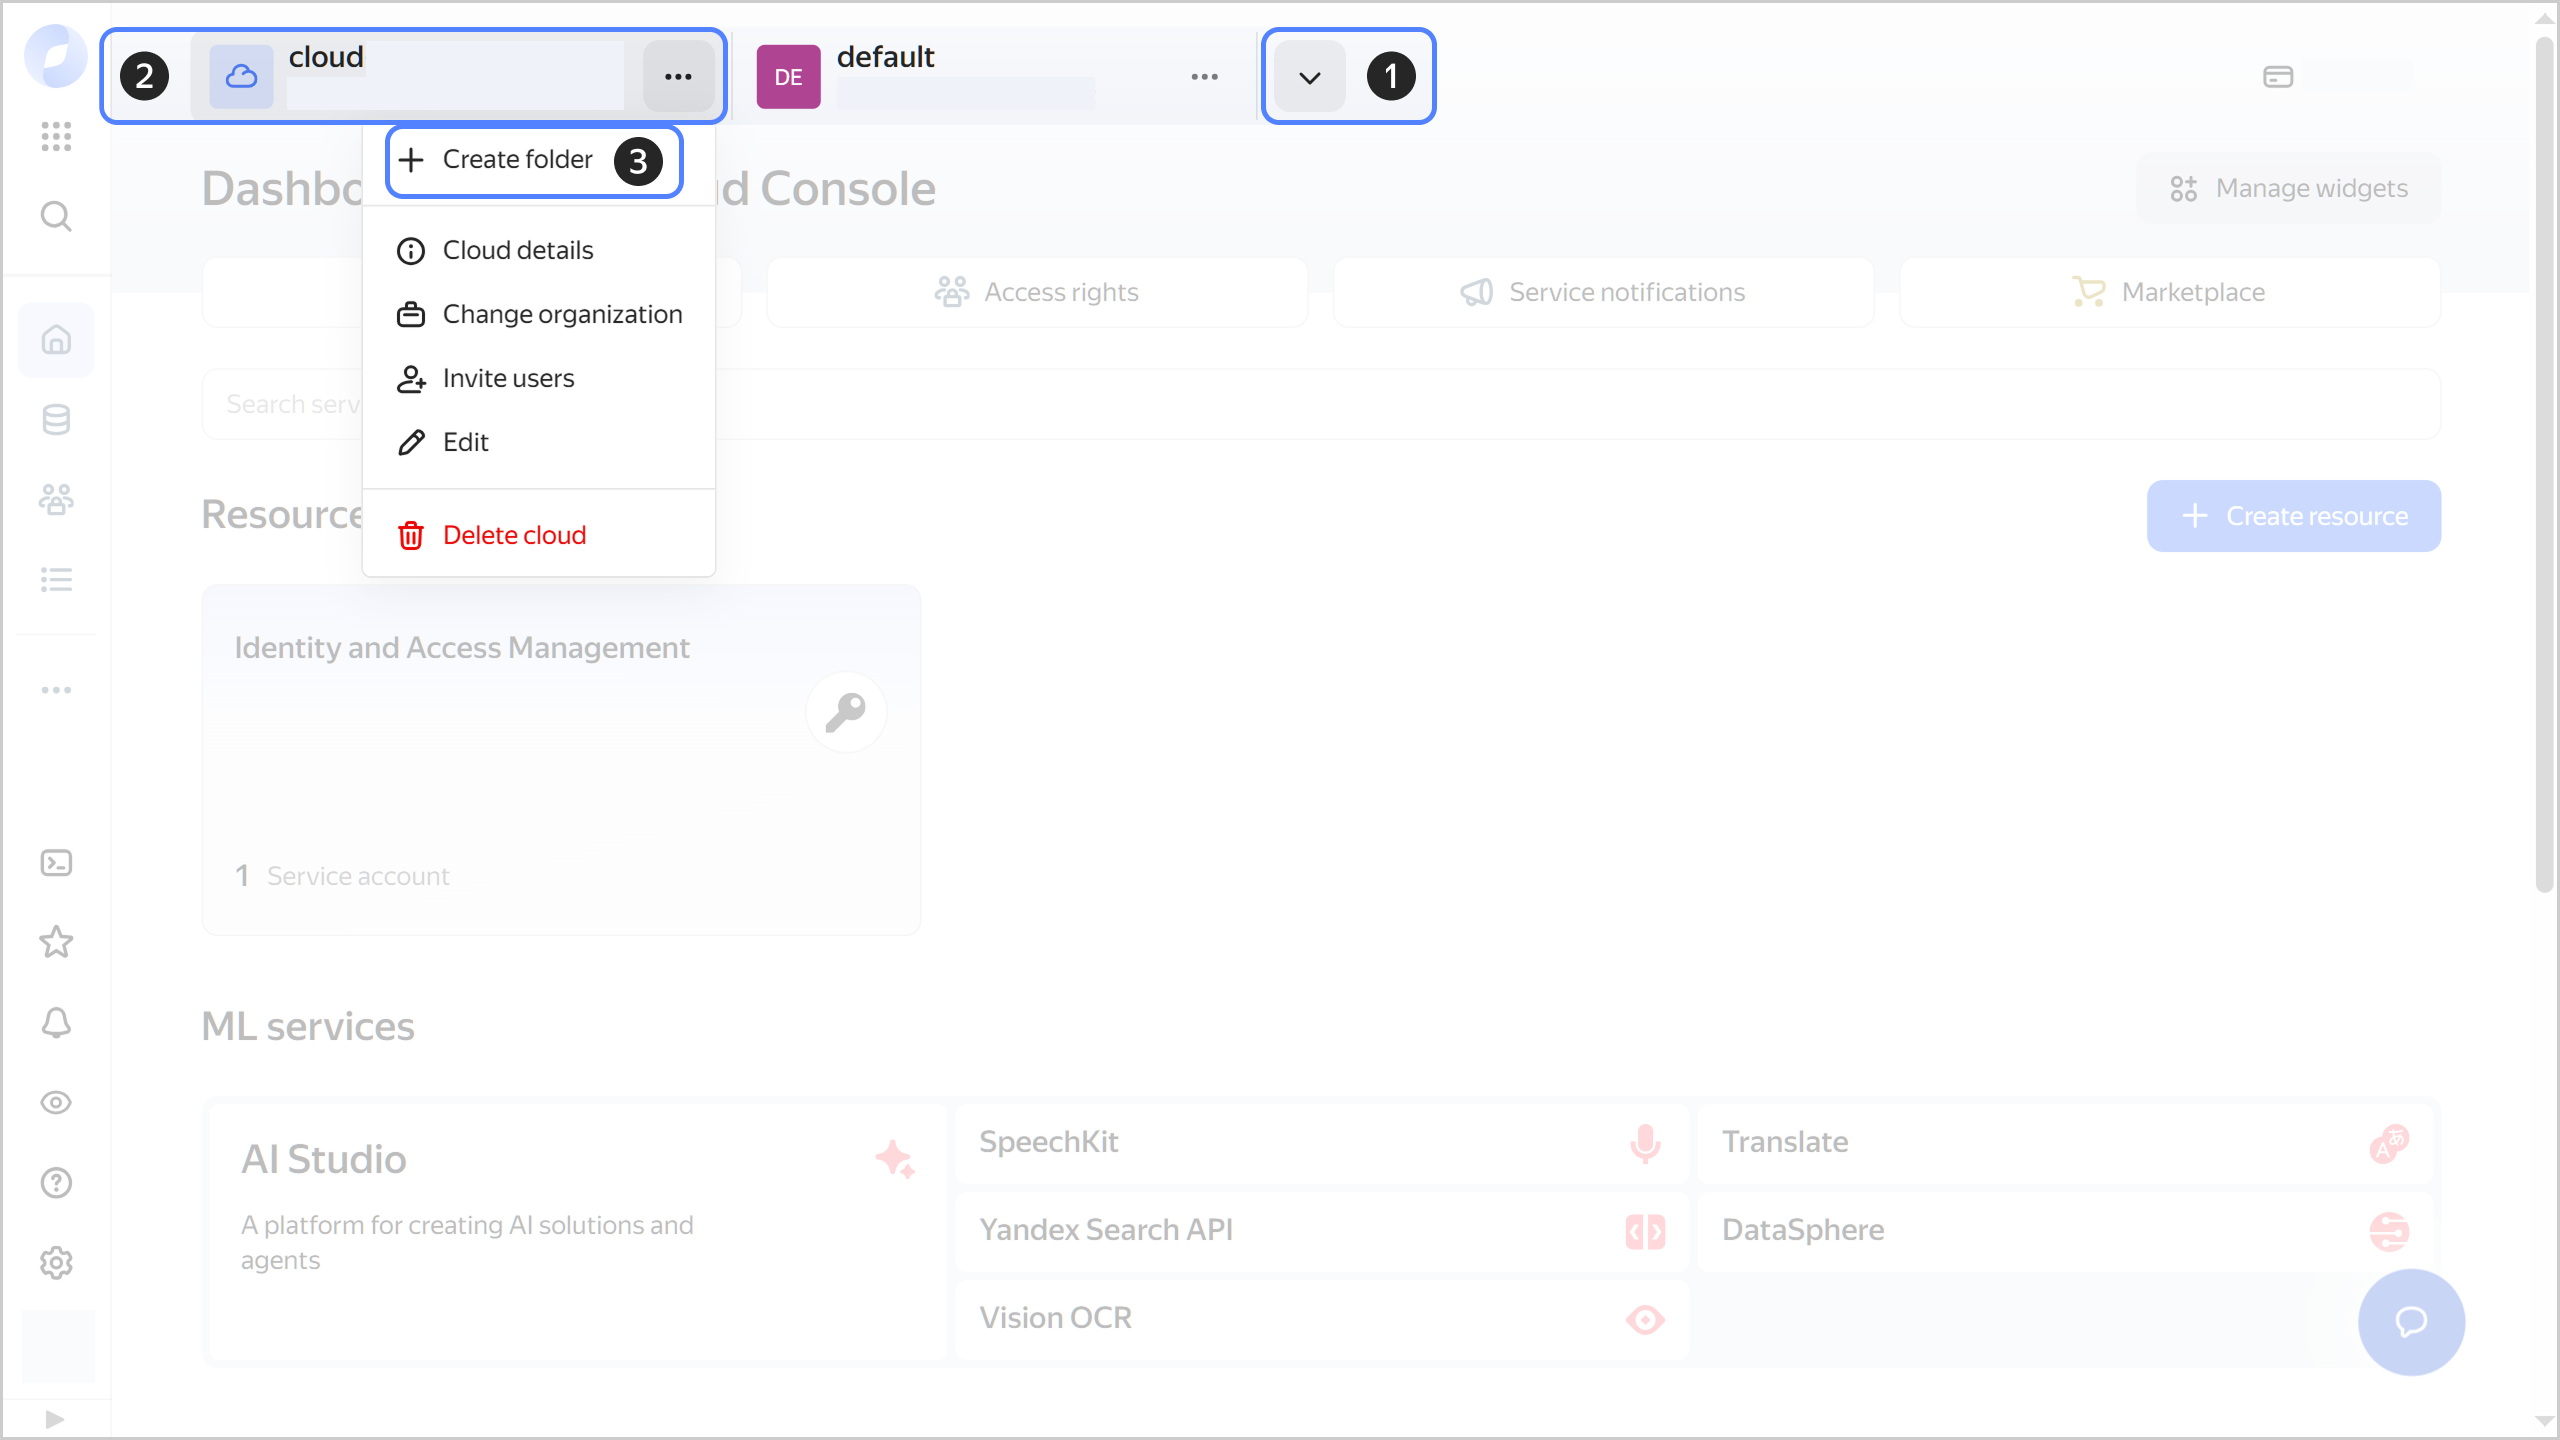
In the management console, in the top panel, click or and select the cloud.
-
To the right of the cloud name, click .
-
Select Create folder.
-
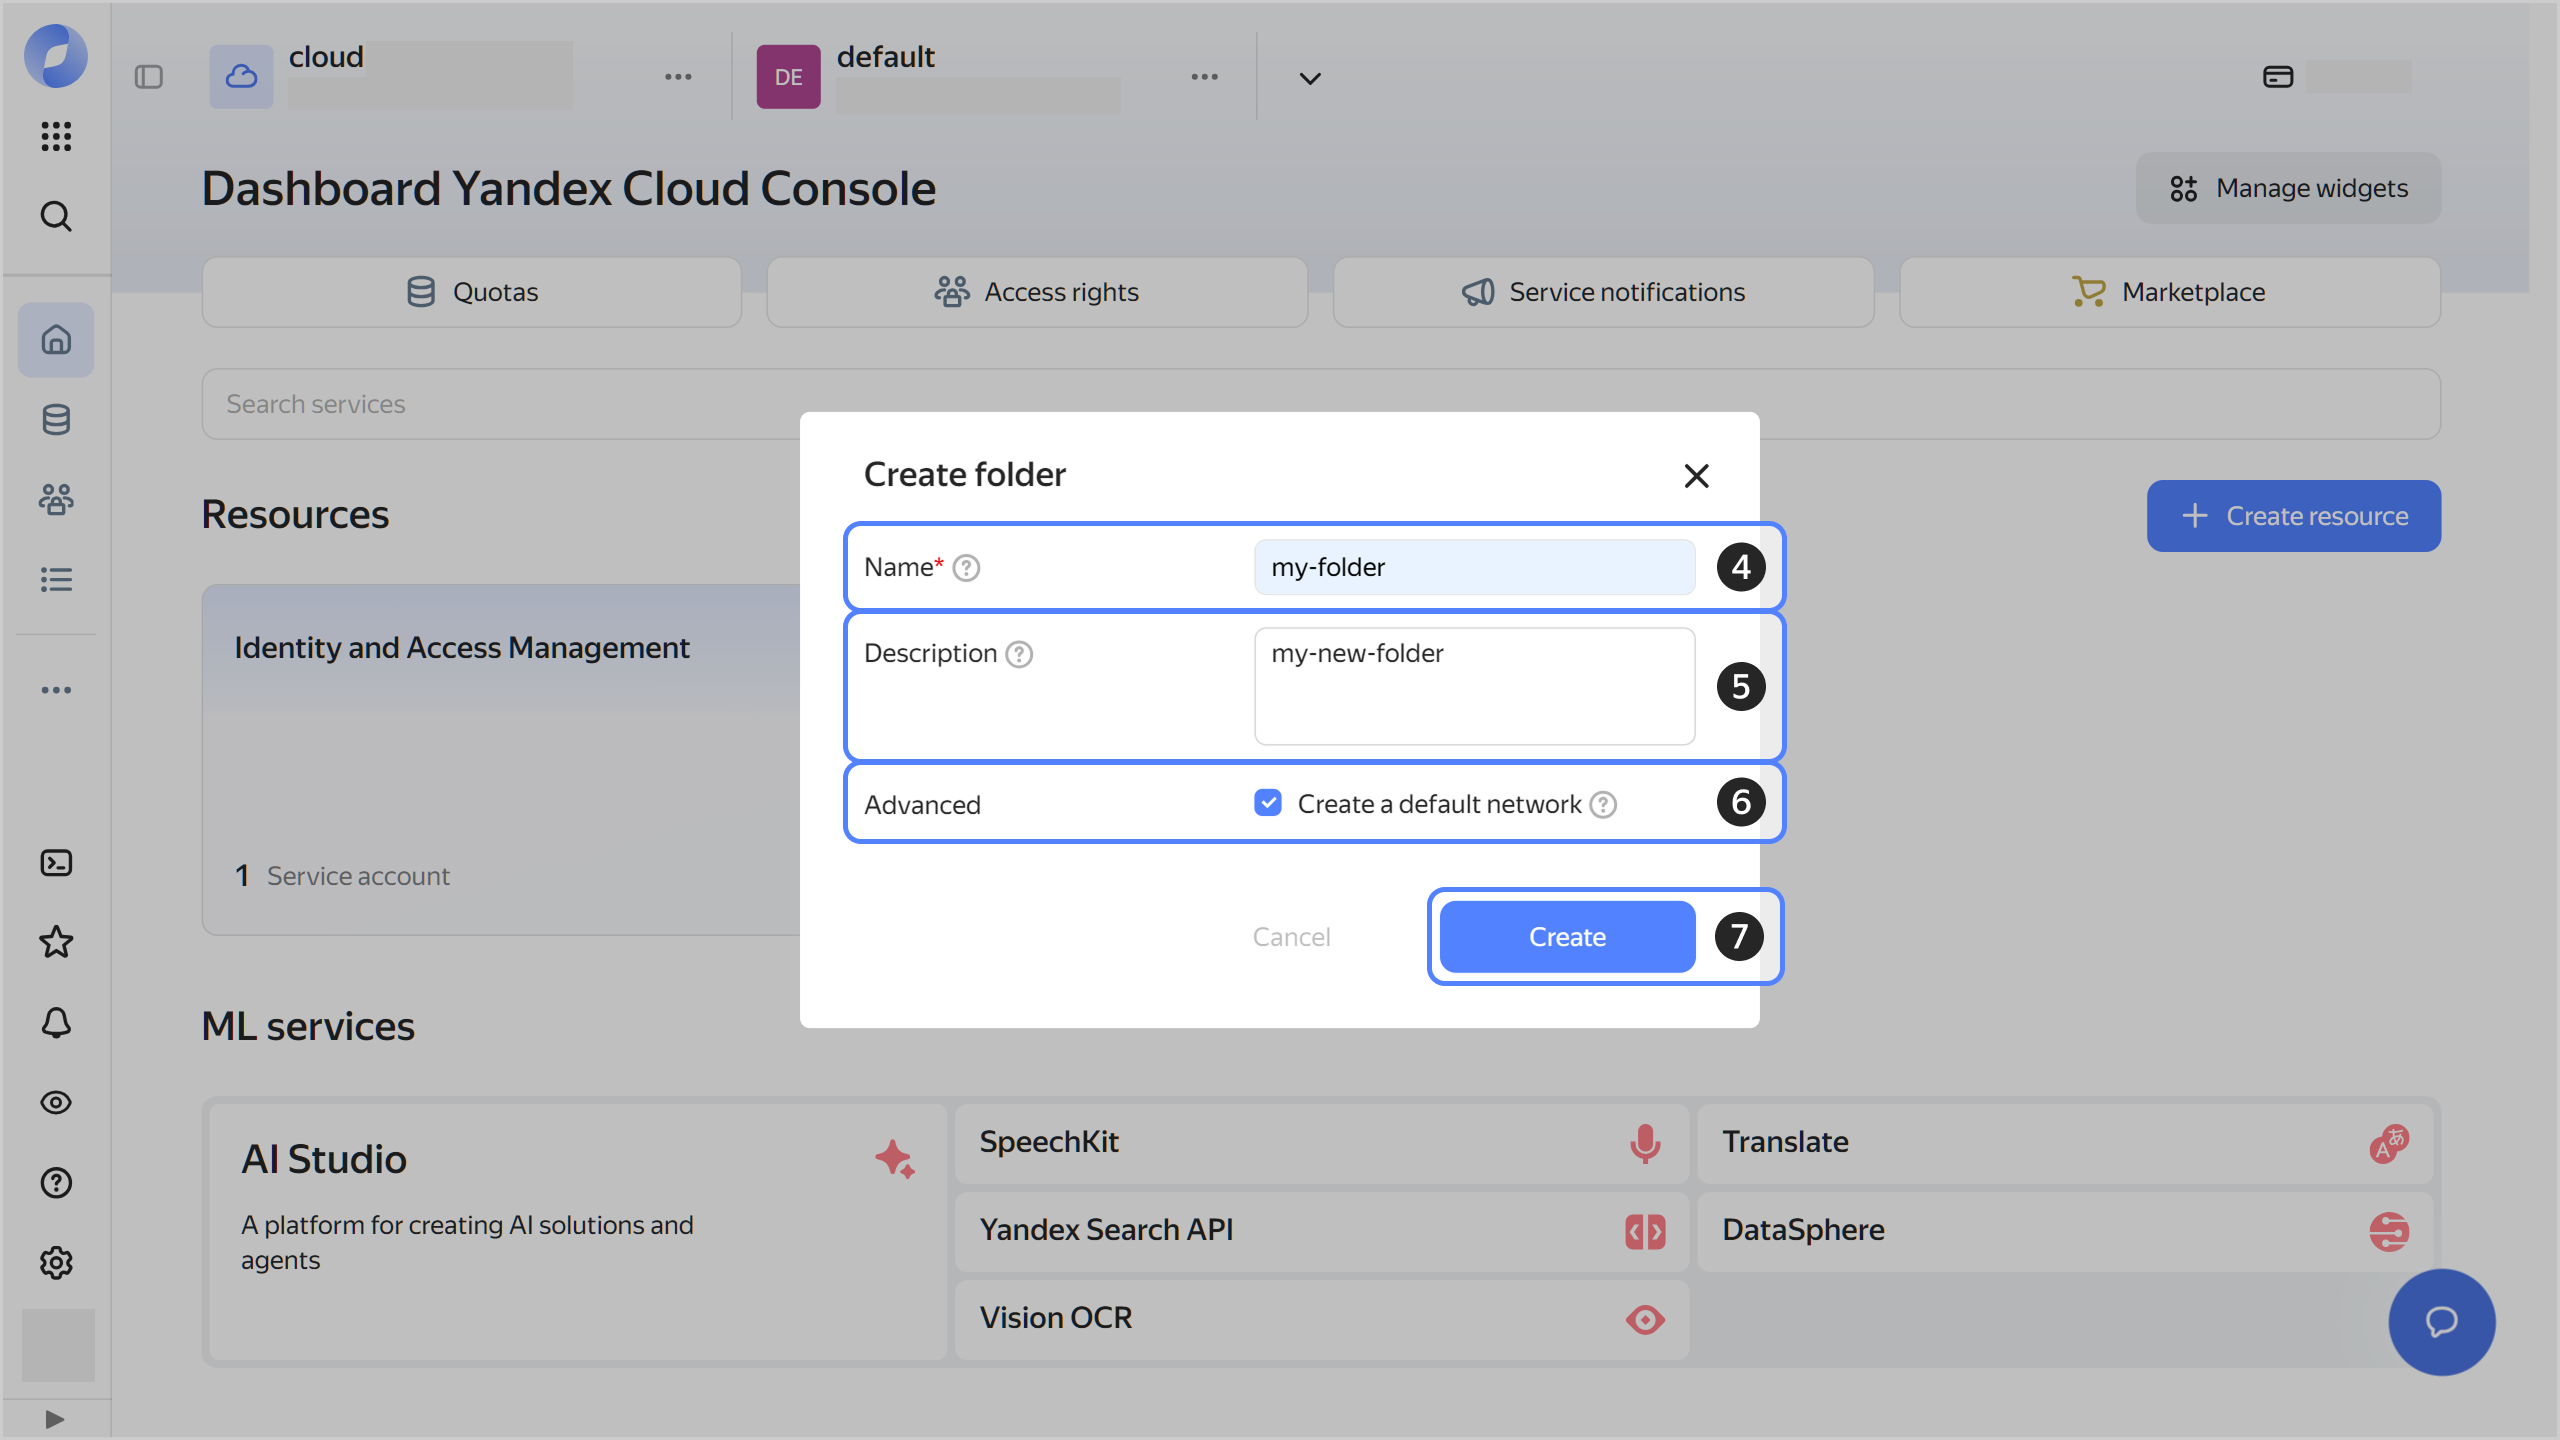
Give your folder a name. The naming requirements are as follows:
- Length: between 3 and 63 characters.
- It can only contain lowercase Latin letters, numbers, and hyphens.
- It must start with a letter and cannot end with a hyphen.
-
Optionally, specify the description for your folder.
-
Select Create a default network. This will create a network with subnets in each availability zone. Within this network, you will also have a default security group, within which all network traffic will be allowed.
-
Click Create.
-
-
Assign the vpc.user role and the gitlab.editor role or higher to your Yandex Cloud account. These roles allow you to create an instance.
Note
If you cannot manage roles, contact your cloud or organization administrator.
Create an instance
Warning
Once you have created an instance, you cannot change its network configuration, i.e., availability zone and subnet.
-
In the management console, select the folder where you want to create a GitLab instance.
-
Navigate to Managed Service for GitLab.
-
Click Create instance.
-
At the top of the page:
-
Enter a name for your instance. It must be unique within Yandex Cloud.
- Length: between 3 and 63 characters.
- It can only contain lowercase Latin letters, numbers, and hyphens.
- It must start with a letter and cannot end with a hyphen.
-
Optionally, enter a description for the instance.
-
Optionally, add labels to break instances into logical groups.
-
Optionally, set instance protection against accidental deletion by users.
-
-
Under Configuration:
-
Select the instance type. After you create an instance, you can upgrade its type to a higher performing one.
-
Specify the availability zone. After you create an instance, you cannot change its availability zone.
-
Specify the subnet to host the instance. Currently, Yandex Cloud technical restrictions do not allow selecting a subnet with the
192.168.0.0/24address range. -
Select a security group or create a new one:
- Click Create group.
- Enter a name and description for the security group. You can add rules for the security group later in Virtual Private Cloud.
- Click Create.
If you do not specify a separate security group, the default security group created in the instance network will apply.
Configure your security group so that its rules allow incoming and outgoing traffic on the specified ports and IP addresses.
Warning
The security group's setup determines the Managed Service for GitLab instance performance and availability.
If you have issues with setting up a security group, contact support.
-
Select the disk size. After you create an instance, you can increase its disk size.
-
Specify the instance domain name: the system will automatically create the relevant DNS records for it in the
.gitlab.yandexcloud.netdomain.The domain name must be unique within Yandex Cloud.
- It must be from 5 to 50 characters long.
- It can include lowercase Latin letters, numbers, and hyphens.
- It cannot not start or end with a hyphen.
-
Set up the automatic backup retention period in days.
-
Optionally, enable approval rules. To do this, select the appropriate configuration for approval rules.
Warning
In Managed Service for GitLab, you pay for approval rules depending on your configuration. For more information, see Yandex Managed Service for GitLab pricing policy.
-
-
Under Administrator data, specify:
- Email: Email address of the GitLab instance administrator. This is the address to receive the email with a link to create a password.
- Login: Administrator login.
-
Optionally, under Advanced settings, enable deletion of untagged images. This setting affects the amount of free disk space on the instance.
-
Click Create.
-
Wait until the instance is ready: its status on the Managed Service for GitLab dashboard will change to Running. This may take a while.
If you do not have the Yandex Cloud CLI yet, install and initialize it.
The folder used by default is the one specified when creating the CLI profile. To change the default folder, use the yc config set folder-id <folder_ID> command. You can also specify a different folder for any command using --folder-name or --folder-id. If you access a resource by its name, the search will be limited to the default folder. If you access a resource by its ID, the search will be global, i.e., through all folders based on access permissions.
-
See the description of the CLI command for creating a Managed Service for GitLab instance:
yc managed-gitlab instance create --help -
Select a subnet:
yc vpc subnet listResult:
+----------------------+---------------------------+----------------------+----------------+-------------------+-----------------+ | ID | NAME | NETWORK ID | ROUTE TABLE ID | ZONE | RANGE | +----------------------+---------------------------+----------------------+----------------+-------------------+-----------------+ | e9bnlm18l70a******** | default-ru-central1-a | enpe3m3fa00u******** | | ru-central1-a | [10.128.0.0/24] | +----------------------+---------------------------+----------------------+----------------+-------------------+-----------------+ -
Create a GitLab instance (this example does not use all available parameters):
yc managed-gitlab instance create \
  --name first-instance \
  --resource-preset-id <host_class> \
  --disk-size <disk_size_in_GB> \
  --admin-login <admin_login> \
  --admin-email <admin_email_address> \
  --domain-prefix <instance_domain_name> \
  --deletion-protection \
  --approval-rules <approval_rule_configuration> \
  --subnet-id <subnet_ID>
Where:
-
--name: Instance name, unique within Yandex Cloud. Follow these naming requirements:- Length: between 3 and 63 characters.
- It can only contain lowercase Latin letters, numbers, and hyphens.
- It must start with a letter and cannot end with a hyphen.
-
--resource-preset-id: Host class. It determines the configuration of the VM to host the GitLab instance. The possible values are:s2.micro: 2 vCPUs, 8 GB RAMs2.small: 4 vCPUs, 16 GB RAMs2.medium: 8 vCPUs, 32 GB RAMs2.large: 16 vCPUs, 64 GB RAM
-
--disk-size: Disk size, in GB. -
--admin-login: GitLab instance admin login. -
--admin-email: Instance admin email address. This is the address to receive the email with a link to create a password. -
--domain-prefix: Instance domain name. The system will automatically create the relevant DNS records for it in the.gitlab.yandexcloud.netdomain.The domain name must be unique within Yandex Cloud.
- It must be from 5 to 50 characters long.
- It can include lowercase Latin letters, numbers, and hyphens.
- It cannot not start or end with a hyphen.
-
--deletion-protection: Instance protection against accidental deletion by users. -
--approval-rules: Approval rule configuration. The possible values are:BASICSTANDARDADVANCED
Warning
In Managed Service for GitLab, you pay for approval rules depending on your configuration. For more information, see Yandex Managed Service for GitLab pricing policy.
-
--subnet-id: ID of the selected subnet.
Result:
id: c17c60tpadua********
folder_id: b1g2slt7p9ug********
created_at: "2025-07-20T18:34:16.078Z"
updated_at: "2025-07-20T18:34:16.078Z"
name: test-cli
resource_preset_id: s2.small
disk_size: "107374182400"
status: RUNNING
admin_login: admin-gl
admin_email: user@example.com
domain: test-domain-user.gitlab.yandexcloud.net
subnet_id: e9b4rrpuu2a********
backup_retain_period_days: "7"
deletion_protection: true
approval_rules_id: BASIC
gitlab_version: 17.11.6
For more information about this command, see the CLI reference.
-
Note
When you create an instance in Managed Service for GitLab, the system automatically generates an SSL certificate. Using HTTPS requires no advanced setup.
Set up the runtime environment
-
Activate your Managed Service for GitLab instance:
- Follow the link you received in your administrator mailbox after creating the instance.
- Change the administrator password.
- Log in using the administrator username and password.
-
Optionally, create a group to host the repository project.
When working with multiple projects, consider grouping users together. This will allow you to:
- Grant permissions for specific projects to each group.
- View issues and merge requests by group.
- View group activity analytics.
For more information, see this GitLab guide.
-
Create an empty project to host the repository.
-
Create users and add them to a group or project with the
MaintainerorOwnerrole.You can only add your team members to a group or project by creating GitLab accounts for them.
Add SSH keys to GitLab
-
Create a pair of public and private SSH keys for the GitLab account:
Linux/macOSWindows 10/11Windows 7/8-
Open the terminal.
-
Use the
ssh-keygencommand to create a new key:ssh-keygen -t ed25519 -C "<optional_comment>"You can specify an empty string in the
-Cparameter to avoid adding a comment, or you may not specify the-Cparameter at all: in this case, a default comment will be added.After running this command, you will be prompted to specify the name and path to the key files, as well as enter the password for the private key. If you only specify the name, the key pair will be created in the current directory. The public key will be saved in a file with the
.pubextension, while the private key, in a file without extension.By default, the command prompts you to save the key under the
id_ed25519name in the following directory:/home/<username>/.ssh. If there is already an SSH key namedid_ed25519in this directory, you may accidentally overwrite it and lose access to the resources it is used in. Therefore, you may want to use unique names for all SSH keys.
If you do not have OpenSSH installed yet, follow this guide to install it.
-
Run
cmd.exeorpowershell.exe(make sure to update PowerShell before doing so). -
Use the
ssh-keygencommand to create a new key:ssh-keygen -t ed25519 -C "<optional_comment>"You can specify an empty string in the
-Cparameter to avoid adding a comment, or you may not specify the-Cparameter at all: in this case, a default comment will be added.After running this command, you will be prompted to specify the name and path to the key files, as well as enter the password for the private key. If you only specify the name, the key pair will be created in the current directory. The public key will be saved in a file with the
.pubextension, while the private key, in a file without extension.By default, the command prompts you to save the key under the
id_ed25519name in the following folder:C:\Users\<username>/.ssh. If there is already an SSH key namedid_ed25519in this directory, you may accidentally overwrite it and lose access to the resources it is used in. Therefore, you may want to use unique names for all SSH keys.
Create keys using the PuTTY app:
-
Download and install PuTTY.
-
Add the folder with PuTTY to the
PATHvariable:- Click Start and type Change system environment variables in the Windows search bar.
- Click Environment Variables... at the bottom right.
- In the window that opens, find the
PATHparameter and click Edit. - Add your folder path to the list.
- Click OK.
-
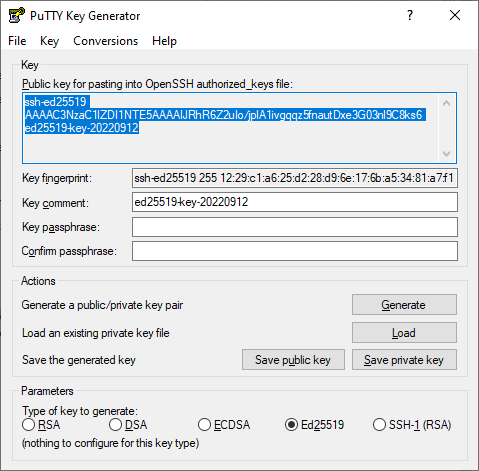
Launch the PuTTYgen app.
-
Select EdDSA as the pair type to generate. Click Generate and move the cursor in the field above it until key creation is complete.
-
In Key passphrase, enter a strong password. Enter it again in the field below.
-
Click Save private key and save the private key. Do not share its key phrase with anyone.
-
Click Save public key and save the public key to a file named
<key_name>.pub.
-
-
Launch the SSH agent:
Linux/MacOSWindows-
Run this command:
ssh-agent -s -
For the SSH agent to start on login, add the launch command to the
~/.profilefile:ssh-agent -s
- Open the Start button context menu.
- Select Computer Management.
- Go to Services and Applications → Services.
- Open the context menu of the SSH agent service and select Properties.
- On the Main tab, change the startup type from Off to Automatic.
- Click OK and start the service.
-
-
Add a key to the SSH agent:
ssh-add <private_key_path> -
Assign a public SSH key to the GitLab account.
-
Check that you can connect to GitLab:
ssh -T git@<GitLab_instance_domain>Here is an example:
ssh -T git@example.gitlab.yandexcloud.netIf this is your first time connecting, you will see a message like this:
The authenticity of host 'gitlab.example.com (35.231.145.151)' can't be established.
ECDSA key fingerprint is SHA256:HbW3g8zUjNSksFbqTiUWPWg2Bq1x8xdGUrliXFzSnUw.
Are you sure you want to continue connecting (yes/no)? yes
Warning: Permanently added 'gitlab.example.com' (ECDSA) to the list of known hosts.
Type
yesand press Enter.If you have connected before, you will get this message upon successful connection:
Welcome to GitLab, @<login>!In case of an error, start the connection in verbose mode to get the logs:
ssh -Tvvv git@<GitLab_instance_domain>
Ask each member of your group or project to create an SSH key pair in this manner and assign the public key to their account in GitLab.
Start using the repository
To start working with a local copy of your repository using the account you created, follow the steps below on your local computer:
-
Clone the repository over SSH.
What to do if you get the
Permission denied (publickey)errorWhen cloning, you may get this error:
Cloning into '<project_name>'...
git@<GitLab_instance_domain>: Permission denied (publickey).
fatal: Could not read from remote repository.

Please make sure you have the correct access rights
and the repository exists.
If you get this error:
-
Create and open a configuration file for SSH key setup:
nano ~/.ssh/config -
Add this content to it:
Host <GitLab_instance_domain>
   IdentityFile <private_key_path>
In the
IdentityFileparameter, specify the absolute path to the private key you created for the GitLab project. -
Save the file.
-
Clone the repository over SSH again.
-
-
Go to the repository directory:
cd <project_name> -
Make changes to the repository files.
-
Index and commit the changes in the local repository:
git add . && git commit -m "<commit_name>" -
Push the changes to the remote repository:
git push origin main